Use this tab to create honeycomb-shaped patterns of objects by creating multiple copies of the selected item.
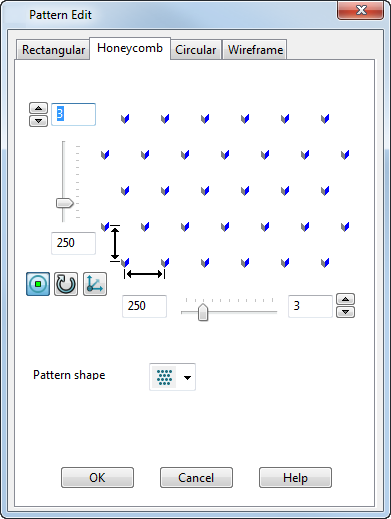
To create honeycomb shaped patterns of objects, you need to select the pattern objects you want to create the pattern with. Use the options to determine how the elements are created.
 Enter number of rows in the pattern — Use the arrow buttons to increase or decrease the number of rows.
 Enter the y direction spacing — You can also use the slider to set the row spacing.
 Display suppress markers — This displays a marker on each pattern element. Click on the markers to turn off individual elements in the created pattern.
 Rotate pattern axes — This rotates the whole pattern through 90
 around the Z axis.
 Set plane of pattern — This displays the
Pattern Plane dialog where you set the coordinates for the origin of where the pattern is positioned.
Set plane of pattern — This displays the
Pattern Plane dialog where you set the coordinates for the origin of where the pattern is positioned.
 Enter the x direction spacing — You can also use the slider to set the column spacing.
 Enter the number of columns in pattern — Use the arrow buttons to increase or decrease the number of columns.
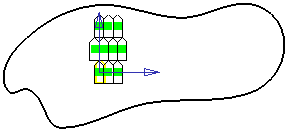
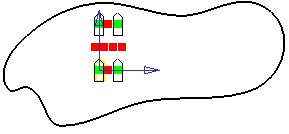
Pattern shape
Choose a pattern shape suitable for the pattern effect you want:
-
 Create offset rows outwards.
-
 Create offset rows to the right.
-
 Create offset rows to the left.
-
 Create offset rows inwards.
The following additional options are displayed on the dialog if the object you have selected to produce the pattern is a feature. They will not be displayed if the selected object just contains solid features.
-
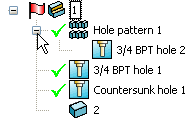
Remove feature — Controls how the original feature is handled when the pattern is created. If selected, when the pattern is created, the original feature is absorbed by the pattern and they become one feature. In the solid tree, the feature icon is replaced by a pattern icon

If deselected when the pattern is created, the pattern is created as a separate feature and both the original feature and the pattern feature can be edited separately. The solid tree will show both the feature icon and a pattern icon
 Note: This option is not displayed on the dialog if you are editing an existing pattern feature.
 - Tile — This option is not currently available.
- Edit Definition — This option is only available when you are editing an existing pattern feature. When you select this option, you can edit the pattern feature using the appropriate dialog.
OK — This creates the pattern and closes the dialog.