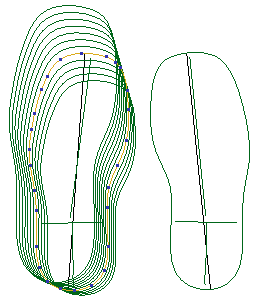
The Grading wizard enables you to quickly create a set of shoes in a range of sizes by grading. You can scale up or down from an original shoe.
To use the Grading wizard:
- Select the model you want to grade.
- Select Wizard tab > Grading panel > Sole.
- If you have reference geometry from which you want to grade, select it in the graphics window.
Generally, grading should be carried out from the internal dimensions of a shoe, rather than the external. However, if no reference geometry is specified, scaling is done based on the overall size of the shoe geometry.
- In the Grading dialog, select a Grading File from the drop-down list.
- Click the Save
 button to save the modified grading file as a .csv file. Save the grading table to the shareddb folder that is typically stored in
C:\Users\Public\Documents\Autodesk.
button to save the modified grading file as a .csv file. Save the grading table to the shareddb folder that is typically stored in
C:\Users\Public\Documents\Autodesk.
If you subsequently display this dialog, the saved grading file is included in Grading File list. The grading table is saved as PSGRADE_LAST_xxxx.csv, where xxxx is your filename.
- Choose a
Grading definition option to specify how scaling factors are expressed in the
Parameters for Scaling area and
Scaling Table. Select:
- Increments to specify the grading increments by measurement.
- Scale factors to specify grading incrementby scaling factors relative to the Nominal Size of the shoe.
-
Select a standard
using the drop-down list:
The standards files contain definitions of width fittings and mid sizes. They are stored as .csv files in:
C:\Program Files\Autodesk\PowerShapexxxxx\file\grading
where xxxxx is the version number of PowerShape and C is the disk on which PowerShape is installed.
You can create your own standards, or customise existing ones, and save them to the shareddb folder.
- Select the
Destination and method for saving your graded model, from:
- New Level — Select this option to save each size to a new level on the existing model.
- Mirror levels then group — Select this option to save each grade to a group; existing levels are preserved.
-
Current Model and levels — Select this option to save sizes to the existing model and levels. Although this option enables you to see all sizes together, the output can look cluttered if you are generating a lot of sizes:
- New Model — Select this option to save each size as a new model. The filename uses the format Graded_size_XX.psmodel, where XX is the shoe size.
- Use the
Sizes area of the dialog to define:
- Smallest Size — Enter the size of the smallest last to create.
- Largest Size — Enter the size of the largest last to create.
- Nominal Size — Enter the shoe size that you want to base the grading on.
- Main Step — Enter the step size for the shoe sizes. For example, to create shoe sizes 10, 10.5, and 11, enter 0.5.
The following options are available only if the Increments option is selected:
- Smallest Mid Size — Select the narrowest fitting. The values that are available to select are defined by the file that you selected from the Select a Standard list. For example, US options display sizing of AAAA - EEEE, and UK options display widths A - H.
- Largest Mid Size — Select the widest fitting.
- Nominal Mid Size — Select the standard width fitting that this model represents.
- Mid Step — Select the step size for the shoe widths. For example, to create shoe widths AA, B, D, and EE, enter 2.
- Select a
Grading Type
from the drop-down list:
- Group — Use group grading to scale the whole shoe up or down by a range of scale factors, including user-defined scale factors (in X, Y and Z), standard grading schemes (using the Select a standard list), or Arithmetic group grading:
- Arithmetic Group — Use arithmetic group grading to grade shoes by user-defined length increments.
- Zone — Use zone grading to grade shoes (or boots) in such a way that different portions of a shoe, known as zones, are scaled by different amounts (or fixed as unscaled) with smooth blending between.
- Use the
Parameters for Scaling area to define the increments or scale factors for grading:
- Main sizes — Enter the X, Y, and Z values used to calculate the scale factors or increments to be used to create the main sizes. If the Arithmetic Group grading option has been selected, enter the Length and Girth values.
- Mid sizes — Enter the X, Y, and Z values used to calculate the scale factors or increments to be used to create the fittings. If the Arithmetic Group grading option has been selected, enter the Girth value.
-
 Swap — Click this button to swap the
X and
Y values in
Main sizes and
Fittings.
Swap — Click this button to swap the
X and
Y values in
Main sizes and
Fittings.
The following options are available only if the Zone gradingoption is selected:
- Zone — Select a zone number from the list.
-
 Edit Zone — Click this button to edit the selected
Zone.
Edit Zone — Click this button to edit the selected
Zone.
- Upper Limit — Edit the upper limit of the zone. Alternatively, drag the zone's upper limit line in the model window.
- Lower Limit — Edit the lower limit of the zone. Alternatively, drag the zone's lower limit line in the model window.
-
 Add Zone — Click this button to add a zone. A new zone is added to the model. Columns are added in the
Grading Table for the
X,
Y, and
Z values of the new zone.
Add Zone — Click this button to add a zone. A new zone is added to the model. Columns are added in the
Grading Table for the
X,
Y, and
Z values of the new zone.
-
 Delete Zone — Click this button to delete the selected
Zone.
Delete Zone — Click this button to delete the selected
Zone.
Note: To move a zone, press and hold the Shift key and drag either the upper or lower limit line.Tip: To copy an existing zone, in the model window, press and hold the Ctrl key and drag the zone's upper or lower limit line.The following options are available only if the Arithmetic Group grading option is selected:
- Nominal last size — If a last is selected the dimensions are extracted and used. If no last is identified in the selection, enter the Length and Girth values. Values for Heel Height (HH) and Toe Spring (TS) are needed if the Stick length option is selected. The default values for these are determined by the width/length of the selection bounding box.
- Stick length — Select this option to grade the sole using the stick length, measured from the toe point to the heel point. If this option is deselected, the nominal length is measured along the axis.
- Use the
Scaling Table to view all the grading and sizing information for the range of sizes. Double-click on a table cell to edit its value. The grading table has the following columns:
- Scale — This column indicates whether the size is defined by grading. Any shoe size that is defined by grading is denoted by Yes by default, except the Nominal Size. To omit a particular size, double-click on the grade cell for the size row and select No.
- Size — This column displays every size that falls in the range defined in the Sizes section.
- X — This column displays the X value grade data for the selected size. If you have selected reference geometry, and the type of grading is set to Increments, this value is the position relative to the reference geometry.
- Y — This column displays the Y value grade data for the selected size. If you have selected reference geometry, and the type of grading is set to Increments, this value is the position relative to the reference geometry.
- Z — This column displays the Z value grade data for the selected size. If you have selected reference geometry, and the type of grading is set to Increments, this value is the position relative to the reference geometry.
- [Solid name] — If you are using a solid in the sole, a column is displayed with the name of the solid, for example Airbag. You can use different scaling factors for solids than for soles. For example, you could use the same sole airbag from a size 18 sole in sizes 19 and 20 soles:
The following columns are available only if the Arithmetic Group grading option is selected:
- Length — This column displays grade data for the selected size. If you have selected reference geometry, and the type of grading is set to Increments, this value is the position relative to the reference geometry.
- Girth — This column displays grade data for the selected size. If you have selected reference geometry, and the type of grading is set to Increments, this value is the position relative to the reference geometry.
- Click OK to create the grading, or Cancel to close the dialog without saving changes.