When a route is complete, the Select Fillet Route dialog highlights the fillet arc editing features.
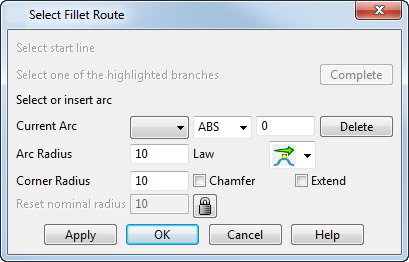
On the ends of the fillet route, arcs appear which represent the radius values at those points. These values are the nominal radius as set in the Fillet dialog.
Current Arc — This has two drop-down lists and a text box.
The first drop-down list displays the selected fillet arc. You can use this drop-down list to select existing fillet arcs. To find the number of an existing arc, select the arc in graphics window. Its number is displayed in this drop-down list.
Use the second drop-down list and text box to enter new fillet arcs as follows:
- Select one of the following options from the second drop-down list to determine where to input the new fillet arc:
ABS — A new arc is inserted along the fillet at a distance from the first fillet arc.
REL — A fillet arc is inserted along the fillet at a distance from the selected fillet arc in the first drop-down list.
PAR — A new arc is input at a parametric distance between two existing arcs. For example, a parametric distance of 3.5 inserts an arc half way between arcs 3 and 4.
- Input a distance in the text box and press Enter to input a new fillet arc.
The fillet arcs are also relabelled.
You can also click a position on the fillet route to enter a new arc.
If you hold the intelligent cursor over the fillet route, a distance is displayed. The option selected in the second drop-down list determines what the value means. For example, if ABS is selected, the value is the absolute distance along the fillet route.
The word KEY is displayed where the fillet crosses a curve on one of the selected surfaces.
Delete — Deletes the selected arc.
Arc Radius — Displays the radius of the selected arc. You can change its value by
- entering a new value.
- dragging the arc on the screen to the required value.
Law — Displays the variation of the radius at the current arc position. Use the Law option to indicate how you want to vary the fillet radius at the selected arc.
Three variations exist:
- Free
- Horizontal
- Sharp.
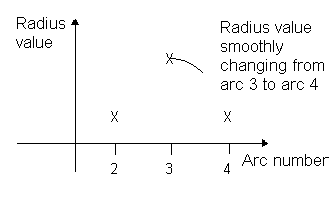
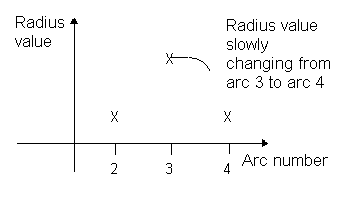
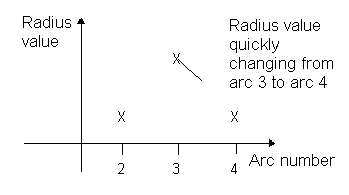
To explain what each of these variations mean, suppose we have the arcs as in the following diagram.

The radius changes from arc 3 to arc 4 with respect to the three variations:
-
Free — the radius varies freely from arc 3 and then takes on the conditions dictated by arc 4
-
Horizontal — the radius remains constant for a short distance away from arc 3 and then takes on the conditions dictated by arc 4
-
Sharp — the radius changes size quickly as soon as it leaves arc 3 and then takes on the conditions dictated by arc 4
-
Free — the radius varies freely from arc 3 and then takes on the conditions dictated by arc 4
The Law option has nine selections:
-
 — Free Free
 -
 — Free Horizontal
 -
 — Free Sharp
 -
 — Horizontal Horizontal
 -
 — Horizontal Free
 -
 — Horizontal Sharp
 -
 — Sharp Sharp
 -
 — Sharp Free
 -
 — Sharp Horizontal
The first word dictates how the radius varies as it enters an arc and the second how it leaves an arc.
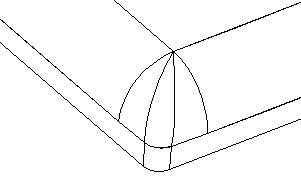
Corner Radius — Type the required value in the Corner Radius text box.
You can use the corner radius to fit a fillet into a corner. In the following figure, the fillet does not fit into the corner; its corner radius is too large.
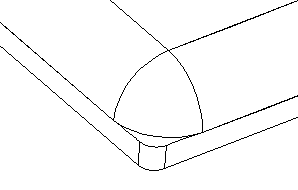
By entering a corner radius equal to the corner, the fillet fits the corner.
Here are some more tips on what Corner Radius values to use and when:
- If you create several fillets, all with the same radius, which meet in one or more concave corners, set the corner radius equal to the fillet radius. Spherical corner pieces are then created in the corners.
- If you create several fillets, with different radii, which meet in one or more concave corners, create the fillet with the larger radius first and set its corner radius equal to the smaller radius. When you create further fillets with the smaller radius, they match the first fillet in the corners.
- If you create a single fillet with longitudinal edges that follow the main surfaces closely and go into corners which are either sharp or have a smaller radius than the fillet, set the corner radius to zero.
- When you create a corner, you can edit it to make it rounder. For further details, see Editing a corner fillet.
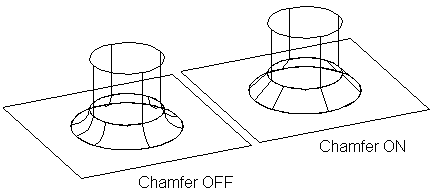
Chamfer — Select this option to create straight fillets.
Extend — Deselect Extend to stop the fillet when it reaches a boundary, or an open edge on one of the surfaces. Select this option to extend the fillet to the edge of the longer surface.

 — Locks the nominal radius. By clicking this Lock button to open
  , you can change the radius in the Reset text box. When the lock is open, click Apply to cancel any fillets created and return to the selection of candidate lines.
Reset — Displays the nominal radius. It can only be changed by opening the Lock button.
Preview — Click this button to see the fillet path.
Apply — When you have edited the fillet, click Apply to create the fillet. Continue creating more fillet surface, if necessary, by selecting a start candidate line.
OK — Creates the required fillets and closes the dialog.
Cancel — Closes the Select Fillet Route dialog without saving the fillets you created.