Use the Manual tab to edit the curves on the heel.
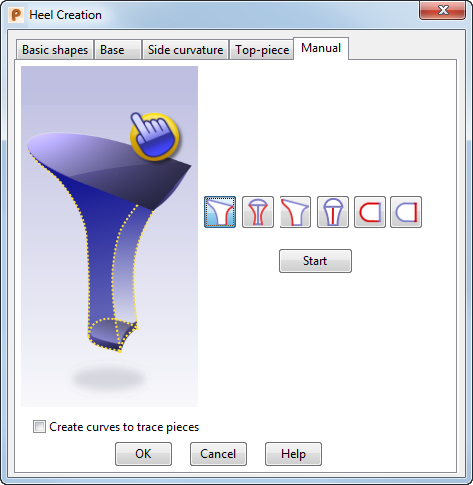
- In the dialog, select the button that represents the section to be edited. The selected button has a blue background.
 Sides X — Select this option to edit the side curvatures of the heel in the X direction. When you click
Start, the view changes to
View from right.
Sides X — Select this option to edit the side curvatures of the heel in the X direction. When you click
Start, the view changes to
View from right.
 Sides Y — Select this option to edit the side curves of the heel in the Y direction. When you click
Start, the view changes to
View from back.
Sides Y — Select this option to edit the side curves of the heel in the Y direction. When you click
Start, the view changes to
View from back.
 Back X — Select this option to edit the back curve of the heel in the X direction. When you click
Start, the view changes to
View from right.
Back X — Select this option to edit the back curve of the heel in the X direction. When you click
Start, the view changes to
View from right.
 Front X — Select this option to edit the front curve of the heel in the X direction. When you click
Start, the view changes to
View from right.
Front X — Select this option to edit the front curve of the heel in the X direction. When you click
Start, the view changes to
View from right.
 Top-piece Back — Select this option to edit the back curve of the heel top-piece. When you click
Start, the view changes to
View from bottom.
Top-piece Back — Select this option to edit the back curve of the heel top-piece. When you click
Start, the view changes to
View from bottom.
 Top-piece Front — Select this option to edit the front curve of the heel top-piece. When you click
Start, the view changes to
View from bottom.
Top-piece Front — Select this option to edit the front curve of the heel top-piece. When you click
Start, the view changes to
View from bottom.
- Click
Start. The editing curve is displayed in white with curve points in green:
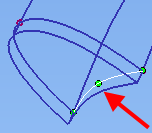
- Edit the curve in one of the following ways:
- To change the curve shape, drag a curve point to a new position.
- To add a curve point, press and hold the T key and click on the curve.
- To remove a curve point, press and hold the T key and click on the point.
- Click Finish to apply the change to the heel.
- Edit other heel curves in the same way.
- Select Create curves to trace pieces to create curves along the edges of the heel. Use these curves to create pieces on the heel; for example a heel cover or a Louis heel effect at the heel front.
- Click OK to save the changes.