You can position pipe and pipe fittings in your model by choosing precise segment and fitting locations or by setting up the program to calculate the fitting type and location.
A number of placement tools and settings are available to help you position pipe and pipe fittings, including pipe grips and the compass.
Use Pipe Grips
You can route pipe from the open port of selected pipe using a Continuation grip. You can also use a Move grip to locate and stretch pipe.
Use the Move grip at the end of a pipe segment to change the length of the selected pipe.
In addition to routing pipe, you can use the Continuation grip at an open port to add an elbow. If you use a Continuation grip that is not at an open port, a branch is created.
Pipe segments have a branch Continuation grip in the middle of the segment. Pipe fittings also have branch Continuation grips. For example: an elbow has a branch Continuation grip that allows you to convert the elbow into a tee.
For more information about grips, see Plant 3D Grips.
Route Pipes Using the Compass
Use the compass to route pipe at precise angles.
The points that you specify using the compass are restricted to the routing plane. You can disable the compass to specify a point that is not on the routing plane.
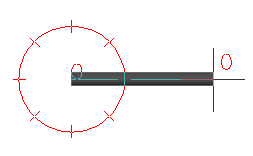
The compass displays tick marks on a circle. You can set the angle between tick marks, change the size of the compass, or turn off the compass.
The compass snap increment is also used in response to the Specify Rotation Angle prompt (for example: when using the rotation grip). You can disable the compass angle snap to use the exact rotation specified.

When you add a fitting, the compass tick marks are set to match the available fitting angles in the pipe spec.
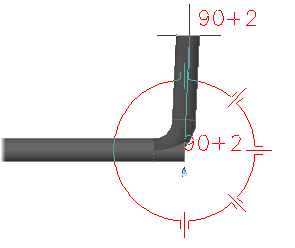

You can set a tolerance angle to allow for slight angle variations when connecting pipe end to end, or adding a fitting. For example: you can specify a 91 degree angle using a 90 degree elbow.
If you turn the tolerance angle on, the compass displays tolerance angle tickmarks. By default, the tolerance angle is off.
Offset Pipe Placement
When routing pipe, you can specify eight offset directions in addition to the center line. If you set the offset to Bottom of Pipe (BOP), you can then specify support locations directly.
Offset is relative to your routing direction: it is not absolute. When you route pipe in a vertical direction, the BOP alignment is relative to a wall. You can
- Set the alignment and the offset in the ribbon before routing pipe.
- Set or change alignment from the command line while routing pipe.
If you want to use object snap while offset routing to specify a point on a pipe, but do not want to connect to the pipe, you can turn off plantoffsetconnect.
Precision Location
You can specify precise object snap points when Continuation grips are not available or not at a desired location.
In general, if you want to connect to pipe when you are routing you use object snap to specify an exact location.
You can use node or end object snaps to connect to the end of another pipe. If you want to connect to a pipe at a right angle, use the perpendicular object snap. Use the near object snap to specify a point that is on the pipe center line.
Use Node object snap to connect to nozzles.
For more information on object snaps, see Snap to Locations on Objects (Object Snaps).
You can use tracking to specify a point that aligns with another point. For more information, see Track to Points on Objects.
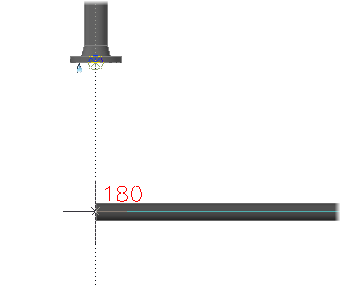
You can enter a distance (pipe length) to specify the next point. For more information, see Enter Direct Distances.
![]() If you want to snap to an object and maintain your current elevation, you can use Elevation Snap. For example, you can connect to vertical pipe.
If you want to snap to an object and maintain your current elevation, you can use Elevation Snap. For example, you can connect to vertical pipe.
Use Routing Solutions
If you specify connection and the endpoints are not in-line, AutoCAD Plant 3D toolset can route pipe and add fittings to complete the connection. You can choose from multiple solutions if multiple paths are available.