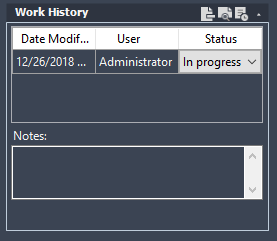
To add status and notes to the Work History
- Under Status, in the drop-down list, select a status.
- In the Notes box, enter a description of the changes you made or are planning to make to the drawing.
- Click OK. Note:
If the Work History dialog box is not displayed when you open or close a drawing, the project was configured with work history prompting turned off. Consult your project administrator.
To view Work History status for a drawing
- In the Project Manager tree view, click a drawing.
- In the Project Manager, on the bottom toolbar, click Work History.

- Under Status, view the drawing status.
To manage work history status
- In the Project Manager tree view, right-click a drawing. Click Open. Note:
If the Work History dialog box is not displayed when you open or close a drawing, the project was configured with work history prompting turned off.
- In the Work History dialog box, in the Status list, click Manage.
- In the Project Status Manager dialog box, do one of the following.
- To add a new status, click New. In the New Status dialog box, in the Name box, enter a new status name. Click Ok.
- To rename an existing status, under Refined Statuses, click a status name. Click Rename.
- To delete an existing status, under Refined Statuses, click the status name and click Delete. Click Close.
- Click OK.
To display and sort the work history for a drawing
- In the Project Manager tree view, click the drawing whose work history status you want to view.
- In the Project Manager, on the bottom toolbar, click Work History.

- To sort the list alphabetically by user or chronologically by date, click the appropriate column heading. (You cannot sort the status list.)