Learn how to edit a curtain wall to create custom patterns of mullions and panels.
Anatomy of a Curtain Wall
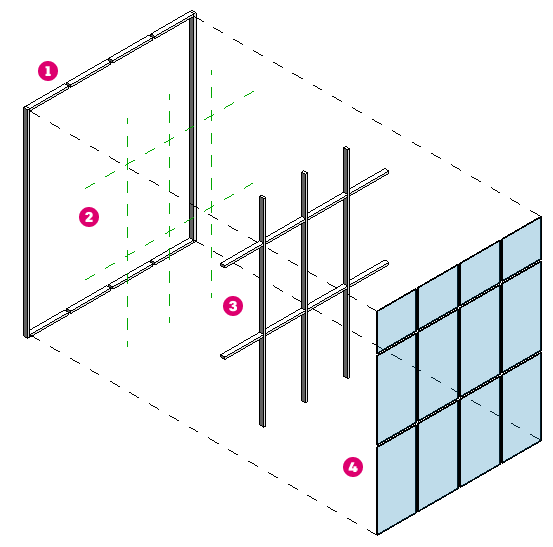
 Wall Borders - The border is the outer edges of a curtain wall. The border is established by the wall height (defined by the base and top constraints instance parameters) and the start and end points of the wall. Typically a curtain wall is a rectilinear shape, but you can
edit the profile of the wall to create different border shapes. Horizontal and vertical wall borders have mullion families assigned to them in the wall type properties.
Wall Borders - The border is the outer edges of a curtain wall. The border is established by the wall height (defined by the base and top constraints instance parameters) and the start and end points of the wall. Typically a curtain wall is a rectilinear shape, but you can
edit the profile of the wall to create different border shapes. Horizontal and vertical wall borders have mullion families assigned to them in the wall type properties.
 Grids - Grids break the overall surface of the curtain wall into smaller portions. Regularly spaced grids can be set in the type properties of the curtain wall and are automatically placed as the curtain wall is created. Grids can also be manually placed on the curtain wall. Instance properties control the angle of the vertical and horizontal grids.
 Mullions - Mullion families are placed on the grid lines and borders of the curtain wall. The profile family used by the mullion family establishes the shape and size of the mullions.
 Curtain Panels - A curtain panel fills the area of a curtain wall established by the grids. Typically panels are glass or solid panels, but a panel can be made up of another wall type, or can be a special family type that acts as a curtain panel and a door. Panels used in a curtain wall can be set by the curtain wall type or can be swapped out individually for different panels.
Control the Curtain Wall Type and Instance Parameters
- Curtain Panel - This sets the default panel family that is used for the curtain wall.
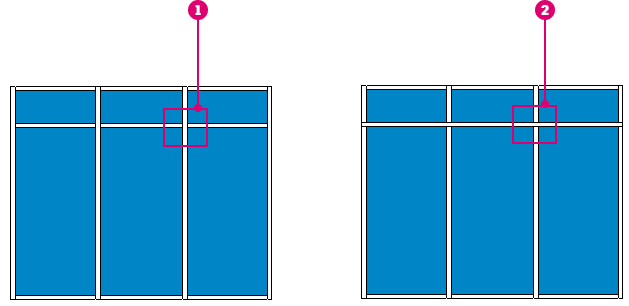
- Join Condition - Use this parameter to control if vertical mullions are modeled as continuous
or if horizontal mullions are modeled as continuous
.
- Vertical Grid and Horizontal Grid - Set the spacing for grid lines on the curtain wall. A grid line is automatically placed as the dimensions of the curtain wall are increased. If a grid is set to Fixed Number, the number of curtain grids placed on the curtain wall is controlled from the instance properties.
- Vertical and Horizontal Mullions - Set the default mullion family used for the border and interior mullions. Mullions are placed on every grid of the curtain wall. Borders are listed as Border 1 and Border 2 because depending on the view direction left and right may be flipped. As a best practice, make a change to one of the border parameters and click Apply in the dialog to understand which border is affected by the change.
 . In order to make a change to a pinned element, you must first un-pin the element by clicking the pin icon.
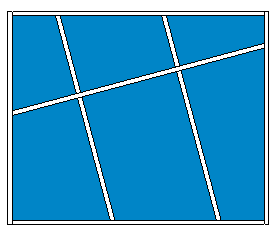
Horizontal and Vertical Grids at 15 Degrees
Customize Grids and Mullions
- Open a 3D view or an elevation view.
- Click Architecture tab
 Build panel
 (Curtain Grid).
- Click Modify | Place Curtain Grid tabPlacement panel, and select a placement type.
- All Segments - Places a curtain grid from one border to the opposite border on the curtain wall.
- One Segment - Places a curtain grid from one panel edge to the other panel edge on the selected panel.
- All Except Picked - Places a curtain grid from one border to the opposite border on the curtain wall. As a second step, click on the curtain grid segments where a curtain grid is not needed.
- Place the cursor along wall edges; a temporary grid line is displayed.
- Click to place the grid lines.
Each section of the grid (design unit) is filled with a separate curtain wall panel of the selected type.
- Click Esc when you are done.
- Add additional grid lines, if necessary, or click Modify to exit the tool.

- Select a curtain grid.
- Click Modify | Curtain Wall Grids tabCurtain Grid panelAdd/Remove Segments.
- Click on a curtain grid segment to remove it.
As you remove segments, adjacent panels join.
- Click in white space in the drawing area.
- Click Architecture tabBuild panel
 (Mullion).
- Select the desired mullion type in the Type Selector.
- On the Modify | Place Mullion tabPlacement tab, select one of the following tools:
- Grid Line: When you click a grid line in the drawing area, this tool places a mullion across the entire grid line.
- Grid Line Segment: When you click a grid line in the drawing area, this tool places a mullion on the individual segment of the grid line that you click.
- All Grid Lines: When you click any grid line in the drawing area, this tool places mullions on all grid lines.
- Click in the drawing area to place mullions on grid lines as desired.
- Click Modify.

The following video demonstrates how to modify a curtain wall to use a custom grid pattern.
Swap Panels
The curtain panels are the final part of the curtain wall that can be customized. Curtain panels are families so they are swapped like other families. Select a curtain panel, you may have to use the tab key to cycle the selection in order to select the panel. With the panel selected, use the Type Selector to change the panel for another family. In most templates, a default glazed panel and a default solid panel are included, but other panel families may be included in the template you use.
Doors in curtain walls are special families that are considered by Revit to belong to both the door category and the curtain panel category. To add a door to a curtain wall, the process is the same as swapping a curtain panel with the type selector. The door in this case will fill the entire panel from grid edge to grid edge. Consider adding curtain grids manually to size the panel to the correct size of the door you are placing.
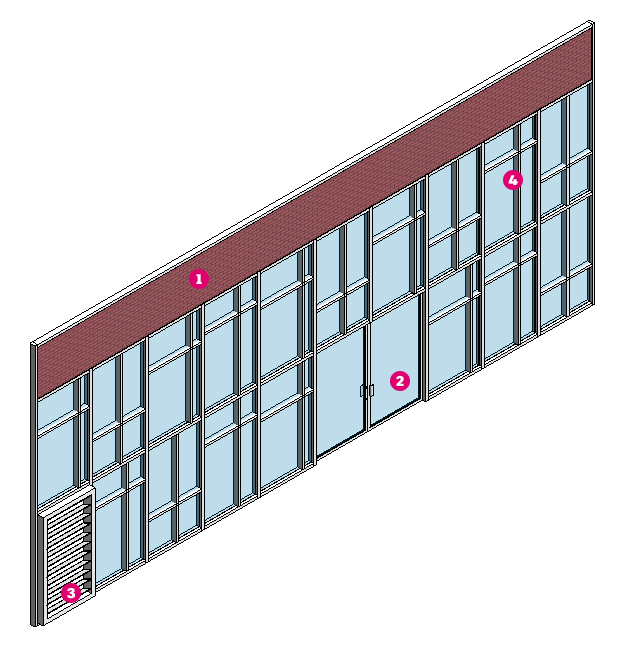
, a door panel
, a custom panel with louvers
, and a custom panel
with different types used to represent a complex mullion pattern.