Learn how to create and assign custom numbering sequences for revisions in your projects.
What is Custom Revision Numbering?
- Create multiple alphanumeric and numeric sequences to track revisions.
- Specify the number of digits used in numeric sequences.
- Transfer sequences between projects with Transfer Project Standards.
Why should you use it?
Prior to 2022, revision numbers were limited to the selection of an alphanumeric or a numeric numbering sequence. Prefixes and suffixes could be added, but in many cases, you were still not able to create the sequences needed for specific project requirements. If you needed more than two different sequences, it was not possible only using the revision tools. You needed to use other parameters or approach revisions in some other way.
For example, if you wanted to create revisions for different phases for work, preliminary design, tender, and construction, it was difficult using revision tools in Revit. With the custom sequencing enhancements, you can make as many sequences as needed for your project making it much easier to meet project requirements.
The revision numbering enhancements added inRevit 2022 are a direct result of customer feedback from the Revit Ideas forum.
Where do you find the tools?
There are a number of steps in the revision workflow in Revit. The 2022 enhancements to the revision tools are covered here in the first two sections, Create a New Numbering Sequence and Edit an Existing Numbering Sequence, the other sections here are included to illustrate the complete revision work flow.
Review the following video to see an overview of how to create a custom numbering scheme.
Create a New Numbering Sequence
- In the project, click View tab
 Sheet Composition panel
 (Sheet Issues/Revisions).
- In the Sheet Issues/Revisions dialog, under Customize Numbering, click Numbering.
- In the numbering dialog, click
 (New).
- Choose the sequence type, Numeric or Alphanumeric.
- Specify the settings:
- Numeric - Set the number of digits used by the numbering sequence and the starting number.
- Alphanumeric - Set the sequence of characters to use for the sequence. Characters are separated by a comma in the sequence.
Note: Once a sequence type is defined, you can not change the type when editing the sequence, it is fixed to either Numeric or Alphanumeric. If you need to change the type of sequence, create a new numbering sequence. - (Optional), Set a prefix and suffix for each number in the sequence.
Edit an Existing Numbering Sequence
- In the Sheet Issues/Revisions dialog, under Customize Numbering, click Numbering.
- Select an existing numbering sequence from the list.
- In the numbering dialog, click
 (Edit).
- Specify the settings:
- Numeric - Set the number of digits used by the numbering sequence and the starting number.
- Alphanumeric - Set the sequence of characters to use for the sequence. Characters are separated by a comma in the sequence.
- (Optional), Set a prefix and suffix for each number in the sequence.
- Click OK.
 (duplicate) an existing numbering sequence and then edit to create a new custom sequence based on an existing one.
Add Revision Cloud
- In the project, open a view in which you want to indicate changes.
You can sketch revision clouds in all views except 3D views.
- Click Annotate tabDetail panel
 (Revision Cloud).
Revit enters sketch mode.
- On the Tools panel, click one of the draw tools. In the drawing area, place the cursor near the part of the view that has changed and draw the cloud to encompass the changed area.
Note: Press the spacebar while drawing to flip the direction of the arcs in the cloud shape.
- Sketch additional clouds, if needed.
- Click Modify | Create Revision Cloud Sketch tabMode panel
 (Finish Edit Mode).
The minimum arc length for the revision cloud shape can be specified in the Arc Length option on the Sheet Issues/Revisions dialog. This setting controls the arc length for all revision clouds in the project.
Assign a Revision to a Revision Cloud
- In a project view, select the revision cloud.
- On the Properties palette, for Revision, select the desired revision from the list.
Tag a Revision Cloud
- Open the view that contains revision clouds.
- Click Annotate tabTag panel
 (Tag By Category).
- In the drawing area, select the revision clouds to tag.
As you select each cloud, Revit displays a revision tag next to it. Numbers in the tags reflect the revisions assigned to the clouds.
Example
As an example, imagine you are working on a project that requires you to track revisions during the design phase and also track revisions separately during the construction phase. Each time a design review package is issued the revision is labeled with a prefix designation of P1, P2, P3, etc... Each marking a release of documents for review. Within each release, you need to document minor changes to the project made. The change made between design review releases are tracked using the prefix of the design release followed by a two digit number.
After documents are issued for construction, the revisions will be indicated with a prefix of C followed by a two digit number.
This revision standard can be accommodated with the revision numbering enhancements in Revit 2022.
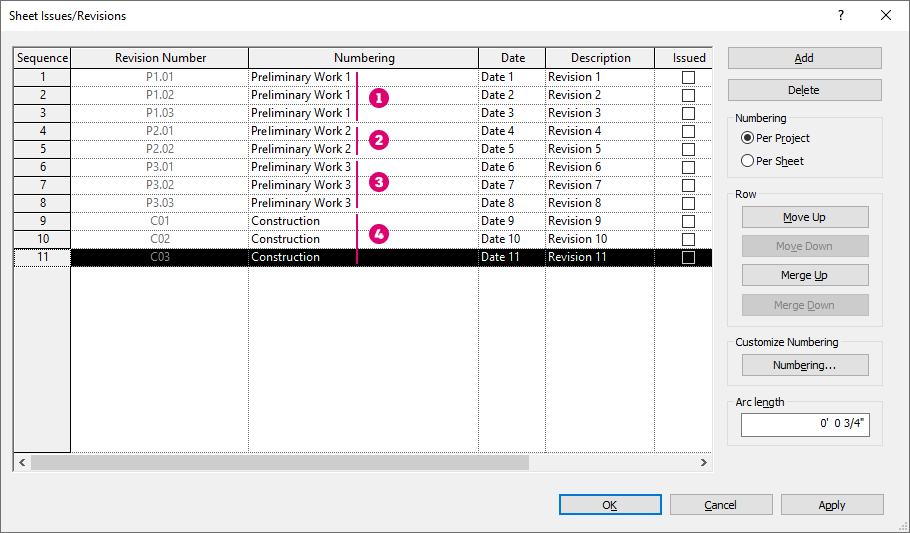
In the image you see how the revision naming scheme previously described is created in
Revit. Each of the preliminary design phases gets a number sequence,
 ,
,
 , and
, and
 . The number sequence is set to use two digits and each has a prefix of P1., P2., and P3. respectively. The construction numbering sequence
 , uses 2 digits and a prefix of C.