Use Generative Design to automate sheet layout exploration.
This article is adapted from this Dynamo blog post by John Pierson.
View packing
Generative Design can aid designers with some of the more mundane tasks in Revit. One such task is laying out sheets. The Generative Design Primer offers an example of packing as many views as possible on a sheet with a feedback loop. However, many Revit users are familiar with the types of views they want on their sheet and need a more useful way to explore sheet layouts.
In this Have You Tried article, we’ll show you how to use Generative Design to lay out sheets in a way that truly assists the designer.
Video
This video gives an overview of how to create sheet layouts using Generative Design. In the video, the sample study type has already been set up. Scroll down for step-by-step directions.
Video courtesy of John Pierson
Set up the sheet
This example uses the rac_advanced_sample_project.rvt sample model. The sample project is available in Revit, or you can download it here.
Download the study type (Dynamo graph) for this example here: Packing Viewports.
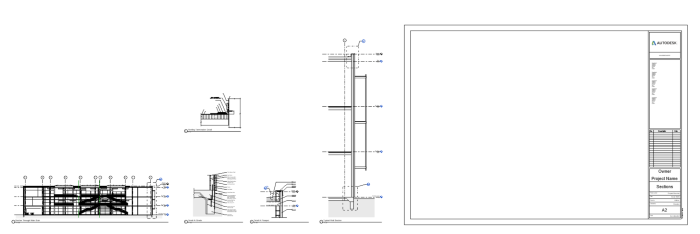
- Open the rac_advanced_sample_project.rvt sample model and go to sheet A2 – Sections.
- Drag and drop the views that you want to place off to the side. This will allow Generative Design to provide the placement.
Set up the study type
Next, we'll create the Generative Design study using the Packing Viewports study type. We'll begin by making the study type available in the Create Study dialog.
Go to Manage  Generative Design panel Create Study.
Dynamo
Generative Design in the top menu Create Study.
At this point, you may see packedViews as a study type in the Create Study dialog if you saved the Packing Viewports folder (containing the DYN file and Dependencies folder) in the same place as your other study types.
If you don’t see the study type, follow these steps:
- Select
 Add Folder next to the Choose Folder drop-down menu.
- Click the + icon and navigate to the path where the Packing Viewports graph folder is located. The folder should include both the DYN file and the Dependencies folder.
- After the folder path has been added, you can close the Manage Folders dialog.
Define the study
The Packed Views study type should now be available to use to create a study.
- In the Create Study dialog, select packedViews in the Choose Folder drop-down or in the list of study types.
- In the Method drop-down, change the method to Randomize.
- Click the
 Study Options menu in the top right corner of the dialog and select Save Default Settings.
- Click Generate. It may take a few moments for Generative Design to create outcomes.
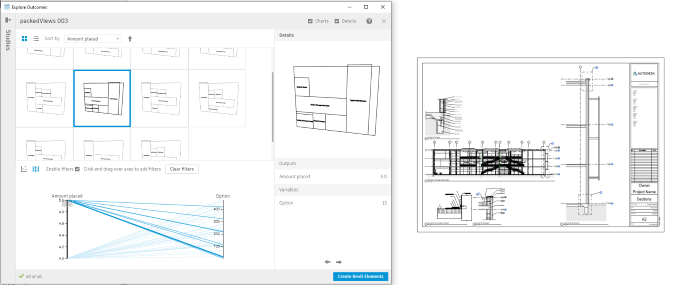
Explore outcomes
You’ll see a number of outcomes in the Explore Outcomes dialog. Select any outcome to display a larger image that you can rotate and zoom in or out to see more detail. The viewport names are included in the preview, illustrating how each option is laid out.
In the example sheet, there are a total of 5 views available. You can use filters in the parallel coordinates chart at the bottom center of the Explore Outcomes dialog to select how many views you want on the sheet. Click and drag along the axes (vertical lines) in the chart to use filters.
View an outcome in Revit:
- Select an outcome that you like and then click Create Revit Elements. This will create the chosen sheet layout in Revit.
- Minimize the Explore Outcomes dialog or move it to the side so that you can see the Revit model.
- To try a different option, select Undo (CTRL+Z), and the layout will reset.
- Back in the Explore Outcomes dialog, select a different option and again click Create Revit Elements. The sheet layout will update accordingly.
Add more views
If you’d like to add more views to the sheet, create a new study. With the study type and settings already defined, this is a quick and easy process.
- Add the desired views to the sheet.
- Create a new study. You can create a study directly from the Explore Outcomes dialog by selecting Create Study in the bottom left corner.
- Select the packedViews study type. The settings will default to the ones you saved previously, but you can change them if you’d like, for example, by selecting a different sheet.
- Click Generate.
Review and experiment with the different layout options as in the previous section. If you have too many views to comfortably fit on the sheet, you can use the filter to specify the number of views to place. Any views that go over this limit will be placed next to the sheet.
With Generative Design, you can eliminate the tedium from sheet layout exploration. Give it a try, and let us know what you think by rating this article below and typing your feedback in the comment box.