When you create a design option set, Revit automatically creates a primary option. Use this procedure to add one or more secondary design options to the set.
- Click Manage tab
 Design Options panel
 (Design Options).
- In the Design Options dialog, in the left-hand list, select the design option set to which you want to add an option.
- Under Option, click New.
The default option name displays under the option set.
- To rename the option, select the option name, and under Option, click Rename. Enter a name, and click OK.
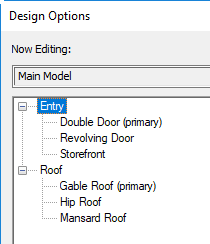
- If you want this design option to be the primary option for the design set, click Make Primary.
The Make Primary button promotes a secondary option to the primary option. The former primary option becomes a secondary option.
Note: Use caution with Make Primary, because references from the main model to the former primary option can be lost. After using Make Primary, check dimension references and tags to be sure they are referencing the correct elements. See Referencing Elements in Design Options. - To open the design option for editing, do the following:
- Select the design option in the list, and click Edit Selected.
- Click Close.
In the current view, elements in the main model display in halftone to distinguish them from the design option that you are editing. For further instructions, see Edit a design option.
Tip: If the current view does not show the active option, check its design option settings. (See Checking the Design Option Settings for a View.) For the appropriate design option set, specify Automatic, or select the desired design option.
If the design option that you just created is a primary option, by default it displays in all project views that are not dedicated to other design options. If the option is secondary, it does not appear in any project views by default. See Viewing Design Options.