About the Reference Editor
Scene > Reference Editor
Use the Reference Editor for seeing all references in your scene, identifying their type, checking their status, seeing when something was last modified, who made modifications, and the file location.
The Reference Editor
The Reference Editor has a menu and search bar, options for seeing content in the Reference Graph or Reference List, two sections displaying reference file details, file paths, and assorted tools, and Icon Bar.
From the Menu Bar, select Scene > Reference Editor.
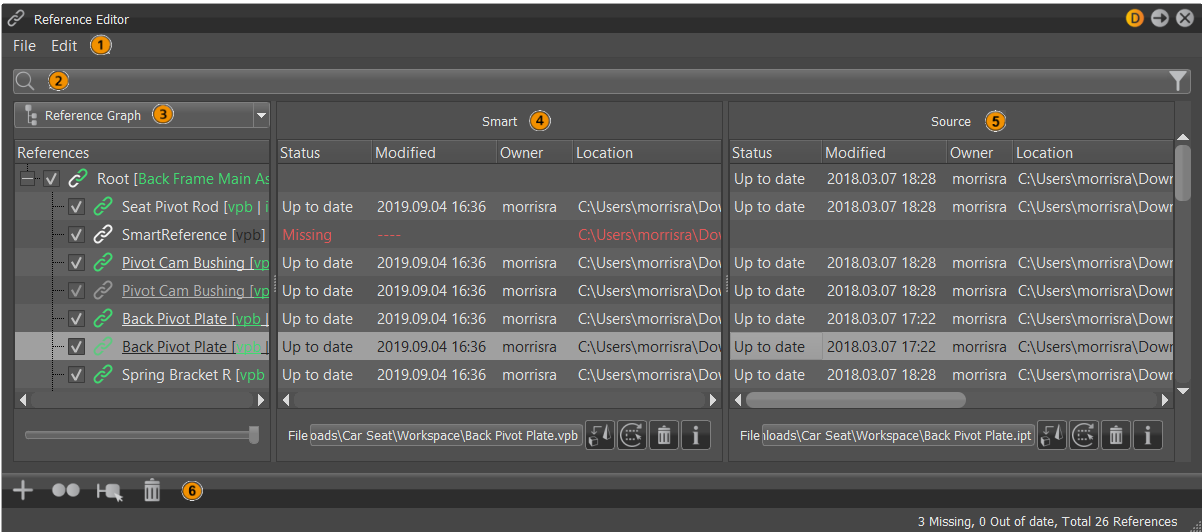
 Menu Bar Menu Bar |
 Search and Filter Bar Search and Filter Bar |
 Reference Graph /Reference List Reference Graph /Reference List |
 Smart Smart |
 Source Source |
 Icon Bar Icon Bar |
|---|
Popup notifications appear in the viewport, indicating files are out-of-date or links are missing. To turn off reminders, uncheck Enable in the Preferences.
Menu Bar
 This section explains what each option in the Reference Editor menus does.
File
Use the File menu to load, unload, and save.
Load All - Loads all references into VRED, displaying the content in the viewport.
Note:This action cannot be undone.
Unload All - Unloads all references from VRED and removes them from the viewport.
Note:This action cannot be undone.
Save All Smart Reference Changes - Saves all smart references that have been modified.
Note:This action cannot be undone.
Edit
Use the Edit menu for converting, reimporting, and repathing.
- Convert All to Smart References - Converts all source references to smart-source references. The smart reference is created in the session, displaying an Unsaved status, but is not saved to disk until the smart changes are saved or project is saved.
- Repath All - Changes the path of the current references to a new storage location. Repath looks in the new location for file names matching the reference names. If the file cannot be found, the Repath dialog appears for locating the file.
- Remove All References - Removes all reference attributes, combining the content of all references into one large project. The nodes no longer appear in the Reference Editor, but as groups in the Scene Graph.
- (Re)Import All Smart References - Reimports all smart reference files. Use this when files are out of date. Opens the Reimport dialog.
- Repath All Smart References - Changes the path of the current smart references to a new storage location. Repath looks in the new location for file names matching the smart reference names. If the file cannot be found, the Repath dialog appears for locating the file.
- Delete All Smart References - Deletes all smart references from the scene.
- (Re)Import All Source References - Reimports all source reference files. Opens the Reimport dialog.
- Repath All Source References - Changes the path of all source references to a new storage location. Repath looks in the new location for file names matching the source reference names. If the file cannot be found, the Repath dialog appears for locating the file.
- Delete All Source References - Deletes all source references from the scene.
Search and Filter Bar
 The Reference Editor contains a search field for quickly jumping to what you need.
 Search Filter
Click  to access a context-sensitive menu.
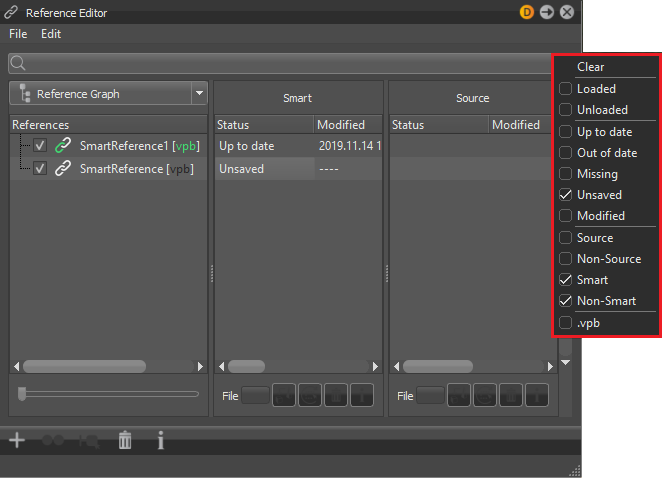
When a search filter is applied, the icon turns orange  . Multiple filters can be applied. File types referenced in the scene will appear below the search filter list.
- Clear - Clears the current filtered search.
- Loaded - Displays a list of only loaded references.
- Unloaded - Displays a list of only unloaded references.
- Up to date - Displays a list of only up to date references.
- Out of date - Displays a list of only out of date references.
- Missing - Displays a list of only missing references.
- Unsaved - Displays a list of all unsaved references.
- Modified - Displays a list of only modified and unsaved smart references.
- Source - Displays a list of only source references.
- Non-Source - Displays a list of all non-source references.
- Smart - Displays a list of only smart references.
- Non-Smart - Displays a list of all non-smart references.
Reference Graph
 From the drop-down, choose Reference Graph.
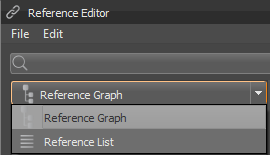
When Reference Graph is selected, a pure reference hierarchy (or assembly structure when dealing with CAD) is displayed. This means the view isn't cluttered with other VRED nodes, such as switches or groups.
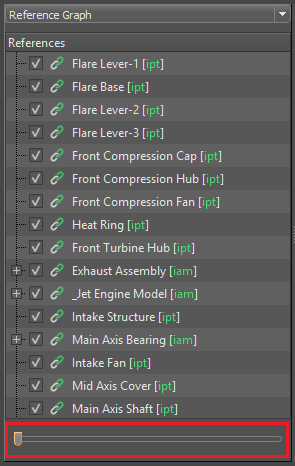 Slider to the left
Use the slider at the bottom to expand the references and expose another layer of the structure.
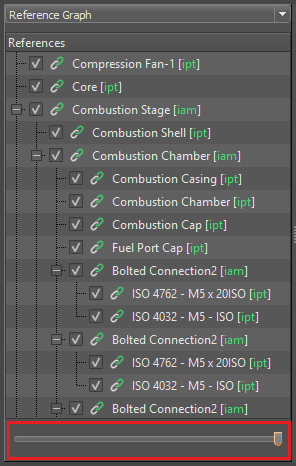 Slider moved to the right
Clicking ![]() will also expand and expose the next layer of the hierarchy.
will also expand and expose the next layer of the hierarchy.
 Reference List
From the drop-down, choose Reference List.

When Reference List is selected, a list of the reference file names is displayed. Use it for traditional flat list searching and list ordering. Also, the number of instances (clones) of a reference in the scene are posted next to each reference.
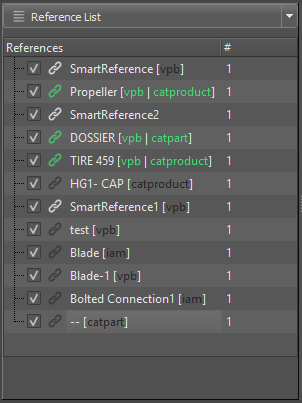
Context Menu
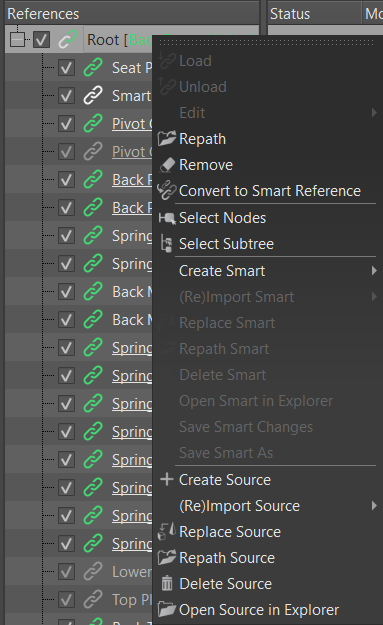
Right-click within the References, Smart, or Source sections to access a menu containing the following options. Keep in mind, some of the options may be greyed out, depending on your selection.
Load
This option needs at least one unloaded reference to be selected.
For smart references, it opens the selected unloaded smart reference VPB file into VRED, displaying it in the viewport. Its status is updated in the Reference Editor and Scene Graph. Use this for memory/performance management during a session.
For source references, it triggers the reimport of the selected unloaded source reference VPB file into VRED, displaying the Import File(s) dialog. After import, it is displayed in the viewport. Its status is updated in the Reference Editor and Scene Graph. Use this for memory/performance management during a session.
Multi-selection is supported for this option, but undo is not.
Unload
This option needs at least one loaded reference to be selected.
It closes the selected loaded smart reference file from your scene, removing it from the viewport. Its status is removed from the Reference Editor and Scene Graph. Use this to unload unneeded content from memory to improve performance during a session.
Multi-selection is supported for this option, but undo is not.
Edit
Select one of the following editing options:
Rename - (Ctrl+R) Changes the name of the selected reference to whatever is entered in the name field.
Clone - (Ctrl+D) Creates an instance of the selected reference in the scene.
Note:Multi-selection is supported for this option.
Unshare - Unshares the selected clone, resetting the cloned smart reference to an Unsaved status, breaking the cloning link, so actions can be applied to the newly changed unsaved smart references.
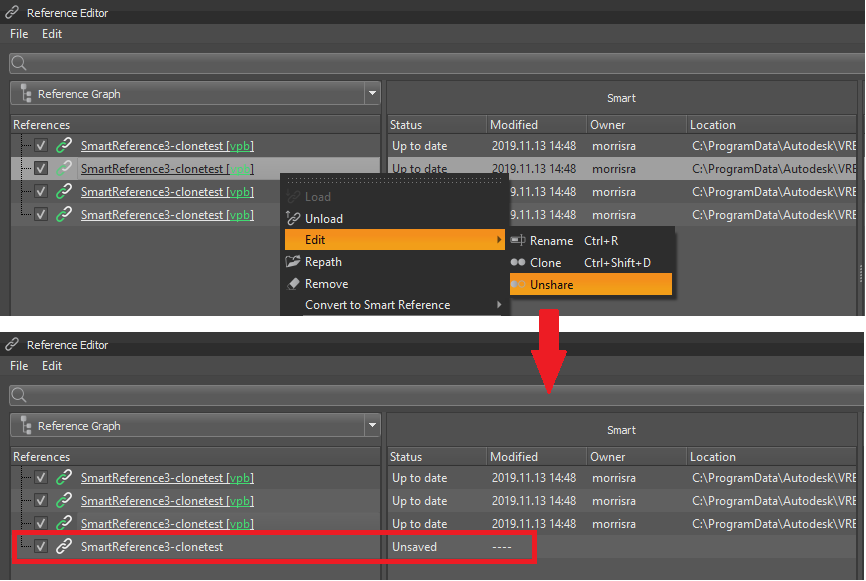
Unshare - Unshares the selected clone, resetting the cloned smart reference to an Unsaved status, breaking the cloning link, so actions can be applied to the newly changed unsaved smart references.

Repath
Changes the path of the current references to a new storage location. Repath looks in the new location for file names matching the reference names. If the file cannot be found, the Repath dialog appears for locating the file.
Multi-selection is supported for this option, but undo is not.
Remove
This option needs at least one selected reference.
Removes all reference attributes and combines the content of the selected reference into the current VPB. Converts the reference into a Transform node.
Multi-selection is supported for this option.
Convert to Smart Reference
This option is ONLY available for source references, empty references, and VRED nodes, such as groups.
Does one of the following:
With a source reference or empty reference selected in the Reference Editor, it converts the reference into a smart reference that has yet to be saved. Use Save Smart Changes to save it.
With a VRED node, such as a group, selected in the Scene Graph, it takes the currently selected VRED node, converts the node to a smart reference for saving the contents of node to a separate file (VPB).
Multi-selection is supported for this option.
Select Nodes
This option is disabled if a smart reference is not selected.
Highlights the selected nodes in Scene Graph and Viewport.
Select Subtree
Highlights the selected subtree nodes in the Reference Editor.
This action cannot be undone.
Create Smart
This option is disabled if a smart reference is already unloaded.
Select one of these two options for creating a smart reference:
New - Creates a smart reference empty node, named SmartReference, below the selected node. If no selection is made, the new node is added to the end of the list.
From File - Creates a smart references from a VPB file that is imported into VRED.
(Re)Import Smart
This option is disabled if a smart reference is not selected.
Reimports the selected smart reference file. Use this to update an out of date smart reference.
Multi-selection is supported for this option, but undo is not.
Select one of the following:
- Selected - Reimports the selected smart reference.
- Outdated - Reimports only outdated smart references.
- Unloaded - Reimports only unloaded smart references.
Replace Smart
Replaces the current smart reference with a user-chosen one.
- With a smart reference or smart-source reference selected, select a reference. This links and imports the new reference, renaming the referenced VRED node. The source reference is updated, depending on the loaded smart reference.
If the new link exists in the current scene, a clone is created. This action cannot be undone.
Repath Smart
This option needs at least one saved smart reference.
Changes the path of the current smart references to a new storage location. Repath looks in the new location for file names matching the reference names. If the file cannot be found, the Repath dialog appears for locating the file.
When a single childless reference is selected, select a new directory.
When references with children are selected or multi-selections are made, the Repath dialog appears for locating the file(s).
Multi-selection is supported for this option, but undo is not.
Delete Smart
This option needs at least one selected smart reference.
Deletes the smart reference.
Multi-selection is supported for this option.
Open Smart in Explorer
This option needs at least one saved smart reference.
Opens an Explorer window at the smart reference file location.
Save Smart Changes
This option is disabled if a smart reference is not selected or already unloaded.
Saves selected smart reference changes made in the VRED session.
Multi-selection is supported for this option, but undo is not.
Save Smart As
This option is disabled if a smart reference is not selected or is already unloaded.
Saves changes made to a selected smart reference in VRED, creating a new file.
This action cannot be undone.
Create Source
Creates a source reference node. When a reference is selected, a source node is created as a child of it. Select a file and click Open.
(Re)Import Source
This option is disabled if a source or smart-source reference is not selected.
Does one of the following:
When a source reference is selected, it reimports the selected source reference file, updating the out of date source file. The status of the source file will change from out of date to Up to date.
When a smart-source reference is selected, it reimports the selected source file and marks the reference as modified. The status changes from Out of date to Up to date for the source reference.
When the Import dialog appears, locate the source file and click Import.
Multi-selection is supported for this option, but undo is not.
Select one of the following:
- Selected - Reimports the selected source reference.
- Outdated - Reimports only outdated source references.
- Unloaded - Reimports only unloaded source references.
Replace Source
Replaces the current source reference with a user-chosen one.
When a source reference is selected in the Reference Editor, select a file, then the new file is imported. The reference VRED node is renamed to that of the new file.
When a smart-source reference is selected in the Reference Editor, select a file, then the selected source file is reimported. In your scene, the smart reference will display an asterisk, indicating it has been modified, but has yet to be saved to disk.
This action cannot be undone.
Repath Source
This option is disabled if there are no references with source links selected.
Changes the path of the current source or smart-source references to a new storage location. Repath looks in the new location for file names matching the reference names. If the file cannot be found, the Repath dialog appears for locating the file.
When a single childless reference is selected, select a new directory.
When references with children are selected or multi-selections are made, the Repath dialog appears for locating the file(s).
Multi-selection is supported for this option, but undo is not.
Delete Source
This option needs at least one selected source reference.
Deletes the source reference.
Multi-selection is supported for this option.
Open Source in Explorer
This option needs at least one selected source reference.
Opens an Explorer window at the source reference file location.
Smart and Source Sections
 and
and 
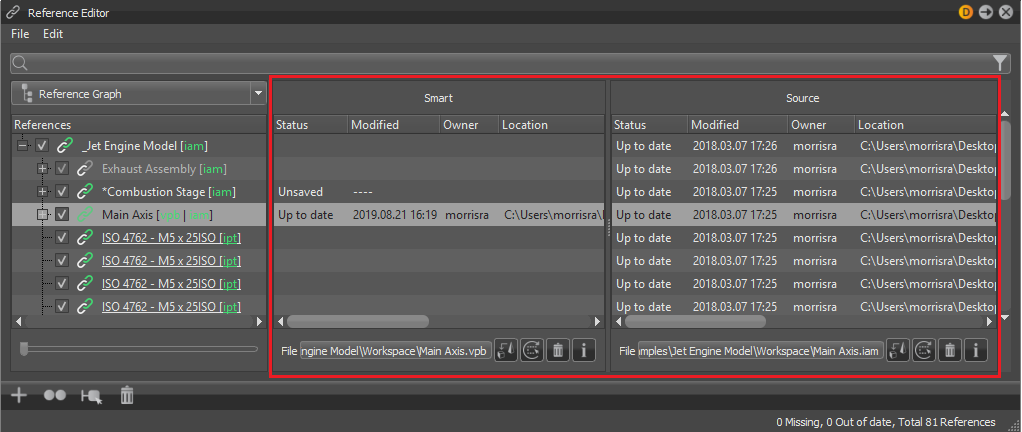
Status
Provides information on the status of the various references.
- Out of date - The reference file is out-of-date. This message is orange. Use
 (Re)Import to have VRED load the latest copy of the file.
 - Up to date - The reference file is up-to-date. This message is white.
- Missing - The reference file is missing. This message is red. Use
 Folder to locate and replace the current file location with another.
 - Unsaved - This smart reference has yet to be saved.
Modified
Provides the date for when the current file was last modified.
Owner
Provides the name of the person who created or last modified the file.
Location
Indicates the storage location of the file.
File (field)
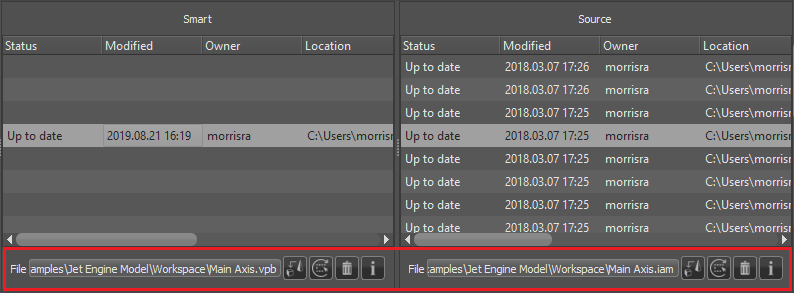
Displays the location of the selected reference file. Use the following icons, found to the right of the File field, to access these frequently used options:
 Replace Selected - Replaces the current selected reference location with another reference.
 (Re)Import Selected - Opens the Re-import File dialog for choosing what is reimported, the selected file is updated to include any modifications and selected options.
 Delete - Deletes the link to the referenced file for the selected reference. All columns for the selected reference is cleared.
![]() Info - Provides information on the selected reference and some details on its children.
Info - Provides information on the selected reference and some details on its children.
 Icon Bar
![]()
Click any of the following icons to access these frequently used options:
 Create Smart Reference
Creates a smart reference empty node at the selected location. If nothing is selection, the new node is added to the end of the list.
Select one of these two options for creating a smart reference:
New - Creates a smart reference empty node, named SmartReference, below the selected node. If no selection is made, the new node is added to the end of the list.
From File - Creates a smart references from a VPB file that is imported into VRED.
 Create Source Reference
Creates a source reference at the selected location. In the Explorer window that appears, set a location.
 Clone
Clone
Clones the selected references, creating new clones in the Scene Graph at the same level as the original nodes.
 Select Nodes
Selects the nodes for the selected references in the Scene Graph.
 Remove
Converts the selected references into Transform nodes. It dismisses the reference information.
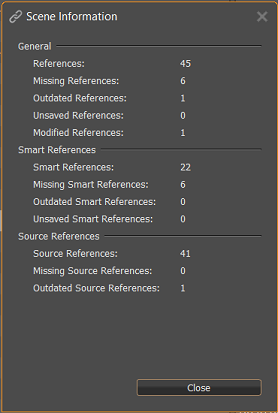
 Show Scene Information
Opens the Scene Information dialog, which lists general information on references, smart references, and source references in the loaded scene.
Status Bar
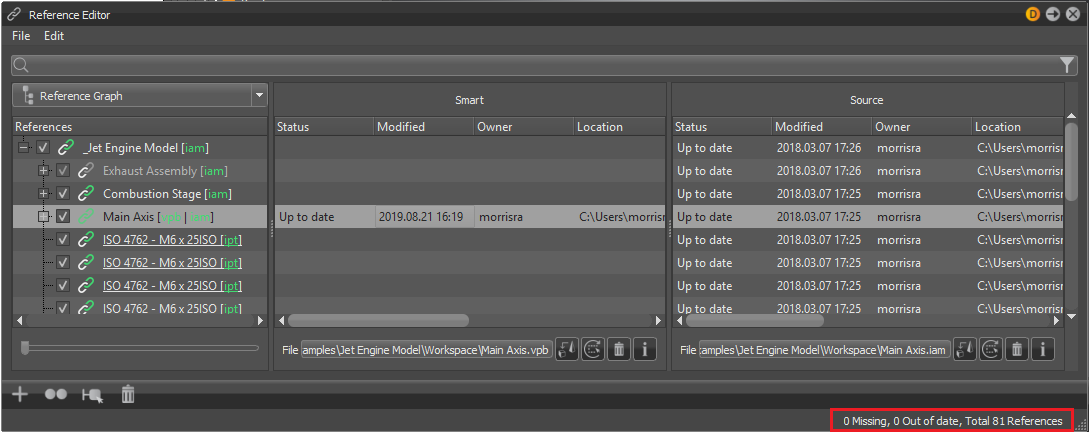
Along the bottom of the Reference Editor, get a tally of the number of missing and out-of-date files, along with the total number of referenced files.
The Status Bar is only displayed when the Reference Editor is undocked.
Re-import File Dialog
When  ((Re)Import Selected) is clicked, the Re-import File dialog appears.
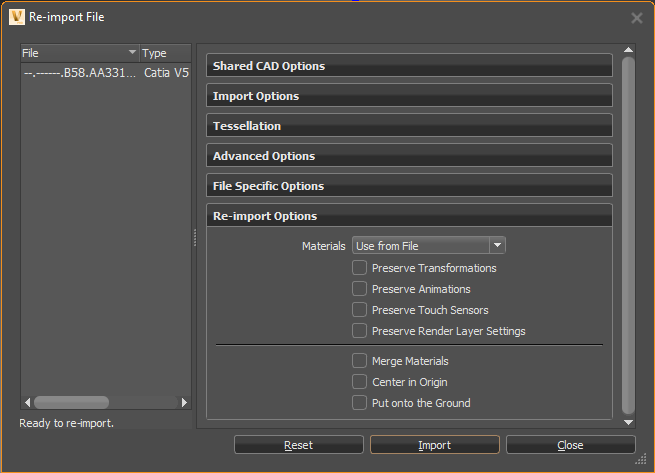
The options found in the most sections of the Re-import File dialog are the same as those in the Import File dialog, with one exception, the Re-import Options section.
Re-import Options
Transfer data from the current scene to the newly imported graph. Check things you want transferred and uncheck any you don't. If you want transformations, animation, and touch sensors preserved, check them. However, if the re-imported source file contains render layer settings and they are not to be included, ensure that option remains unchecked.
Materials - Choose the action to be taken for materials. Choose from:
- Use from File - VRED uses materials from the newly imported file and applies them to the scene.
- Preserve from Scene - VRED tries to identify identical nodes between the old and new data, then it re-applies the old material onto the new data.
- Apply from Asset Manager - Uses the materials selected from the Asset Manager, once
 is clicked.