About the Sceneplate Editor
The Sceneplate Editor is where you create and manage frontplates, backplates, groups, and switches. Options for setting properties, size, and position, as well as making color correction are all found here.
Click here to view the Sceneplate Editor video.
 Menus
Menus
Along the top of the Sceneplate Editor are three menus:
File
Contains the following options:
Load - Opens a browser for locating and loading an OpenSG Binary Geometry (*.osb) sceneplate file.
Save - Saves all items in the Sceneplate Editor tree list as Open SG Binary Geometry (*.osb) files.
Save Selected - Saves the item or items selected in the Sceneplate Editor tree list as Open SG Binary Geometry (*.osb) files.
Edit
Contains options for editing content within the Sceneplate Editor tree. Rename, copy, paste, cut, and delete content. Create a duplicate of the selected content or paste the attributes of one sceneplate onto another or group of others. Lock sceneplates so changes cannot be made or unlock them to make changes. Reorder tree items. Select all, deselect all, or even invert a selection.
Create
Contains options for creating frontplates, backplates, groups, and switches. To create a group with only the selected tree items, choose Create Group from Selected. To create a switch with only the selected tree items, choose Create Switch from Selected.
Right-clicking within the tree view also gives you access to these options.
 Search
To locate something within the Sceneplate Editor tree, use the search field, located under the menus. Click the field, then start typing the search term, the tree view will adjust to show only entries that match the search. Remove all content from the search field to see all the tree items.
 Tree
Tree
Contains your frontplates and backplates, groups, and switches. Click to select a tree entry and show its properties in the panel to the right. When something is checked, it is visible. When unchecked, it is hidden. Right-click to access a menu with options for creating frontplates, backplates, groups, and switches, editing the selected entry, load sceneplates, select, deselect, and reposition tree entries, and view information about the selected entry.
Context Menu
Right-click within the Sceneplate Tree to access a context menu with the following options:
- Create Frontplate - Creates a frontplate, then provides attributes for setting various properties, size, position, and color correction.
Create Backplate - Creates a backplate, once a file has been selected from the Explorer dialog. Use the Properties Editor to set properties, size, position, and color correction.
Edit - Accesses a sub-menu with options for copying, pasting, duplicating, and deleting, along with others for pasting attributes and texture size, dealing with inline images sequence, and locking and unlocking sceneplates.
- Assets - Provides a sub-menu for editing the usage of external file references. These files are imported into the Scene Graph and are present within its structure.
- Load - Loads a previously saved sceneplate from a file.
- Save - Saves the selected sceneplate to a file.
- Create Group - Creates a group node to which you can add objects.
- Create Group from Selected - Creates a group out of the selected sceneplates. See Creating and Managing Backplates and Creating and Managing Frontplates.
- Create Switch - Creates a Switch node with only one child visible at a time.
- Create Switch from Selected - Creates a Switch node for the selected sceneplates.
- Remove all Groups - Removes all groups from the Sceneplate Editor.
- Move Up - Moves the location of the selected sceneplate up the tree.
- Move Down - Moves the location of the selected sceneplate down the tree.
- Select All - Selects all sceneplates in the tree.
- Deselect All - Deselects all sceneplates in the tree.
- Invert Selection - Takes all selected sceneplates and deselected then, while selecting the ones that were not selected.
- Show Information - Opens the Image Information dialog, containing the file path and origin, image, and camera specifications.
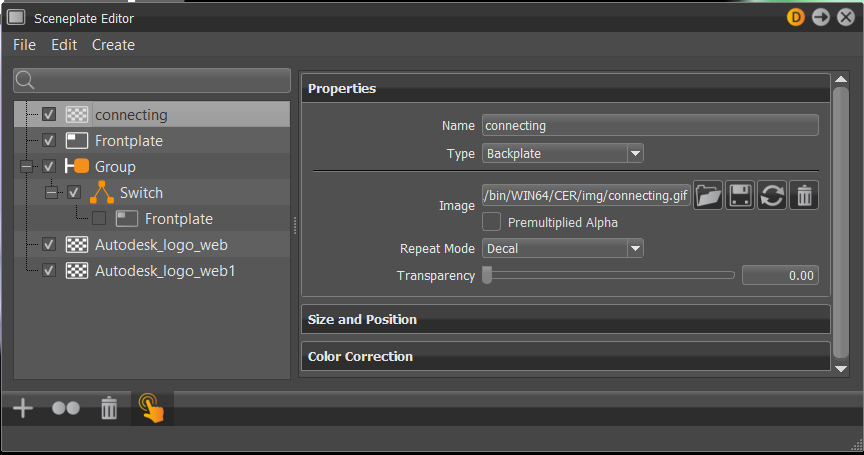
 Attributes
Use the attributes to set things such as sceneplate name, type, location, transparency, as well as size and position and color correction.
Sceneplate Location
Relative paths are used to define sceneplate location, instead of absolute. This way, no matter what version of VRED is open, the sceneplate will always be loaded.
Properties, Size and Position, and Color Correction
Provides options for setting and customizing sceneplate properties, size, position, and color correction. Enter a name, the type of sceneplate, image or text used. Control the transparency and set the repeat mode. Determine the position, offset, rotation, and size of the sceneplate. If any color correction is required, change the white balance, shift the hue, and tweak the contrast, brightness, and saturation.
 Icon Bar
Contains visual shortcuts for commonly used commands in the Sceneplate Editor.
 Create - provides a sub-menu with opens for creating frontplates, backplates, groups, and switches.
 Duplicate - Duplicates the currently selected node.
 Delete - Deletes all the selected nodes.
 Toggle WebEngine Interaction - Toggles the ability to interact with the WebEngine in the viewport.
Setting Per-View Options
Set different visibility options for each view. From the toolbar, select Window > New Render Window, to create more views. Click to select a view, then to any of the following:
- Right-click-hold Sceneplates and add a check to make the sceneplate visible in the selected view.
- Right-click-hold Sceneplates and remove a check to hide the selected sceneplate(s).
- Click Sceneplates. When highlighted, checked sceneplates are visible for the selected view. When not highlighted, all sceneplates in the selected view are hidden.
Setting an Image Sequence
Use an animated image sequence for a sceneplate. In the Sceneplate Editor, under Content Type, select Image, then click the folder icon and load an image sequence image. Check Use Image Sequence. It will ask if it should create animation.
If there is already animation on the image number, you are not asked about creating animation. Where did it come from? It is probably due to using key all when animating something else, such as a front plate.
Sceneplates with Transparent Images
Sceneplates with transparent elements use an additional alpha channel for storing the transparency data. There are two ways this alpha channel can be interpreted:
Straight Alpha - Only the alpha channel contains transparency information, while the RGFB color channels do NOT. This is widely used and simple. An issue arises, however, when using it in textures. A visible halo may be introduced around semi-transparent pixels, if no special precautions are taken.

- Pre-multiplied Alpha - The alpha channel contains transparency information and multiplies it into the other color channels. This makes it good for compositing and for textures; however, it is not widely supported.
Sceneplates support both image types. As most image files do not indicate which alpha representation is use, the Sceneplate Editor has a check box for manually setting the correct type. By default, it is set to Straight Alpha.
If you see dark borders around opaque areas, it is likely your image is a premultiplied alpha image, so enable Premultiplied Alpha.
If you see bright borders around opaque areas, your image might use a straight alpha image, but Premultiplied Alpha is enabled. Disable Premultiplied Alpha.
Using Web-Engines with Frontplates
Use web-engines as content for frontplates. After, you can use the color correction tools to change the white balance, brightness, contrast, hue shift, and/or saturation.
Frontplate Pick-Throughs
If you have a transparent plate with buttons, the transparent areas can be picked through. When you need to select the content, you can simply click through the frontplate. This means you don't need to hide the frontplate, make your selection, then turn visibility back on. Also, when using color correction, if the frontplate is selected, only it will be affected, even though you can interact with the content behind the plate.
Renderpasses
In the Renderpasses section, under Image Processing, you can select Frontplates and Backplates. This renders all the views, providing a backplate pass and frontplate pass, any empty views, and the full view. If you have four views, there will be four renders.
If you disable the backplates, you can see the backplate pass, the frontplate pass, etc.