Shotgun Assets
When a project is created, assets need to be added.
An asset in automotive is a chunk of work that needs to be done for an automotive project. Exterior body panels, wheels, or a door could all be assets.
Assets are broken up into different steps that need to be done to complete the asset. These steps are called tasks. These tasks are defined in a task template.
Adding Assets to a Project
- From the project menu bar, select Assets.
- Click the Create a new Asset button.
- In the Create a new Asset dialog, enter an asset name, description, and assign a task template.
- Click Create Asset.
The asset is created and appears in the list on the Assets page.

Uploading an Asset Thumbnail
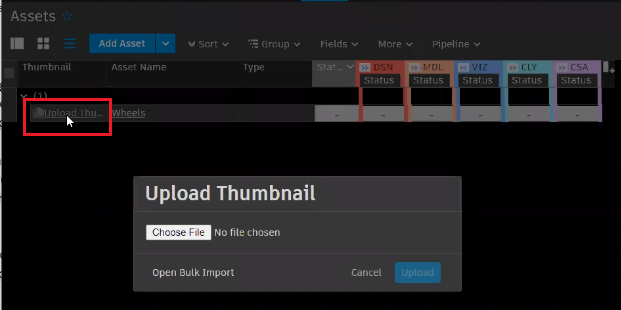
A thumbnail provides an image of the asset for easy identification.

-
In the Thumbnail column for your asset, click Upload Thumbnail.

-
In the Upload Thumbnail dialog, click Choose File, select an image, and click Open.
-
Click Upload.
Fields
Along the top of the Assets page are fields, such as Thumbnail and Asset Name. Shotgun provides an assortment of default fields in the Project templates.

In some fields, such as Type, if you hover over it, a small icon, called a List Field (![]() ), appears. Clicking the List Field opens a list of things. For Type, you may see Exterior and Interior in this list. List Fields are customizable.
), appears. Clicking the List Field opens a list of things. For Type, you may see Exterior and Interior in this list. List Fields are customizable.
![]()
Setting a Type
- Hover over the Type area of an asset.
- Click
 to access a list of types.
 - Select a type to set it.
Changing an Asset and a Task's Status
By default, an asset's Status field and all its tasks are set to Waiting to Start. As you start working, change these to show your progress.
- To change the status of an asset, hover over the Status area of the asset.
- Click
 to access a list of status options.
 - Select one to set the asset's current status.
- Hover over a task and click its List Field.
- Select a status option from the list to change its status.