About the Light Editor
Scene > Light Editor
Light Editor Rework Video Captions: In VRED 2021, we have reworked our Light Editor. It is now decoupled and have a full object-based Python API. More information can be found in the Python V2 documentation. Additionally, the Light Editor has an improved Search field, with a filter for the different light types. Also, editing values on multi-selection is now possible. So, you can, for example, select multiple lights and edit the color or intensity for all selected lights, in one go. In the Ghost Lines, you can now zoom and pan for better adjusting lens flair effects that are very close together. These improvements will make light setup more efficient. Thanks for watching the video.
Use the Light Editor to create and manipulate light sources in VRED. See a list of all light sources within a scene. For an empty scene, Headlight is the default light source. It is automatically disabled when a new light source is added. The headlight can be re-enabled in the Light Editor or using the Headlight button in the Icon Bar.
Another way to access the Light Editor is to right-click the empty space next to the Quick Access Bar and select it from the list.
The Light Editor has a left and right side. The left houses the Light Sources Tree View and Search field. The right contains two tabs, Light Settings and Image Processing. Along the bottom of the editor is the Icon Bar.
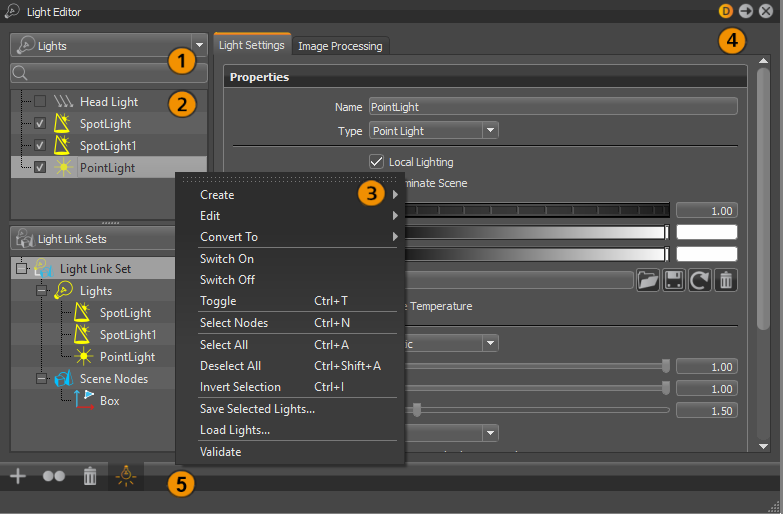
Search Field
 Use the Search field, found just above the Light Sources Tree View, to find lights by name. It has live-search capabilities.
Light Sources Tree View
 The tree is on the left and displays all scene-contained light sources. After selecting a light from the list, parameters, such as name, color, and intensity, appear on the right.
Context Menu
 Right-click within the left side of the Light Editor to access these options:
Create > Directional Light
Light rays from directional light sources are parallel, like sunlight. A directional light represents a distant light source and has no position, only a direction that affects how the scene is illuminated. Directional lights always create hard shadows.
Create > Point Light
Point light rays start at a single point, radially emits light. In Raytracing mode, the point light generates a hard shadow. In OpenGL, a point light shows no shadow.
Create > Spot Light
Spot light rays follow a beam cone. They start at a single point and spot in a circular area in the direction it is oriented. An area around the hotspot, defined by the penumbra property setting, is where the light falls off to darkness. It is often used to emphasize an object or a surface.
Create > Spherical Light
Spherical give off light rays as if from a glowing ball. A spherical light generates diffuse light and soft shadows. It provides indirect lighting and is more atmospheric and natural than a point light.
Create > Disk or Rectangular Light
Light rays from disk and rectangular light sources appear as if from a hole in the ceiling. The light appears in the shape of a circle (disk) or square (rectangular).
Create > Ray Light
Ray light files contain the simulated spatial and angular distribution and photometric or spectral information of emitted light from a complex light source.
Create > Group (Ctrl+G)
Creates a group node for creating a tree structure within the Light Editor tree, independent of the Scene Graph tree. Groups help to keep scene-contained light clearly arranged.
Edit > Rename (Ctrl+R)
Enables you to rename the selected light or group.
Edit > Duplicate (Ctrl+D)
Creates an independent copy of the selected light.
Edit > Delete (Del)
Removes the selected light or group.
Edit > Copy Lens Flare
Copies the lens flare from the selected light.
Edit > Paste Lens Flare
Pastes a copied lens flare on the selected light or group.
Edit > Inline Image Sequences
Packages inline image sequences within the .vpb file.
Edit > Group Selection (Ctrl+Shift+G)
Creates a group node where the selected lights are and pastes them as its children.
Convert to
Changes the selected light into another type of light.
Switch On/Off
Enables or disables the light.
Toggle (Ctrl+T)
Toggles the light on or off, depending on its previous state.
Select Nodes (Ctrl+N)
Selects the current node in the Scene Graph.
Select All (Ctrl+A)
Selects all the nodes in the Light Sources Tree.
Deselect All (Ctrl+Shift+A)
Deselects all nodes in the Light Sources Tree.
Invert Selection (Ctrl+I)
Inverts the current selection in the light list. Selects all deselected lights and deselects all currently selected lights.
Save Selected Lights
Saves the selected lights and preferences to an .osb file.
Load Lights
Loads previously saved lights from an .osb/.vpe/.vpb file.
Validate
Updates and validates all lights in the Scene Graph.
Light Settings
 Use these parameters to modify the light's settings.
Properties
Name
Displays the name for the selected light.
Local Lighting
Enables the light to illuminate only certain objects in the scene. See Light Link Sets, for a description on how to set up which objects should be illuminated.
Illuminate Scene
Toggles the illumination of object on and off. If you only need the light source to cast a lens flare, without actually adding light to the scene, you would uncheck this option. If Light Link Sets are defined for the light source, the light source should illuminate them, if switched on.
Intensity
Displays the relative strength or intensity of a light, where a higher value gives off more light.
Use Temperature
Uses the temperature value to determine the light's color values.
- Temperature - Simulates the light's color by using a Temperature value.
Diffuse Color
Sets the lighting color of a diffuse reflection (characteristic for light reflected from a dull, non-shiny surface). A diffuse color attribute specifies the color of the light diffusely reflected by the objects to which it is assigned.
Glossy Color
Sets the lighting color of a glossy reflection. A glossy color attribute specifies the color of the light reflected by the objects to which it is assigned.
Use Texture
Loads an image texture the light source projects into the scene. Not available for directional and ray lights.
Attenuation
Sets the falloff of the light intensity. Three values are available:
-
None - Keeps the intensity of the light constant, in relation to the distance of the light source.
-
Linear - Decreases light intensity linearly, in relation to the distance of the light source.
-
Realistic - Decreases light intensity quadratically, in relation to the distance of the light source to an illuminated object.
Material Shadow Intensity
Sets how dark or intense the material shadows cast are and their color.
Ground Shadow Intensity
Sets how dark or intense the ground shadows cast are and their color.
Map Filter Radius
Sets the radius used for filtering the shadow map lookup in OpenGL.
Map Resolution
Sets the quality of OpenGL shadow maps. Higher values increase the quality.
Illuminate Shadow Material
Illuminates the shadow material. The shadow material needs to have its reflection mode set to Diffuse Only, Glossy Only, or Diffuse + Glossy for this option to work correctly.
Cast Shadow on Shadow Material
Only available for Raytracing. Allows lights to cast shadows on shadow materials.
Importance Multiplier
A value higher than 1 increases the probability that the light source emits photons at the photon mapping. Great for rather dark light sources in an interior, if the incident light comes from outside Environments.
Ray File
These options are only available when a Ray Light is selected.
There are two ways to use ray files for illumination:
-
Use Photons for Direct Lighting - This (photon mapping) is the easiest to use. The rays in the ray file are traced like photons. The limitation of this approach is that the ray light is not visible in reflections or when looking directly into it.
-
Evaluate Ray Lights -This needs the surface with the ray origins for the rays stored in the ray file. This surface needs a material applied to it with Evaluate Ray Lights enabled. In the ray file, Use Photons for Direct Lighting must be disabled. The surface now becomes the light source and evaluates the data stored in the ray file when another ray hits the surface. Since a ray is infinitesimally small, it will never hit the origin of another ray stored in the ray file from the direction of the ray file. Therefore, Radius, Cone, and Offset are used to define a region in which to search for rays in the ray file.
Ray File
Specifies the ray file to use. Use any of these options:
-
 opens a file browser and loads an IES profile from a file.
 -
 opens a menu with a list of Ray files in the scene.
 -
 removes the currently loaded Ray file.
Use Light Spectrum
Ignores the spectrum of the rays and uses only the light spectrum for all rays, instead.
Use Random Sampling
Uses random sampling of the rays. Use when there is more than one luminaire in your scene.
Use Photons for Direct Lighting
Toggles whether to use photo mapping for direct lighting or not.
-
If enabled, rays stored in the ray file will just be traced like photons. However, ray lights are not visible in reflections or when looking directly into them.
-
If disabled, ray lights can be used without photon mapping, but the surface must be defined with Evaluate Ray Lights on. These surfaces will then act as light sources, using all the ray files within the given radius.
Emitter Cone
Reduces noise by controlling the size of an emitter cone used to vary the direction of emitted photons from ray lights. This increases the number of photons that can be generated during tracing. You get smoother images, while only sacrificing a bit of accuracy. It also clamps colors outside the color gamut.
| Before Emitter Cone Changes | After Emitter Cone Changes |
|---|---|
 |
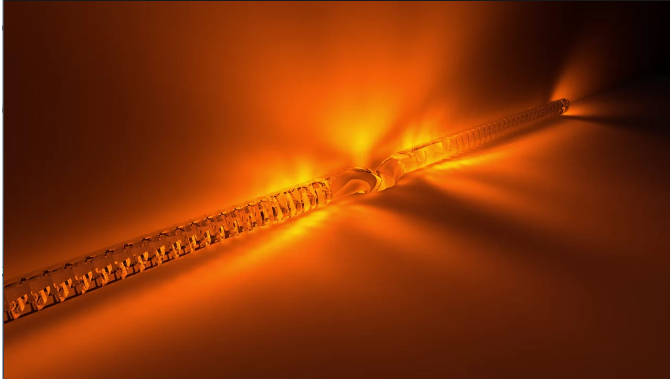 |
Since the quality of Ray files depends on the number of photons stored in the file, you want to create noise-free images. But, these require many photons - often more than what is commonly available in a Ray file. This is where the Emitter Cone options comes in.
Visualization Raycount
Sets the number of the rays emitted by every final gathering point.
Visualization Raylength
Sets the length of the rays emitted by every final gathering point.
Cone
Defines a cone around the direction of a ray in the ray file. If a ray is found, it contributes to the illumination.
Radius
Defines the radius of a sphere around the hit point used for searching for ray origins in the ray file.
Offset
Defines an offset along the surface normal for the radius sphere, which helps with inaccuracies in the modelling of the surface.
Ray File Info
Provides information on the file, such as the luminosity, number of rays, global scaling factor, and spectral info.
Area Light
These options are only available when a DiskLight, RectangularLight, or SphericalLight is selected.
Primary Visibility
When enabled, the light is directly visible with the eye. When disabled, it is not be directly visible.
Visible in Reflections
When enabled, the light is visible in any reflections. When disabled, it is not visible in reflections.
Interactive Quality
Sets number of samples used to evaluate the light in interactive rendering.
Still Frame Quality
Sets number of samples used to evaluate the light in stillframe rendering.
Use Cone Angle
This option is only available when a DiskLight or RectangularLight is selected.
Toggles the cone angle settings on or off. When enabled, the following options are available:
Cone Angle
Sets the light beam’s angle from one edge to the other, measured in degrees.
Penumbra Angle
Controls the light edge’s falloff in degrees. This feature can be a positive or negative value.
Light Profile
Use Light Profile
Enables a light profile from an imported file to be used. When toggled on, the following options are available:
IES Profile
Defines where the light profile is located. Clip the Browse icon to the right to locate the .ies file.
Set Profile Shape
Uses the shape information from the .ies file for the selected light.
Profile Info
Displays information for the selected light, such as lumens per lamp, number of lamps, candela multiplier, etc.
Visualization
Display Light
Shows or hides the selected light source representations in the Render Window.
Scale
Scales the light source representation to better fit the Render Window.
Transform
Position
-
Get from Camera - Sets the light’s position and direction to the current camera’s position and direction.
-
Apply to Camera - Sets the camera’s position and direction to the values of the currently selected light source.
-
Get from Node(s) - Positions the light by using the node’s transformation properties.
Image Processing
Not all lights will have image processing parameters. Point and Spot will, since lens flares can only be enabled for them.
Lens Flare
Use presets or create custom lens flares. Use the Lens Flare parameters for making global changes to all lens flares. Right-click in a blank area to access a context menu.
Lens flare is an effect attached to a light (Point or Spot) and affect image processing. It is available in OpenGL and raytracing render modes and added as a post process. Use the Lens Flare parameters to globally adjust color, size, intensity, radius, and angular intensity. For control of individual Lens flare elements, such as shape and color, use the Custom preset.
Since lens flares can be created only for point and spot lights, select one to access the Image Processing Lens Flare parameters.
- To set parameters on individual elements, you'll need to create the elements, then set them. See the section to follow.
- To reposition a lens flare, select the light source, then from the menu bar, use the Transform tool.
Enable
Enables or disables the lens flare applied to the selected light.
Lens Flare Presets
Contains a list of the following assorted lens flare presets, which can be easily applied to your scene. The selected preset is applied to the selected point or spot light.
- Head Lamp Blue Steel
- Head Lamp Ring Burst
- Tail Lamp Ruby Red
- Tail Lamp Radical Red
- Sun Warm
- Sun Cool
- Street Lamp
It is also possible to start from scratch by selecting Custom to create your own lens flares. Use the other presets' attributes as a base for your custom lens flare. Doing this will not override the preset. Elements can be created for your custom lens flare. See the Ghost Line section of Elements that follows for more information.
Use Light Properties
Always uses the Intensity of the light settings. This only affects the color and applies to the selected light source's lens flares. When disabled, the color set in the Image Processing tab's Color option is used globally.
Color
Changes the color of all lens flares. The color selected is multiplied with any element color already assigned.
If Use Light Properties is enabled, the color set here is ignored and the light color is used.
Since this color is multiplied with element color assignments, there may be instances where a lens flare disappears, due to the multiply operation. If this occurs, try changing the color of the individual lens flares (instead of using this option) or change the color of this option.
If there are no element assigned colors, this color is assigned to all lens flares.
Size
Changes the size of all lens flares.
Intensity (Lens Flares)
Changes the brightness of all lens flares.
Radius
Changes how dispersed the flare is for all lens flares. The radius represents the virtual size of the light sources, since the lights do not have geometry. A larger radius requires a larger object to completely occlude the effect. Shrinking of the lens flare will start when the radius around the light source starts to get occluded by an object. That occlusion also decreases the intensity of the ghosts. As the radius increases, the intensity of the light decreases. As the radius decreases, the flare becomes more intense and defined.
Angular Intensity
Changes the brightness of the flare, as the angle changes. As the light source is rotated toward the viewer, becoming perpendicular to the view, its intensity increases. It is like how intense a sunset gets as it reaches the horizon, just before setting. Another example would be turning a flashlight's beam toward you. From your point of view, as the light aligns with your view, it becomes more intense, to the point of blinding.
Context Menu
Right-click in a blank area to access a context menu, select Create Element, then an element from the list. Once an element is created, options appear for renaming, duplicating, and editing it.

For more information on elements, see About Lens Flares and Elements.
Icon Bar
 Use the icons in this toolbar to create, duplicate, delete, or toggle a light on or off.
How to Create a New Light
Select Create New Light. This opens a menu for selecting and creating the type of light or making a light group.
How to Duplicate a Selected Light
Select Duplicate Selected Light. This creates a duplicate of the selected light and places it below the original in the Scene Graph and Light Sources Tree.
How to Delete a Selected Light
Select Delete Selected Light. This deletes the selected light.
How to Toggle a Light On and Off
Select Toggle Light. This turns the light cast by the selected light on or off.