Working with Bake Light and Shadows
Use the Bake Light and Shadows module, Visualization menu, and UV Editor to create precomputed light and shadows on vertices and textures. Since baking is complex, this topic provides tips, recommendations, and explanations that we hope you will find helpful when dealing with lightmaps and vertex baking.
Selecting a Bake Type
There are two Bake Type options for baking. Check out the sections below to determine which is best for your needs.
Vertex Baking
Vertex baking is for objects already finely tessellated, or with adequate subdivisions. An advantage of the vertex bake type is you can bake shadows from the environment, a simple lighting setup, or a neutral pure diffuse look, all in a very fast way, without requiring any manual reworking.
If objects don't have fine tessellation, the geometry can be subdivided to acquire better bake results. One thing you need to avoid or check for is self-intersections of the mesh, which result in dark spots. Disable displacement textures in materials before subdividing.
Keep the following in mind:
- Subdividing will add more triangles, negatively impacting VR, raytracing, UV editing, and data quality.
- Photon mapping cannot be used to do for vertex baking.
- Cloned geometry will always share the same bake result.
- Since architecture has many planar surfaces, vertex baking is not recommended; therefore, use texture baking.
Texture Baking
Texture baking is good for simple, flat geometries. It provides high-quality lightmaps, while only having a rough tesselation of geometries, like construction data and architecture. Also use it to bake more complex lighting effects, such as reflections or caustics from nearby glass or specular materials. Just ensure Hide Transparent Objects is disabled, so these objects will then be visible during baking. It is also possible to create lightmap variants, which can be toggled quickly, by using Repath lightmaps and/or the Python API.
Lightmap UVs are needed for texture baking, so for complex or important objects in direct view, we recommend manually unwrapping UVs. To edit the UV sets for a lightmap, use the UV Editor.
Caustics can be baked as part of indirect illumination, preferably with more than 16 indirections. The number of indirections is essentially an override of the Trace Depth of the raytracer during baking.
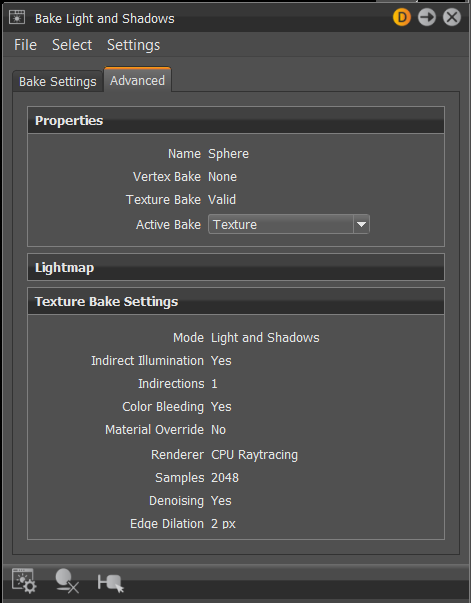
Though it may take longer to calculate and requires more work upfront, the texture bake type delivers a more accurate result than vertex, without affecting the geometry. It is especially good for shadowing of anything with fine detail that is hard to display with vertex baking. Photon mapping can be used to improve difficult lighting scenarios and is also a requirement for baking Ray Lights.
Active displacement textures are evaluated during baking. However, if Indirect Illumination has Override Material enabled, the material assignments will be replaced during baking by a flat diffuse material of a chosen color. Ensure it is disabled, if you want to bake displacements into lightmaps.
With texture baking, a clone can have different lightmaps. Therefore, if you have a cloned wheel on the left and right side of a car and the vertex bake type is selected, they will all have the same bake result as the first selected in the Scene Graph (might be too light for the shadow side of the car). However, with a texture baking, you can store lightmaps on different clones. Ensure Share lightmaps for clones is unchecked, so you don't need to unshare as you would with vertex baking.
Finally, baking of different lighting setups can be saved externally as .exr files, using Save Lightmaps. These files can then be edited in an external image editing program.
Enabling Ambient Occlusion
Use ambient occlusion if you want quick shadows without an elaborate lighting setup or for a neutral appealing look that increases the realism of geometry in your scene. It approximates the real world by making shadows similar to those cast by an overcast sky. It darkens cracks, creases, corners, and points of contact.
Ambient occlusion is a rendering trick, not physically accurate, that samples a proportion of a hemisphere occluded by other geometry and shades the pixel accordingly. It does not simulate light bouncing off or through objects, but works even if there are no lights in the scene.
-
In the Menu Bar, click Scene > Bake Light and Shadows.
Note:If Bake Light and Shadows is not listed, in the Menu Bar, turn off Simple UI.
-
In the Bake Settings tab > General section, select Ambient Occlusion.
-
Set the weighting and its minimum and maximum distance.
-
To view the results, choose one of the following. Keep in mind, these are pre-processing calculation done during data preparation. Results are baked onto the geometry's vertices or into its texture.
- Calculate All - Calculates the ambient occlusion for all visible and selected nodes and their child nodes.
- Calculate Missing - Calculates the ambient occlusion for nodes that weren't included in the last ambient occlusion pass. Save time by not having to search for all missing visible and selected nodes and their child nodes.
Since the smoothness of the ambient occlusion depends on the detail level of the geometry, VRED offers several ways to increase the quality on low-level geometries, such as subdividing triangles for vertex baking and pre-defined quality presets in the Direct Illumination section of the module.
Differences in Indirect Lighting in Ambient Occlusion and Shadows Modes
When using Ambient Occlusion or Shadows modes, there are differences between vertex and texture baking results from baking indirect light.
With vertex, a neutral calculation for baking the indirect light in Ambient Occlusion and Shadows is used. After baking, an environment factor (the average color from the HDR modified by color correction and exposure settings from the environment) will be applied to adjust the backed indirect light to the current active environment in real-time rendering. This means the environment can still be changed after baking.
With texture, the environment factor will be also multiplied in real-time rendering, after baking. However, the current lighting situation, which might not be neutral, is used to bake the indirect light. Therefore, to achieve a neutral result for the indirect light in the Ambient Occlusion mode, use a white/neutral HDR while baking to reproduce the vertex baking method. You can still toggle through different environments, even though the indirect light was baked with a specific light situation of the scene.
Tips for Environment Lighting and Shadows
Since the dominant light source in OpenGL and raytracing precomputed rendering modes is often the environment, the shadows usually need some work. Try the following to improve shadows for the environment lighting in these modes:
-
Use one or more real-time light sources extracted from the environment image. Try Material Editor > Environment > Shadow Lightsource.
-
Use Screen Space Ambient Occlusion; however, it is only available for OpenGL through the Visualization menu > Advanced OpenGL Settings.
-
Bake ambient occlusion, shadows, or light and shadows.
- Ambient Occlusion baking is based on how much the objects in the scene occlude each other.
- Shadows baking takes into account the lighting directions from the active environment and active lightsources.
- Light and Shadows baking also takes into account the current light in the scene. To view baked shadows and ambient occlusion, use the Visualization menu > Ambient Occlusion Rendering option.
Please note, environment shadow light sources can be used in combination with baking, however, they should be used only with ambient occlusion or a neutral shadow baking (and optionally indirect illumination).
Do not combine environment shadow light sources with the baked Light and Shadows results. This would produce doubled lighting from the environment, since baked and real-time light sources would be included.
Precomputed Illumination Rendering for Light and Shadows
The content in the table below provides the visible differences seen with Precomputed Illumination Rendering when lights and shadows are baked, based on your render mode and whether vertex or texture baking. Use Precomputed Illumination Rendering to preview what has been baked.
For example, if you are in OpenGL and have baked lights and shadows using texture baking, the Precomputed Illumination Rendering mode will display baked direct light and baked indirect light if it was enabled.
To see what was baked, use the Bake Light and Shadows > Advanced tab, which contains options for seeing what was already baked.
| Render Mode | Displayed Baking for Vertex | Displayed Baking for Texture |
|---|---|---|
| OpenGL, RT Precomputed, and RT Precomputed + Reflections | Baked direct + indirect light
|
Baked direct + indirect light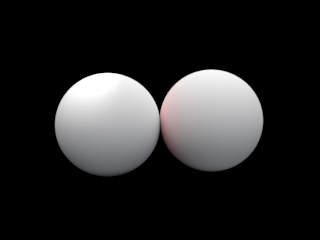
|
| RT Precomputed + Shadows | Baked indirect light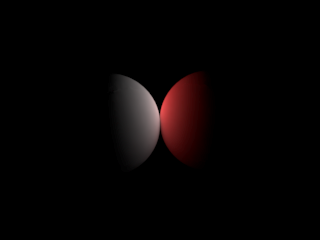 Known Issue: This should display baked direct + indirect light. However, currently ONLY baked indirect light is displayed if enabled. |
Known Issue: This should display baked direct + indirect light. However, currently NO baked light is displayed. |
| RT Precomputed + IBL | Baked indirect light Indirect light is displayed ONLY when enabled. |
Limitation for Precomputed Illumination Rendering: This should display indirect light ONLY. But, the lightmap stores the sum of direct and indirect illumination; therefore, the indirect light cannot be displayed on its own. |
| RT Full GI | No baking is displayed. Photon map or Final Gather map are displayed, only if Photon Tracing was enabled. | No baking is displayed. Photon map or Final Gather map are displayed, only if Photon Tracing was enabled. |
Direct and Indirect Illumination from the Environment
Direct and indirect illumination from the environment and other light sources can be baked. Direct illumination comes from all active light sources, including the environment; whereas indirect illumination is light reflected by nearby objects onto a baked object. Also, for additional information, see Differences in Indirect Lighting in Ambient Occlusion and Shadow Modes.
To view baked illumination, use the Visualization menu > Precomputed Illumination Rendering option when the current selected render mode uses Precomputed Illumination (e.g., Raytracing Full Global Illumination does not use baked illumination; therefore, baked illumination cannot be used while in Raytracing Full GI mode).
Precomputed Illumination Rendering for Ambient Occlusion and Shadows
The content in the table below provides the visible differences seen with Precomputed Illumination Rendering when ambient occlusion or shadows are baked, based on your render mode and whether vertex or texture baking. Use Precomputed Illumination Rendering to preview what has been baked.
For example, if you are in OpenGL and have baked ambient occlusion using texture baking, the Precomputed Illumination Rendering mode will display no baking/black result or baked indirect light if it was enabled.
To see what was baked, use the Bake Light and Shadows > Advanced tab, which contains options for seeing what was already baked.
| Render Mode | Displayed Baking for Vertex | Displayed Baking for Texture |
|---|---|---|
| OpenGL, RT Precomputed, RT Precomputed + Reflections, RT Precomputed + Shadows, RT Precomputed + IBL | Baked indirect light Indirect light is displayed ONLY when enabled. |
Baked indirect light Indirect light is displayed ONLY when enabled. |
| RT Full GI | No baking is displayed. Photon map or Final Gather map are displayed, only if Photon Tracing was enabled. | No baking is displayed. Photon map or Final Gather map are displayed, only if Photon Tracing was enabled. |
How Bake Results are Applied During Rendering
This is how bake results are applied during rendering:
-
Ambient occlusion and shadows are multiplied over a real-time environment. Indirect illumination is multiplied by the diffuse color of the object and added on top.
-
When only indirect illumination (no direct light from the Light and Shadows mode) is baked, this indirect illumination is brightened or darkened by the exposure of the current environment.
-
Baked direct lighting replaces the diffuse part of the real-time environment in precomputed modes (OpenGL, raytracing Precomputed, Precomputed + Reflections, and Precomputed + Shadows).
Previewing Lighting
Before baking, use the options in the Visualization menu to preview lighting that will be baked. Use Raytracing Full Global Illumination. Specifically, check the Renderpasses Rendering > Illumination Channels > Diffuse Indirect Illumination. As the number of indirections set in the Bake Light and Shadow module will override the Trace Depth during baking, the trace depth reflects the number of indirections needed for the bake calculation to achieve the same result like in Full Global Illumination.
Once light sources are baked using Light and Shadows, those light sources need to be switched off (or at least in their diffuse contribution, e.g, set diffuse light color to black) after the baking. This will ensure there is no double lighting on objects; otherwise, there will be light from both baking and the real-time light source. Remember to enable the light again when re-baking!
If you want to change the materials during baking, try Use Override Material. By enabling the override, you get a neutral looking bake that does not incorporate material properties, such as glossiness and colors. All solid objects in the scene get a flat diffuse material with a chosen color during baking.
Glass objects, semi-transparent objects, and the shadow plane are not overridden.
Best Practices for UVs
Before working with UVs on an object, use Scene > Optimize > Optimizations > Unify Vertices, then click Optimize. This merges duplicate vertices that have the same value for all properties. It can improve the speed of OpenGL rendering and UV Editor calculations.
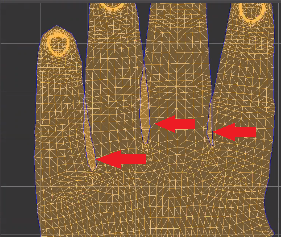
Guidelines for Lightmap UV Unwrapping
-
Avoid too many islands and distortion; however, use as much of UV space as possible.
-
Avoid overlapping UVs.
-
Use UV Sets > Copy to Lightmap UV Set in the UV Editor to reuse material UVs as a starting point. This copies the material UVs to the lightmap UV Set.
-
Place seams only in areas that are not visible in 3D.
-
Provide padding (a few pixels) between islands to avoid the color from one island bleeding into its neighbor. This distance, however, should be kept as small as possible. The padding in UV space correlates to the chosen lightmap resolution. Padding can be smaller in UV space for a bigger texture resolution because the pixels are smaller. We recommend 4px island padding and 2px for edge dilation.
-
Change the island structure before redoing UVs with Unfold from the use of Triplanar Projection, which created islands. Sew all islands, using Ctrl-A (Sew Islands in Island mode) and make new cuts, or delete the UV set.
-
For shells, we recommend one island per surface as a starting point. Use Sew Islands (or Sew UV Edges) to combine islands, creating larger ones and reduce the number of seams. By default, a lightmap UV set is empty. When using Unfold & Layout on an empty UV set, the whole object is treated as one large island, if the triangles are connected in 3D. The individual islands for the surfaces are gone. At this point, it can be helpful to have each surface as an island as a starting point. This can be done one of two ways:
-
By default, shells with multiple surfaces have one island per surface in their material UVs after import. In this case, copy the Material UVs to the Lightmap UVs.
-
Enable component selection (Selection tool > Component), then in the Scene Graph, select all surface nodes of the shell. In the UV Editor, use Unfold & Layout to unfold all surface nodes, individually. Finally, select the shell node again and continue working on that.
-