About the Material Editor
Scene > Material Editor
Use the Material Editor to create, modify, and group materials within VRED. For information on specific materials, see the Materials section.
The Material Editor is comprised of the following:
 Materials Section (Selector)
 Tags Section (Selector)/Tree View
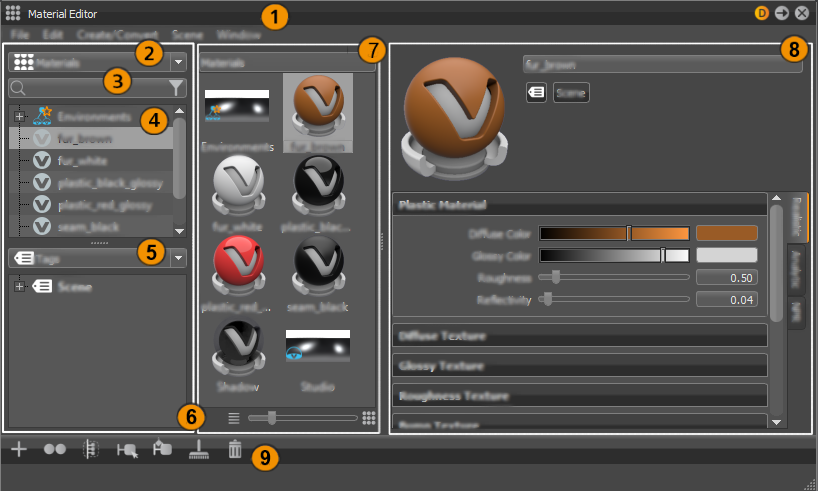
Menu Bar
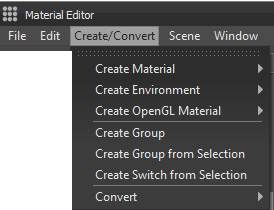
File
Contains options for loading and saving materials, loading animation to the Materials Editor, rendering preview images, and viewing statistics.
-
Load Materials - Loads a previously saved material from a file.
-
Save Materials(s) - Saves the selected materials to a file.
-
Load Animation To Materials - Applies a saved material animation to the selected material nodes.
-
Render Preview Images - Renders the preview images of all materials, depending on the used mode, either in OpenGL or Raytracing. The previews are usually created when needed, which can result in delays while scrolling through the preview list. Creating all previews explicitly takes a bit of time and avoids delays.
-
Statistics - Shows some important statistics about the materials used within the scene, such as the number of materials and textures and amount of memory used by the materials.
Edit
Contains options for copying, pasting, merging, referencing, optimizing, removing, locking/unlocking, and compressing and decompressing.
-
Copy - Copies the selected material to the clipboard.
-
Paste - Pastes a material saved on the clipboard into the material tree.
-
Duplicate - Creates a unique copy of the selected material.
-
Delete - Deletes the selected material.
-
Merge Duplicate Materials - Deletes copies of a material and only uses one, when two materials of the same type and settings are available. This also updates any material references on objects, so they use this one material.
-
Remove Unused Materials - Removes materials not referenced by an object from the material tree.
-
Reference Unused Materials - Creates a reference to any unused materials, so that they are not erased by commands such as Remove Unused Materials.
-
Optimize Materials - Optimizes materials to improve render performance.
-
Optimize Textures - Optimizes textures to improve memory performance.
-
Remove All Groups - Removes all material group nodes and places the materials in the top level of the material tree.
-
Scroll to Selected - Scrolls to the selected material. This is useful when working with large lists of materials.
-
Lock/Unlock - Prevents or allows the material to be modified.
-
Compress/Uncompress Textures - Compresses or decompresses textures to save memory or improve speed.
Create/Convert
Contains options for creating and converting materials, groups, switches, and environments.
-
Create Material - Creates a Truelight Material. Select materials from its list. See the Materials section for a full listing of available materials and options within VRED.
-
Create Environment - Creates an environment map material. Select environments from its list.
-
Create OpenGL Material - Creates a OpenGl material. Select OpenGL materials from its list.
-
Create Group - Creates a new empty material group node.
-
Create Group from Selection - Creates a material group node filled with the selected materials.
-
Create Switch from Selection - Creates a material switch filled with the selected materials.
-
Convert - Converts the selected material of one type into another.
Scene
Contains options for dealing with selecting things within a scene.
-
Select Nodes - Selects the geometry nodes assigned to the currently selected materials.
-
Add Nodes to Selection - Extends the selection in the Scene Graph to include nodes with the currently selected material.
-
Apply Selection Nodes - Applies the currently selected material to the selected geometry nodes in the Scene Graph.
Window
Contains the Groups/Tags, Preview, Attributes options for changing the appearance of the Material Editor. When an option is checked, that component is added to the editor. When unchecked, it is removed.
All Components
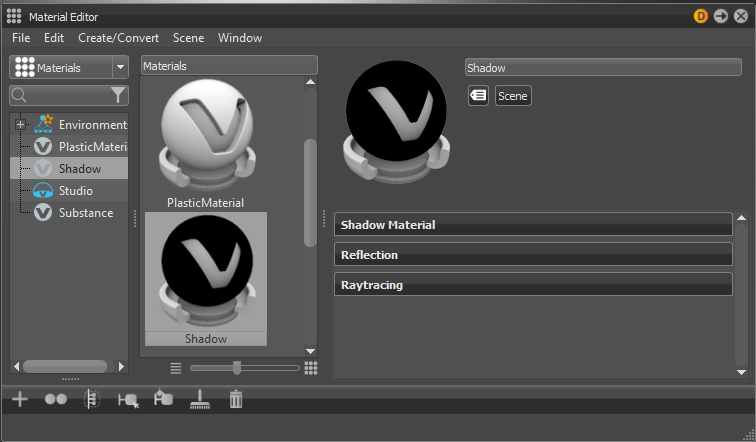
Groups/Tags Disabled
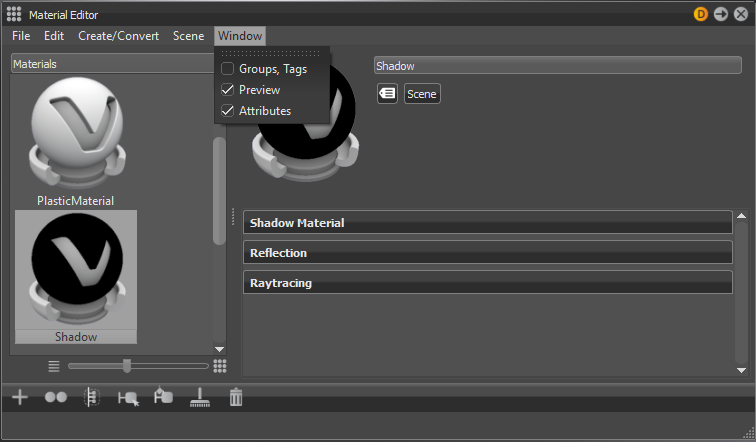
Groups and Tags Pane
Shows the logical sorting and listing of the currently created materials. This is comprised of the Materials/Tags Selector, Search Bar and Filter, Material Tree, and Tag Tree.
Materials and Tags Sections

Sets whether a section will be Materials or Tags. Click the selector to pick which view is shown in which section. By default, one shows Materials and the other, Tags.
Materials Tree View
![]()
Lists all the materials and groupings within the scene. Third-party material types can be easily identified by their icons. OCS materials are identified with  , Substance with
 ![]() , and X-Rite with
, and X-Rite with ![]() .
.
Right-click within the Materials section to access an assortment of options. See the Context Menu for a list of these options.
Tags Tree View
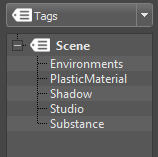
Lists all tags found in the scene materials. By clicking a tag, the preview is filtered by materials with the selected tag. Tags can be defined in the general section, next to the material in the Attributes window or by dropping the material on a tag. Dropping a material group on a tab assigns the tag to the entire group.
Right-click within the Tags section to access the following options:
- New Tag
- Add to Selected Materials
- Remove Tag from Material
- Remove Tag
- Remove All Tags
Search Bar and Filter

Conducts searches or filters for materials and tags. These can be searched for by name, using the Search Bar, or by material type, using the filter icon to the right of the search input box. The icon turns orange when a filter is active.
Materials Preview Pane
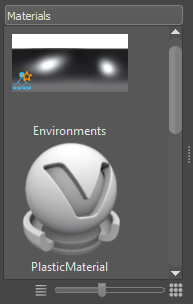
Shows a visual listing of the materials, depending on the selection. Click something in the Materials Tree. When a material group is selected, only the materials in that group is shown. If no material groups are selected, then the entire listing of scene materials is shown.
- Slider - Changes the size of the previews. At the bottom of the Materials Preview Pane, drag the slider to increase or decrease the size of the previews.
Context Menu
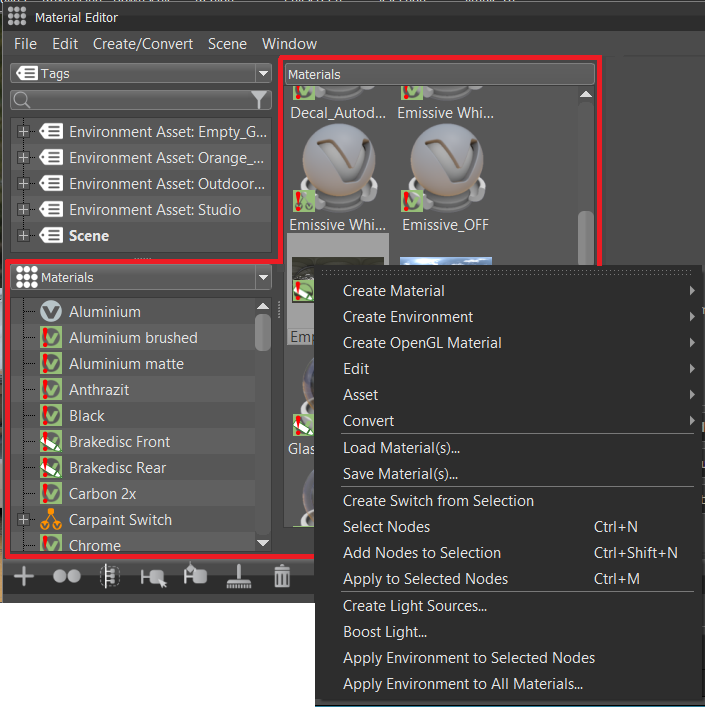
Contains quick shortcuts to commonly used Material Editor functions. Right-click in the Materials section and Material Preview pane to access the following options:
Create Material
Creates a material. Choose from a large list of materials. See the Truelight Materials Reference section, for information on each material and its use.
Create Environment
Creates an environment map material. Choose from Sphere Environment, Skylight, Substance Panorama, and Environment Switch.
Create OpenGL Material
Accesses a sub-menu for opening or creating an OpenGL Chunk material. See About OpenGL Materials - Chunk Material for more information.
Edit
Accesses a sub-menu with options for copying, pasting, duplicating, and deleting, along with others for pasting attributes and texture size, dealing with inline images sequence, and locking and unlocking materials.
Asset
Provides a submenu for editing the usage of external file references. These files are imported into the Scene Graph and are present within its structure.
Modify
Makes it possible to change the selected object. The object's icon changes to Modified Assets (modified asset).
Save in Asset Manager
Saves the selected asset within the Asset Manager.
Reload from Asset Manager
Updates the selected asset from the Asset Manager.
Remove Link
Breaks the link from the node of the selected asset to the Asset Manager.
Convert
Accesses a sub-menu with options for converting the selected material into a TrueLight material, Phong Truelight material, Skylight, or Sphere Environment.
Load Material(s)
Loads a previously saved material from a file.
Save Material(s)
Saves the selected materials to a file.
Create Switch from Selection
Creates a switch with only the selected tree items.
Select Nodes
Selects the geometry nodes assigned to the currently selected materials.
Add Nodes to Selection
Extends the selection in the Scene Graph to include nodes with the currently selected material.
Apply to Selected Nodes
Applies the currently selected material to the selected geometry nodes in the Scene Graph.
Create Light Sources
(Only available when Environment materials are selected) Opens the Create Light Sources from HDR module to add lights to your environment. Once the module opens, click the Create New Light Source button.
Boost Light
(Only available when Environment materials are selected)
In some outdoor HDRs, the sun is too dark compared to the sky. This leads to incorrect lighting that's bluish look, with shadows that aren't contrasted enough, etc.
Use the Boost Light dialog to repair an HDR. All values in the HDR above a threshold (e.g., 95% of maximum value) are scaled up by a user-defined boost. Use this to make the sun brighter, compared to the rest of the HDR.
If you choose to apply your boost settings to the environment, this action is not undoable, as the pixel values in the HDR are actually modified (overwritten).
Apply Environment to Selected Nodes
(Only available when Environment materials are selected)
Applies the environment to all materials of the selected Scene Graph geometry. This is a quick way to apply the same environment to a part of the model, such as a car exterior.
Apply Environment to All Materials
(Only available when Environment materials are selected)
Applies the environment to all materials in the Material Editor. Material types, such as Plastic, Brushed Metal, and Carpaints, use the environment for image-based lighting. Use the dialog that appears to assign the environment to only materials with a certain name.
For example, if you select an environment called “Skylight” and enter nothing in the dialog, all materials are assigned the Skylight environment. However, if you enter “Studio”, all materials currently assigned the Studio environment, now are assigned Skylight.
By default, all materials are assigned the default Environments switch. This means they use the environment that is currently active in the switch. When assigning a specific environment to a material, they will always use that environment, instead.
Attributes Pane
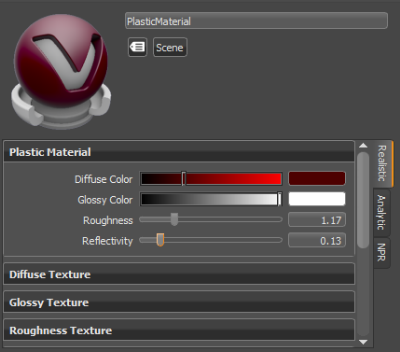
Shows all available settings for the currently selected material, along with a preview of the material. Any tags associated with the material are listed to the right of the preview.
Material Attributes
Descriptions for the following most noteworthy material attributes can be found in About the Substance Attributes:
Shadow Attributes
Descriptions for the shadow attributes can be found in Shadow.
Environment Attributes
Descriptions for the following environment attributes can be found in About the Substance Attributes:
For HDR Light Studio attribute definitions and explanations, see HDR Light Studio.
Icons Bar
![]()
Contains visual shortcuts for commonly used commands in the Material Editor. The order of the icons is:
-
 Create - Creates a material.
 -
 Duplicate - Duplicates the currently selected material.
 -
 Create Group - Creates a group the from selected material(s).
 -
 Select all nodes - Selects all nodes with the currently selected material applied.
 -
 Apply - Applies the selected material to all currently selected nodes.
 -
 Remove - Removes all unused materials.
 -
 Delete - Deletes the currently selected material.
Keyboard Shortcuts
There are several hotkeys available for the Material Editor:
-
Select Nodes
<Ctrl + N> -
Add Nodes to Selection
<Ctrl + Shift + N> -
Apply to Selected Nodes
<Ctrl + A> -
Create Group
<Ctrl + G> -
Create Group from Selection
<Ctrl + Shift + G> -
Scroll to Selected
<Ctrl + Shift + F> -
Copy
<Ctrl + C> -
Paste
<Ctrl + V> -
Rename
<Ctrl + R> -
Delete
<Del> -
Remove Unused Materials
<Ctrl + U> -
Optimize Materials
<Ctrl + O> -
Optimize Textures
<Ctrl + Shift + O> -
Lock
<Ctrl + L> -
Unlock
<Ctrl + Shift + L>
 Menu Bar
 Search Bar and Filter
 Materials Tree View
 Groups and Tags Pane
 Materials Preview Pane
 Attributes Pane
 Icons Bar