Virtual Reality Preferences
Find out about the Virtual Reality preferences for customizing settings for general VR interaction, teleport, and HMD use.
Edit > Preferences > Virtual Reality
Use the Virtual Reality preferences to customize interaction setting for visualization, tooltips, object collision, and teleport, as well as eye tracking, foveated rendering, and StarVR use. These options can be found in one of two tabs, Interaction or HMD. Once everything is set, click Apply.
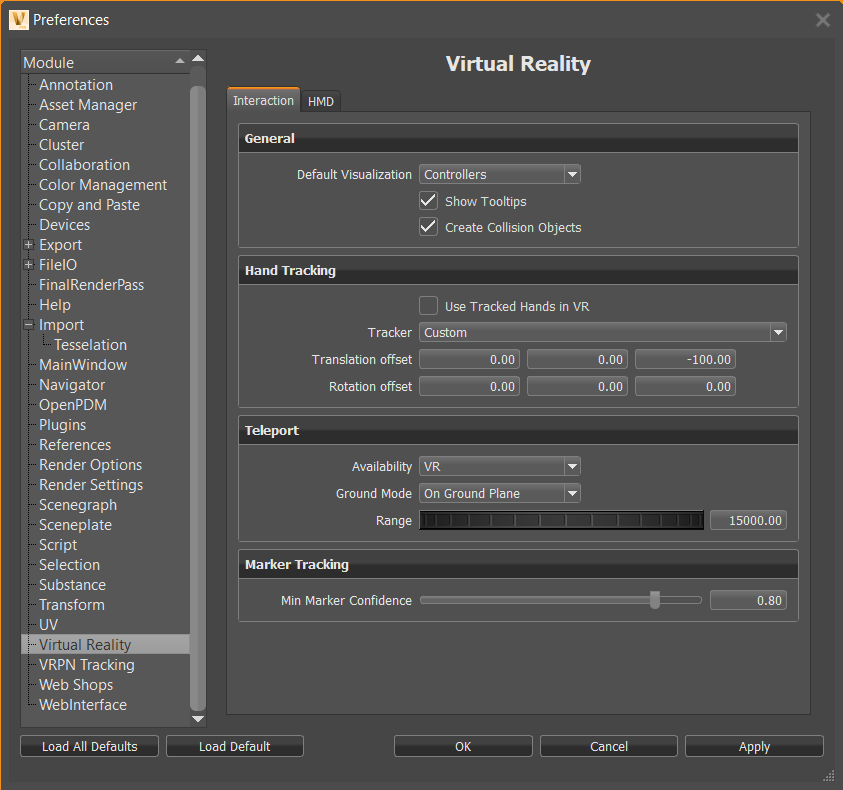
Interaction
Use these parameters to set the default general, hand tracking, teleporting, and marker tracking interactions in VR.
General
Default Visualization
Sets whether the initial session starts with VR hands or controllers displayed.
Show Tooltips
Sets the default visibility behavior for controller tooltips. By default, this option is toggled on, displaying tooltips for the controller.
Create Collision Objects
Sets the default state for the creation of collision objects for all touch sensors and WebEngines in the scene. When disabled, you cannot interact with touch sensors and WebEngines when using VR Hands.
Hand Tracking
Only available for Varjo XR-3 users.
Sets the default state for enabling hand tracking and setting translational and rotational hand offset for tracked hands.
For Varjo XR-3 users, enabling hand tracking in the preferences automatically activates it for VR or MR.
Use Tracked Hands in VR
Only available for Varjo XR-3 users.
Sets the default to always track hands in VR when enabled. If Tracker is set to Varjo Integrated Ultraleap, hand tracking is also enabled in MR for supported HMDs.
Tracker
Only available for Varjo XR-3 users.
Sets the default system used for hand tracking.
-
Varjo users need to enable Varjo Integrated Ultraleap.
-
To use other hand tracking devices, select Custom.
Setting up Hand Tracking for Other Devices
For the Custom Tracker option, you must provide all the tracking data to VRED's Python interface. How to do this can vary from device to device; however, if you can access the tracking data via Python script, the data needs to be set into the
vrdTrackedHandobjects returned by the methods used. This requires the transformation data of the tracked hand and/or different finger joints (see theexternalHandTracking.pyexample file for how this works).For testing, set the corresponding preferences, load the script, and enter VR. You may have to modify the script by changing values for hand and/or joint transforms to understand how everything works.
Translation offset
Set the default translational tracking offset from the hands. Use this to adjust any offset between the tracked hands and the hands rendered in VR.
Rotational offset
Set the default rotational tracking offset from the hands. Use this to adjust any offset between the tracked hands and the hands rendered in VR.
Teleport
Sets the default state for the teleporting mode and range.
Availability
Sets the default mode in which you can teleport. Choose from only teleport in VR or in both VR and MR.
Ground Mode
Sets the default mode when teleporting to teleport onto models or into and around them.
To teleport into a vehicle or anywhere on the ground plane, select On Ground Plane. When On Geometry is selected, you can teleport onto geometry, but not into it.
Range
Sets the default limit for how far you can teleport within the scene.
Marker Tracking
The marker tracking system detects each marker and assigned a confidence value to it, ranging from 0.0 to 1.0.
-
0.0 means the system deems the detected result (marker ID and position) 100% incorrect.
-
1.0 means the system deems the detected result (marker ID and position) 100% correct.
For example, a marker that gets a value of 0.9 means there is a 90% confidence in the correctness of the marker's position and IDs.
-
A marker with a low confidence value appears to be jumping around. Setting the minimal accepted confidence to a higher value makes the system ignore unreliable detected results.
-
A marker that was detected with high confidence value, but later is detected to have a confidence value lower than the minimum value will be ignored and its position will not be updated.
For more information on using markers, see Markers in Mixed Reality.
Min Marker Confidence
Sets the default minimum value used by the marker tracking system to determining if the detected marker position is correct.
HMD
Use these parameters to set the default HMD settings for eye tracking, foveated rendering, and HMD-specific options. These are disabled by default.
Eye Tracking
VRED currently supports eye tracking for the HTC VIVE Pro Eye and the StarVR headsets.
Sets the default eye tracking behavior. This is disabled by default. When enabled, the HMD tracks your eye movement. This data is used by Foveated Rendering when it is enabled to determine which areas need high-resolution rendering.
Foveated Rendering
The OpenGL Shading Rate extension is required for Foveated Rendering and is only available on NVIDIA RTX cards (Turing architecture).
This improves performance by reducing the peripheral image quality and is used with Eye Tracking.
Foveated Rendering
Sets the default foveated rendering state. This is disabled by default. When enabled, eye-tracked areas are rendering in high resolution and peripheral areas in low resolution.
This option is currently not supported for Varjo and StarVR headsets. For other headsets that don't have eye tracking, you can enable the Foveated Rendering preference option for VR. However, since your eyes cannot be tracked, the foveal region will not move. It will remain fixed to the center of the image.
If a message appears regarding the OpenGL Shading Rate Image extension, this is because Foveated Rendering is only available on NVIDIA RTX cards (Turing architecture).
Foveal Region Size
Sets the default size of the foveal region, which is oval shaped.
A new Python service vrHMDService has been added for access to foveated rendering settings.
Shading Quality
Sets the default level used for foveated rendered shading. There are three image regions with foveated rendering that can be rendered with different shading qualities:
- Inner - The foveal region
- Middle - The transition zone between the inner and periphery
- Periphery - The outer periphery region
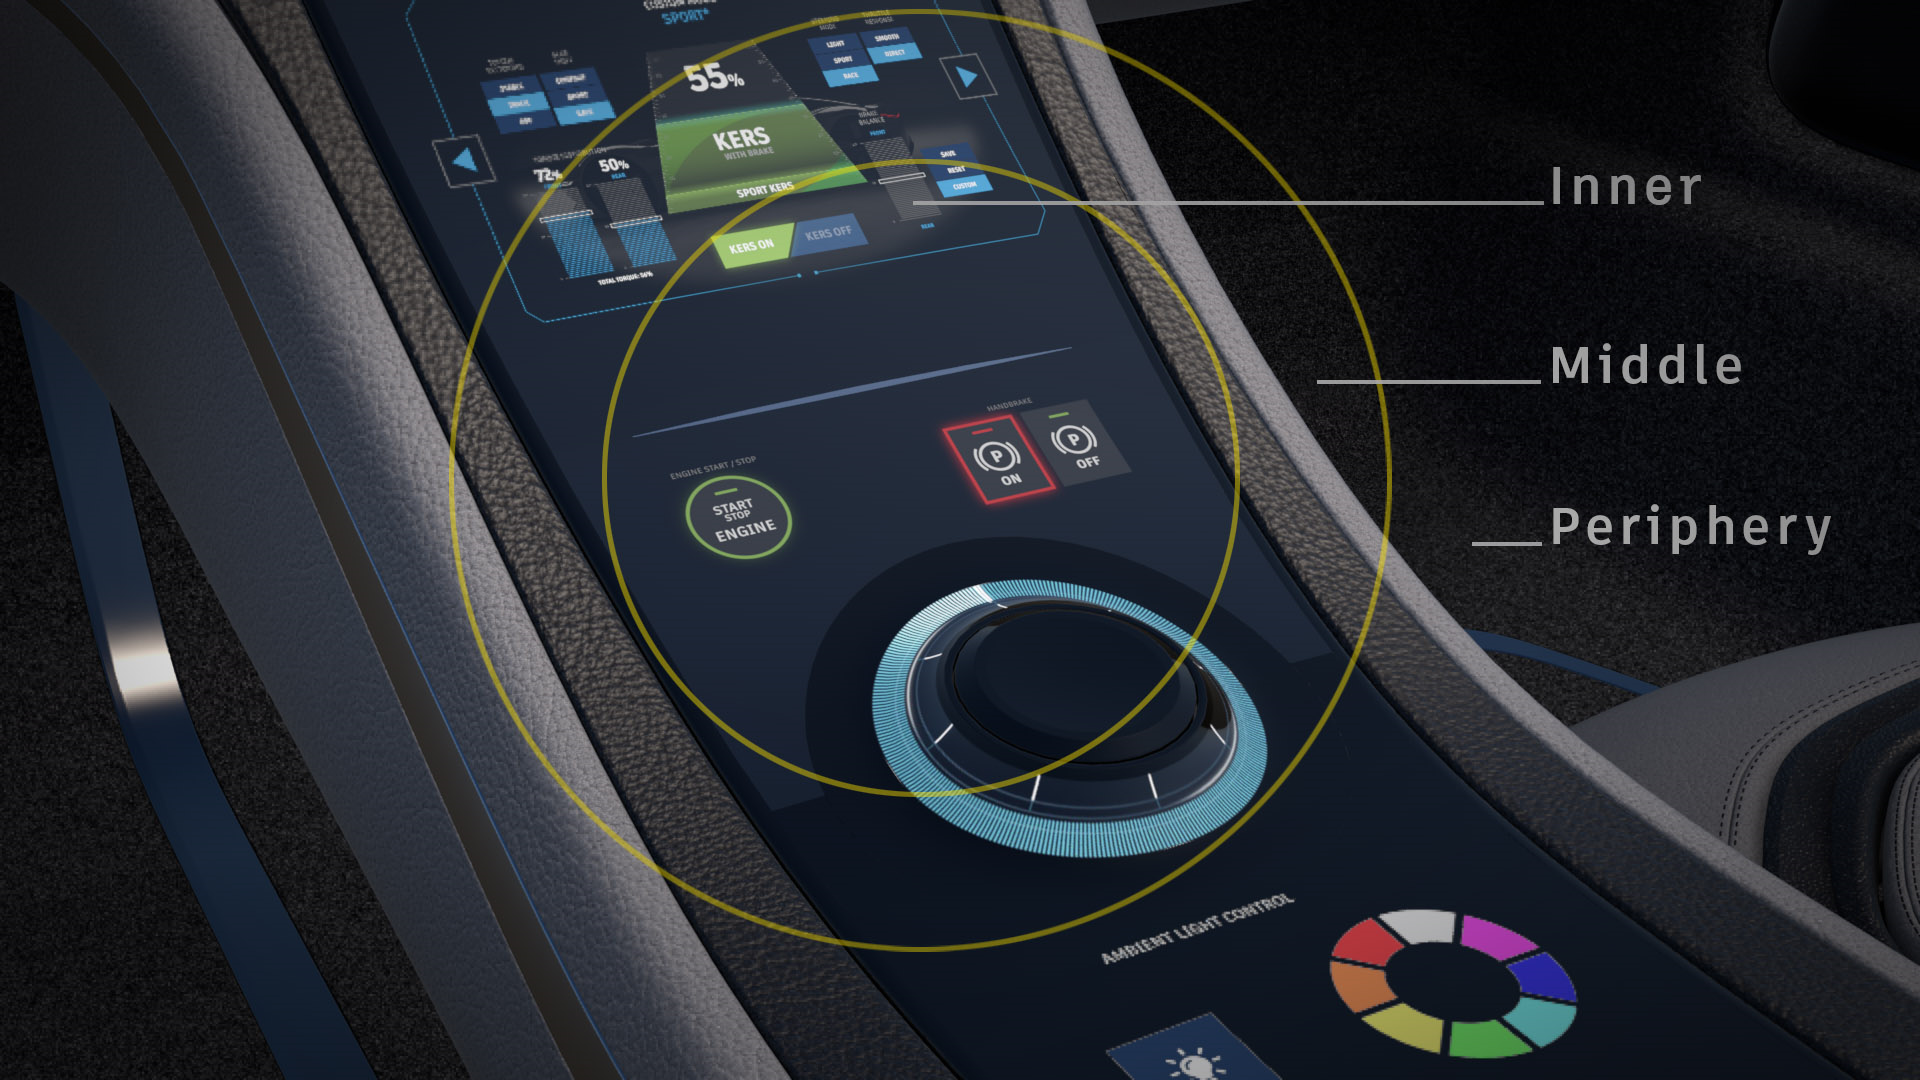
The above rendered image shows the following qualities:
- Inner - 4 Samples (supersampling shading with 4 samples per pixel)
- Middle - 1 Sample (native pixel shading 1x1)
- Periphery - 1 Sample per 4 Pixels (coarse shading with 1 sample per 4x4 pixel block)
Use either a preset or select Custom to set up your own shading qualities. Normally, the innermost region is rendered with the best quality, compared to the other two, with the periphery being the lowest.
Highest Performance
Uses a lower visual quality, but provides the highest performance, by using coarse shading in the periphery.
Balanced and Highest Quality
Improves the visual quality, which is especially noticeable for materials with small repeating patterns, such as the Carbon material, or with certain textures.
Visual quality is improved due to the use of supersampling shading qualities, which can be 2x (2 Samples), 4x (4 Samples), or 8x (8 Samples).
The supersampling shading quality only takes effect if at least the same amount of samples are rendered with multisample antialiasing (realtime antialiasing).
A hint is displayed next to the Shading Quality setting in the Foveated Rendering preferences providing the minimum number of required samples. Activate the level of realtime antialiasing that has a sufficient number of samples. By default, Low uses 2, Medium 4, and High 8 samples.
For example, if the hint indicates that at least 4 samples are needed, activate either Medium or High realtime antialiasing. The Realtime Antialiasing samples can be changed in the preferences (Edit > Preferences > Render Options > Visualization Advanced tab > Realtime Antialiasing Presets).
The specific qualities of the presets are:
| Preset | Inner (Foveal) | Middle Quality | Periphery Quality |
|---|---|---|---|
| Highest Performance | 1 Sample | 1 Sample per 4 Pixels | 1 Sample per 16 Pixels |
| Balanced | 4 Samples | 1 Sample | 1 Sample per 4 Pixels |
| Highest Quality | 8 Samples | 4 Samples | 2 Samples |
Custom
Provides full control over individual qualities and exposes the Custom Quality section.
Custom Quality
Sets the default custom foveated rendering shading quality for the inner, middle, and periphery image regions.
- Inner - The foveal region
- Middle - The transition zone between the inner and periphery
- Periphery - The outer periphery region
Select one of the following options for each parameter:
- 1 Sample - This is the standard shading quality which doesn't use foveated rendering.
- 1 Sample per 4 Pixels and 1 Sample per 16 Pixels - Shaders with lower shading qualities are evaluated less often. The result of a material evaluation is used for multiple pixels (e.g., 1 Sample per 4 Pixels is coarse shading with 1 sample per 2x2 pixel block).
- 2 Samples, 4 Samples, 8 Samples - Materials with higher shading qualities are evaluated up to 8 times per pixel.
Displacement materials with accurate silhouettes are currently always evaluated with standard shading quality.
StarVR
These settings are specific to a StarVR HMD. Once your preferences have been set, click Apply and OK to save these settings.
Native Foveated Rendering
Requires Eye Tracking to be enabled.
When disabled, renders without foveated rendering. Without foveated rendering, the viewing area is split into a front and side viewport for each eye, so the scene is rendered 2 times per eye. Enable the Single Texture per Eye option to render only one texture per eye.
When enabled, the following parameters are exposed:
-
Foveated FOV factor - Only available when Foveated Rendering is enabled. Defines the percentage of the whole field-of-view per eye used for the high-resolution area. For example, is the FOV factor is 0.35 = 35% of whole eye FOV used for eye tracked Render Window.
-
Foveated Resolution Scale - Only available when Foveated Rendering is enabled. Sets the resolution scale factor for high-resolution, foveated, areas.
-
Non-Foveated Resolution Scale - Only available when Foveated Rendering is enabled. Sets the resolution scale for low-resolution, full FOV, non-tracked, areas. Should be lower than 1.0.
Front View Resolution Scale
Only available when Non-Foveated Rendering is enabled. Sets the resolution scale for front Render Windows in non-foveated rendering mode.
Side View Resolution Scale
Only available when Non-Foveated Rendering is enabled. Sets the resolution scale for side Render Windows in non-foveated rendering mode.
Single Texture per Eye
Only available when Non-Foveated Rendering is enabled. Toggles the use of only one texture per eye in non-foveated rendering mode, instead of the two textures, front and side.
Varjo
These options are specific to a Varjo HMD for settings the default native foveated rendering state, the mode you enter, and hand depth.
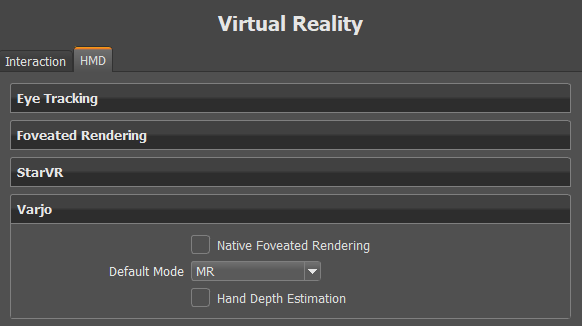
Once your preferences have been set, click Apply and OK to save these settings.
Native Foveated Rendering
Requires Eye Tracking to be enabled.
Sets the default state for how things in the periphery are rendered. When enabled, peripheral resolution (image quality) is reduced; however, areas tracked by your eye are still rendered at high resolution. This improves performance in scenes with compute intensive materials, and when using real-time antialiasing. For more information on foveated rendering and the different settings, see Custom Quality.
Default Mode
Sets the default viewing mode for a Varjo HMD. If you always work in mixed reality, set this to MR.
Hand Depth Estimation
Sets the default state for real-world hands in MR. When enabled, it detects your real-world hands in the mixed reality video and shows them in front of a virtual object, if they are closer than the object. When disabled, the rendering from VRED will always occlude the real hands, even if the hands are closer than the rendered object.
| Hand Depth Estimation OFF | Hand Depth Estimation ON |
|---|---|
 |
 |