About the Scene Graph
Scene > Scenegraph
Use the Scene Graph to show all the nodes and references in a scene, organized in a tree structure. Imported files are highlighted in green. The root node is at the top of the structure and is a parent to all other nodes in the scene. The root node is a group node and cannot be deleted, renamed, or otherwise edited.
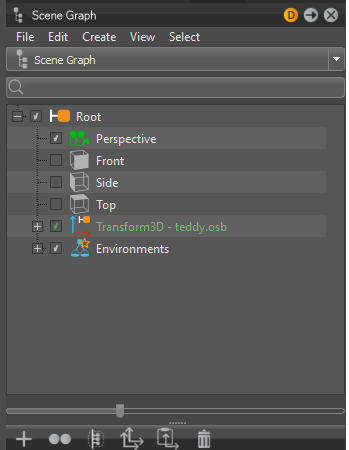
The Scene Graph has a menu, search, and icon bar, options for displaying the Scene Graph library tree view or scene tags, and slider for expanding the node hierarchy.
From the Menu Bar, select Scene > Scenegraph or in the Quick Access Bar, click  Graph.
Menu Bar

The Menu Bar contains these menus for working with nodes and references in the Scene Graph:
View Filter
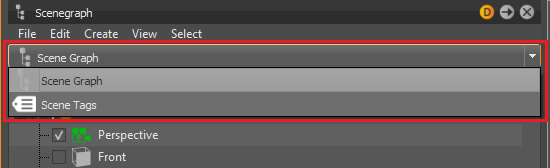
Click the section found below the Menu Bar to change what is displayed in the Scene Graph.
-
Scene Graph - Changes to a tree view of the nodes and references in the scene.
-
Scene Tags - Helps with associating scene tags with nodes in the Scene Graph. In the Render Window, use scene tags to filter content and quickly isolate it.
Search
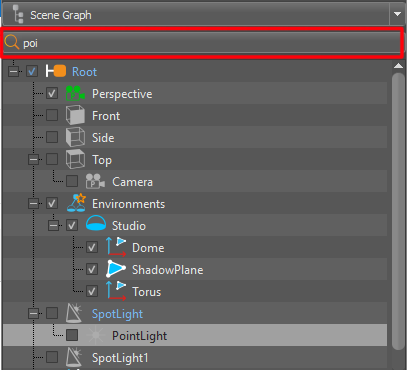
Use the Search field at the top of the Scene Graph to find nodes. Regular expressions are supported.
Tree View
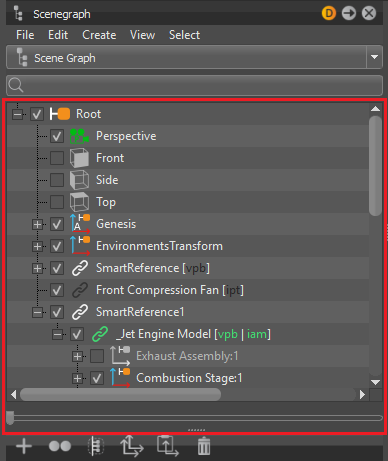
If the Tree View is not displayed, click the View Filter section and select Scene Graph.
Use the Scene Graph to do the following and more:
See Working with the Scene Graph for more ideas.
The Scene Graph Context Menu
Right-click within the Tree View to access the following options:
Create
Provides a list of things to create, such as different types of geometry, lights, cameras, as well as groups, shells, matrix transforms, material groups, environments, etc.
See How to Create a Node for an explaining of these options.
Edit
Provides a list of things to edit, such as different types of surfaces, geometry, animation, as well as options for renaming, removing select nodes, etc.
See the Scene Graph Edit Menu for an explaining of these options.
Asset
Provides a submenu for editing the usage of external file references. These files are imported into the Scene Graph and are present within its structure.
Modify
Allows to make changes to the selected object. The object's icon changes to  (modified asset).
Save in Asset Manager
Saves the selected asset within the Asset Manager.
Select all Occurrences
Selects all incidents of the chosen asset in the Scene Graph.
Find in Asset Manager
Selects the related asset within the Asset Manager.
Reload from Asset Manager
Updates the selected asset from the Asset Manager.
Remove Reference
Removes the reference connection to the Asset Manager. The asset itself is deleted, using this action.
Convert To
Changes the selected node into what you have selected, such as a group, matrix transform, material group, switch, etc.
References
Provides access to the Reference options.
Load
This option needs at least one unloaded reference to be selected.
For smart references, it opens the selected unloaded smart reference VPB file into VRED, displaying it in the viewport. Its status is updated in the Reference Editor and Scene Graph. Use this for memory/performance management during a session.
For source references, it triggers the reimport of the selected unloaded source reference VPB file into VRED, displaying the Import File(s) dialog. After import, it is displayed in the viewport. Its status is updated in the Reference Editor and Scene Graph. Use this for memory/performance management during a session.
Multi-selection is supported for this option, but undo is not.
Unload
This option needs at least one loaded reference to be selected.
It closes the selected loaded smart reference file from your scene, removing it from the viewport. Its status is removed from the Reference Editor and Scene Graph. Use this to unload unneeded content from memory to improve performance during a session.
Multi-selection is supported for this option, but undo is not.
Repath
Changes the path of the current references to a new storage location. Repath looks in the new location for file names matching the reference names. If the file cannot be found, the Repath dialog appears for locating the file.
Multi-selection is supported for this option, but undo is not.
Remove
This option needs at least one selected reference.
Removes all reference attributes and combines the content of the selected reference into the current VPB. Converts the reference into a Transform node.
Multi-selection is supported for this option.
Convert to Smart Reference
This option is ONLY available for source references, empty references, and VRED nodes, such as groups.
Does one of the following:
-
With a source reference or empty reference selected in the Reference Editor, it converts the reference into a smart reference that has yet to be saved. Use Save Smart Changes to save it.
-
With a VRED node, such as a group, selected in the Scene Graph, it takes the currently selected VRED node, converts the node to a smart reference for saving the contents of node to a separate file (VPB).
Multi-selection is supported for this option.
Create Smart
This option is disabled if a smart reference is already unloaded.
Select one of these two options for creating a smart reference:
-
New - Creates a smart reference empty node, named SmartReference, below the selected node. If no selection is made, the new node is added to the end of the list.
-
From File - Creates a smart references from a VPB file that is imported into VRED.
(Re)Import Smart
This option is disabled if a smart reference is not selected.
Reimports the selected smart reference file. Use this to update an out of date smart reference.
Multi-selection is supported for this option, but undo is not.
Select one of the following:
- Selected - Reimports the selected smart reference.
- Outdated - Reimports only outdated smart references.
- Unloaded - Reimports only unloaded smart references.
Replace Smart
Replaces the current smart reference with a user-chosen one.
- With a smart reference or smart-source reference selected, select a reference. This links and imports the new reference, renaming the referenced VRED node. The source reference is updated, depending on the loaded smart reference.
If the new link exists in the current scene, a clone is created. This action cannot be undone.
Repath Smart
This option needs at least one saved smart reference.
Changes the path of the current smart references to a new storage location. Repath looks in the new location for file names matching the reference names. If the file cannot be found, the Repath dialog appears for locating the file.
-
When a single childless reference is selected, select a new directory.
-
When references with children are selected or multi-selections are made, the Repath dialog appears for locating the file(s).
Multi-selection is supported for this option, but undo is not.
Delete Smart
This option needs at least one selected smart reference.
Deletes the smart reference.
Multi-selection is supported for this option.
Open Smart in Explorer
This option needs at least one saved smart reference.
Opens an Explorer window at the smart reference file location.
Save Smart Changes
This option is disabled if a smart reference is not selected or already unloaded.
Saves selected smart reference changes made in the VRED session.
Multi-selection is supported for this option, but undo is not.
Save Smart As
This option is disabled if a smart reference is not selected or is already unloaded.
Saves changes made to a selected smart reference in VRED, creating a new file.
This action cannot be undone.
Create Source
Creates a source reference node. When a reference is selected, a source node is created as a child of it. Select a file and click Open.
(Re)Import Source
This option is disabled if a source or smart-source reference is not selected.
Does one of the following:
-
When a source reference is selected, it reimports the selected source reference file, updating the out of date source file. The status of the source file will change from out of date to Up to date.
-
When a smart-source reference is selected, it reimports the selected source file and marks the reference as modified. The status changes from Out of date to Up to date for the source reference.
When the Import dialog appears, locate the source file and click Import.
Multi-selection is supported for this option, but undo is not.
Select one of the following:
- Selected - Reimports the selected source reference.
- Outdated - Reimports only outdated source references.
- Unloaded - Reimports only unloaded source references.
Replace Source
Replaces the current source reference with a user-chosen one.
-
When a source reference is selected in the Reference Editor, select a file, then the new file is imported. The reference VRED node is renamed to that of the new file.
-
When a smart-source reference is selected in the Reference Editor, select a file, then the selected source file is reimported. In your scene, the smart reference will display an asterisk, indicating it has been modified, but has yet to be saved to disk.
This action cannot be undone.
Repath Source
This option is disabled if there are no references with source links selected.
Changes the path of the current source or smart-source references to a new storage location. Repath looks in the new location for file names matching the reference names. If the file cannot be found, the Repath dialog appears for locating the file.
-
When a single childless reference is selected, select a new directory.
-
When references with children are selected or multi-selections are made, the Repath dialog appears for locating the file(s).
Multi-selection is supported for this option, but undo is not.
Delete Source
This option needs at least one selected source reference.
Deletes the source reference.
Multi-selection is supported for this option.
Open Source in Explorer
This option needs at least one selected source reference.
Opens an Explorer window at the source reference file location.
Hide
Hides the selected node.
Show/Hide
Toggles the selected node on or off.
Show Last Hidden
Shows the last hidden node. This is great for quickly locating and turning on a node when working with a large and complex model.
Hide Subtree
Hides the selected node and its subtree.
Show Subtree
Shows the selected node and its subtree.
Hide All
Hides everything in the Tree View, but has no effect on the Viewport.
Show/Hide All
Shows and hides everything in the Tree View. Use it to view your nodes after using Hide All.
Set To A Side
Sets the selected nodes as A sides, so they are visible in the Viewport.
Set To B Side
Sets the selected unneeded shapes and components as B sides, to hide them in the Viewport and avoid re-loading these files.
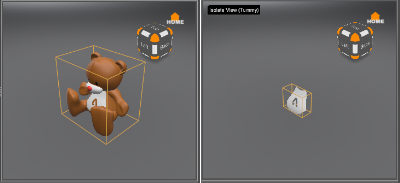
Isolate View Selected
Shows only the selected node in the Viewport. To see your entire model, select the top node of our model, then Isolate View Selected.
View In New Renderwindow
Opens a new Viewport (Render Window), displaying the selected rendered node.
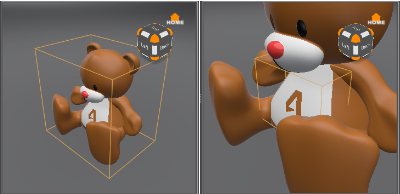
Zoom To
Zooms the Viewport into the selected node's geometry.
Show Components
Shows the individual patches for objects (only Surfaces and Shells).
Selectable
Toggles the selection mode of a node and its children on or off. If nodes are deselectable, they cannot be modified in the Viewport. Mouse interaction with the deselectable node is not possible, such as applying a material by drag and drop or flipping normals. However, the touch sensors can still be used, such as annotations and measurements with the deselectable nodes. The object’s icon changes from  (selectable) to
  (deselectable). To deselect things, use Deselect All.
Select All
Selects all parent nodes in the Scene Graph, excluding the root node. (Ctrl+A).
Deselect All
Deselects all nodes in the Scene Graph. (Ctrl+Shift+A).
Select Subtree
Selects the current node and its child nodes in the Scene Graph.
Select Parent
Selects the parent node for the selected node in the Scene Graph.
Select All Clones
Selects all clone nodes of the select node in the Scene Graph.
Select All Transformable Clones
Selects all transformable clone nodes of the selected node in the Scene Graph.
Select All In Same Level
Selects all nodes that are at the same level in the tree. For example, you want to select all 3rd generated child nodes. If you have a large project, this would be time consuming. However, if you select one, then use Select All In Same Level, all are selected immediately.
Invert Selection
Switches from what is selected to everything else. In the tree, the inversely selected nodes will highlight blue. In the Viewport, if Boundings is active, the select geometry will change. (Ctrl+I).
Invert Selection in Group
Switches the selection from the things selected in the group to what wasn't selected. (Ctrl+Shift+I).
Grow Component Selection
(Surfaces/Shells only) Expands the currently selected nodes to include neighboring patches. (>).
Shrink Component Selection
(Surfaces/Shells only) Deselects patches that have unselected neighbor patches. This is the inverse of Grow Component Selection (<).
Find
Opens the Find pop-up window. Any objects matching the criteria are selected. (Ctrl+F).
Scroll to Selected
Scrolls through the Scene Graph to the selected node. (Ctrl+Shift+F).
Information
Opens Node Information, which displays an assortment of details regarding the selected node or reference. Click OK or the X to close it.