Working with Scripts
VRED Professional supports custom Python modules (script plugins). Use the Script Editor (Edit > Script Editor) for creating and editing scripts and script plugins and the Terminal (View > Terminal) to view messages and commands. For more information on Python scripts, please check the Python Documentation.
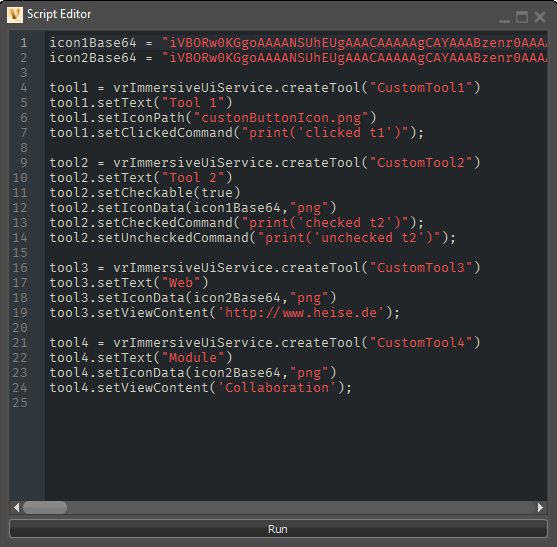
Here's what you can expect from the Script Editor:
- Dark theme
- Fira Code font to make the coding experience better
- Highlighted syntax
- Ligatures support, so multiple characters appear to combine into a single character: "!=", ">=", "==>", "www"
- Autocomplete for VRED python commands
-
Ctrl+Fsearch functionality - Find and Replace functionality
-
Ctrl+G GoTo Linefunctionality
How to Create and Edit Scripts
Use the Script Editor, found under Edit > Script Editor, for creating and editing scripts.
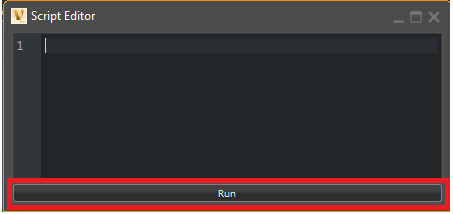
How to Run a Script
Use either the main VRED window or Script Editor to run a script.
- From the main VRED window, in the Menu Bar, select Edit > Run Script to run the script currently in the Script Editor.
- From the Script Editor, click Run.
How to View Messages and Run Python Commands
Use the Terminal window to view errors and warnings, as well as run Python commands.
- To open the Terminal, in the Menu Bar, select View > Terminal.
- To save the output to a file, right-click inside the Terminal and select Save output.
About the Scripted Custom Python Modules (Script Plugins)
VRED Professional supports custom Python modules (script plugins). Once your script plugins have been copied to a specific location (see How to Create a Scripts Menu Option), they are automatically loaded during the next VRED start-up. You will find all your script plugins listed in the newly created Scripts menu.
We've provided an example module with VRED (see Load an Example Script), so you can test this out and create a Scripts menu option.
How are Script Plugins Handled?
Script plugins are created to be independent from VRED's 'Main' context, which every Python code executed in the Script Editor, Terminal, or Script preferences, or scripts loaded together with VPBs run in. Script plugins are not affected by creating a new scene, unlike the 'Main' context, which is, and is flushed and reset to its default state.
Every Python command executed in the Terminal or Script Editor will not influence plugins or interfere with each other.
How to Update a Plugin
To update a plugin, use Edit > Reload Script Plugins and close any open window of the plugin, since the running code in memory cannot be updated. Edit a plugin, close its window, then initiate Edit > Reload Script Plugins to update the plugin.
If the plugin needs to do some house keeping when its unloaded, try this new callback function:
def onDestroyVREDScriptPlugin():
    """
    onDestroyVREDScriptPlugin() is called before this plugin is destroyed.
    In this plugin we want to stop all processes.
    """
    streamingPlugin.deleteAllProcesses()
This example is from QtQuickStreaming.py.
Script plugins have access to VREDPluginWidget, VREDMainWindow and vrMainWindow. Those are copied into the globals of each plugin when loaded or re-loaded.
With the Script Editor, things need to be handled a bit differently. Every time you press Run, it destroys all objects created in a previous run of the Script Editor and is freed and cleaned up by Python's garbage collection.
It will NOT remove any objects not in the script that is loaded into the editor. You can create object instances through the command line in the Terminal that will not be touched when Run is pressed.
Here's a simple test:
class test(object):
    def __init__(self):
        print("create")

    def __del__(self):
        print("destroy")

t = test()
Running this in the Script Editor demonstrates that clicking Run cleans up before executing the script again.
How to Create a Scripts Menu Option
The first thing you'll need to do is create a Scripts menu. Unless you've loaded other plugins into VRED, this will be missing from your menu bar. Do the following to add a Scripts menu to your menu bar:
Windows (Create a Scripts Menu Option)
-
In a browser window, navigate to:
C:\Users\<user>\Documents\Autodesk\ -
Right-click and select New > Folder.
-
Name the folder
VRED-<internalVersion>. For example, if you're using VRED v.13.1, you would create a VRED-13.1 folder. -
Open the
VRED-<internalVersion>folder, right-click, and select New > Folder. -
Name the folder
ScriptPlugins.
Mac (Create a Scripts Menu Option)
-
In a Finder window, from the column to the left, select Documents, then the Autodesk folder in the space to the right.
-
From the menu bar, select New > New Folder.
-
Name the folder
VRED-<internalVersion>. For example, if you're using VRED v.13.1, you would create a VRED-13.1 folder. -
From the menu bar, select New > New Folder. This creates a folder within the
VRED-<internalVersion>folder. -
Name the folder
ScriptPlugins.
IMPORTANT The Scripts menu option won't appear in the menu bar until you've loaded scripts into your ScriptPlugins folder and restarted VRED. See How to Load an Example Script.
How to Load an Example Script
To load the example script, which will appear in your Scripts menu, do the following:
Windows (Load an Example Script)
-
Once you've created a ScriptPlugins folder, in a browser, navigate to:
C:\ProgramData\Autodesk\VREDPro-<internalVersion>\examples\plugins -
Copy the
SimpleExamplefolder and paste it into the ScriptPlugins folder:C:\Users\<user>\Documents\Autodesk\VRED-<internalVersion>\ScriptPlugins\ -
Save your work, then close and restart VRED. The Scripts menu is now displayed in the menu bar. When you select it, you'll see the example, called SimpleExample, listed.
Mac (Load an Example Script)
-
Once you've created a ScriptPlugins folder, in a Finder window, navigate to:
/Users/Shared/Autodesk/VRED-<internalVersion>/examples/plugins/SimpleExample -
Copy the SimpleExample folder and paste it into the ScriptPlugins folder:
C:/Users/<user>/Documents/Autodesk/VRED-<internalVersion>/ScriptPlugins/ -
Save your work, then close and restart VRED. The Scripts menu is now displayed in the menu bar. When you select it, you'll see the example, called
SimpleExample, listed.
How to Use Environment Variables to Define a Path
For another way to create the Scripts menu and add the script plugins, try setting an environment variable.
There are two kinds of environment variables, one that's version-dependent and one that's not. You can only define one version-dependent environment variable with an absolute path per VRED version. There is no limitation like this for non-dependent ones.
How to Set an Environment Variable on Windows
-
Access your Control Panel.
-
In the search field at the top of the window and to the right, type:
environment variable -
On the new page, click the link for editing the system environment variables. This opens the Advanced tab of the System Properties window.
-
Click the Environment Variables button.
-
In the System variables section, click the New button to open the New System Variable window.
-
Enter the name of the variable
(VRED2019_SCRIPT_PLUGINS), followed by the value(C). -
When finished, click OK.
How to Set an Environment Variable on Mac
-
Open a terminal window.
-
Type the following command:
export <variable name>=<value>export= VRED2018_2_SCRIPT_PLUGINS=C
How to Use Non-dependent Variables
Use VRED_SCRIPT_PLUGINS to define where VRED looks for script plugins. This will add the variable to:
/Autodesk/VRED-<internalVersion>/ScriptPluginsIf you enter:
VRED_SCRIPT_PLUGINS=C:you set the search path for script plugins to:
C:/Autodesk/VRED-<internalVersion>/ScriptPluginsHow to Use Version-dependent Variables
To use a version-dependent variable, you need to properly identify the version you're targeting. When you run VRED, the version is displayed in the title bar. If you see 2019, in the variable, you would change this to 2019.
For example, for version 2018.2, the variable name would be VRED2018_2_SCRIPT_PLUGINS and for 2019, it would be VRED2019_SCRIPT_PLUGINS.
Using the Scripts Menu
The Scripts menu contains options a list of scripted plugins, along with the xR Home Menu options.
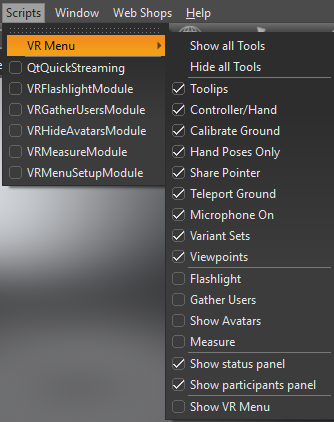
xR Home Menu
Use the options in the xR Home Menu to customize the tools that appear in the xR Home Menu panel used in VR.
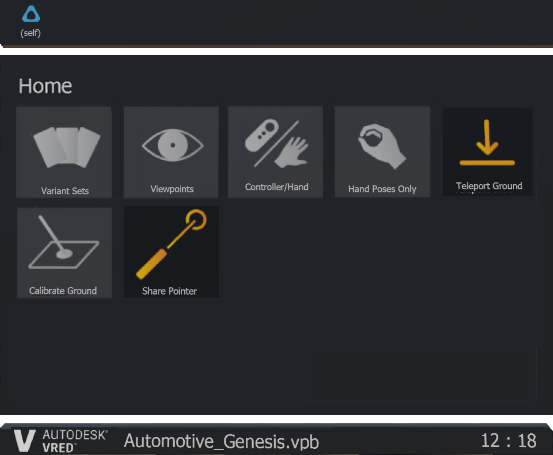
When items in this list are checked, they appear in the xR Home Menu. To remove tools from the menu, uncheck them.
Scripted Plugins
VRED comes with an assortment of scripted plugins, which are listed in the Scripts menu.
QtQuickStreaming
Creates a convenience UI for starting and stopping Qt Quick applications with WebGL streaming enabled. Use it to stream the GUI of a Qt Quick application to a web browser and show the web page in a web engine in the Media Editor or web frontplate in the Sceneplate Editor.
IMPORTANT: This application will run in the background, as a child process of VRED, on the local machine.
VRFlashlightModule
Adds the Flashlight tool to the xR Home Menu.
VRGatherUsersModule
Adds the Gather Users tool to the xR Home Menu.
VRHideAvatarsModule
Adds the Show Avatars tool to the xR Home Menu.
VRMeasureModule
Adds the Measure tool to the xR Home Menu.
VRMenuSetupModule
Adds a tool for adding tools to the xR Home Menu.