イメージ ボタン
これらロールアウト ユーザ インタフェース項目タイプであるボタン、チェック ボタン、マップ ボタン、およびマテリアル ボタンは、テキスト ラベルを含む簡単なテキスト ボタンか、テキストの代わりにビットマップを表示するイメージ ボタンのいずれかとして使用できます。イメージは単一のアイコンとして指定するか(iconName を使用)、複数のイメージ状態を含むイメージ リストとして指定することができます。
単一のアイコンを使用する場合
これらのボタンに表示されるイメージは、作成時間パラメータ iconName/iconSize、または images 使用して指定されます。
iconName/iconSize の場合、パラメータの形式は次のとおりです。
iconName:<filename> iconSize:<point2>マルチ解像度アイコンが表示され、iconSize およびシステムの DPI スケールに基づいて使用するアイコンが選択されます。iconSize は 100% DPI スケールで使用するアイコン サイズです。iconSize が指定されていない場合の既定値は、[24,24]です。
例:
    button rcw "" height:20 width:29 iconName:@"PolyTools\TransformTools\PB_CW" iconSize:[20,20] -- loads PolyTools\TransformTools\PB_CW* files.  The PB_CS_20 file will be the icon used at 100% dpi scaling

    button PTdo "" height: 26 width: 26 iconName:@"PolyTools\Topology\Wall"  -- loads PolyTools\Topology\Wall* files. The Wall_24 file will be the icon used at 100% dpi scaling
イメージ リストを使用する場合
パラメータの形式は次のとおりです。
 images: #(
<image>,
<maskImage>,
<count_integer>,
<enabled_out_image_index>,
<enabled_in_image_index>,
<disabled_out_image_index>,
<disabled_in_image_index>,
<invert_boolean>,
<colortheme_boolean>
)
ボタンのイメージは、作成後に読み取り専用の .images プロパティを設定することで変更できます。
image と maskImage (1、2)
<image> および <maskImage> には、ビットマップ ファイル名の文字列または MAXScript ビットマップ値を指定できます。
<image> は常に指定する必要があります。
<maskImage> は、必要がない場合は undefined と指定できます。
2 つのイメージのいずれかがファイル名で指定された場合、以下のディレクトリでリストされている順にビットマップ ファイルが検索されます。
現在の MAXScript ディレクトリ
MAXScript の Startup ディレクトリ
MAXScript Scripts ディレクトリ
3ds Max maps ディレクトリ
3ds Max image ディレクトリ
3ds Max の実行ファイル ディレクトリ
PATHS 環境変数のディレクトリ
指定できるイメージは 4 つあり、それぞれ以下のボタン状態を表します。
有効、押下(out)
有効、チェック(in)
無効、押下(out)
無効、チェック(in)
これらのイメージは、隣り合わせに格納された複数のイメージを含む単一のビットマップ ファイルまたは MAXScript ビットマップ値から取得されます。ボタンに使用するイメージを 1 つ以上含むこのビットマップは、imagelist と呼ばれます。イメージリスト内のサブイメージはすべて同じ幅であるとみなされ、どの状態にどのイメージを使用するかは、イメージ インデックスをビットマップに含めることで指定します。この仕組みにより、異なるボタンに異なるインデックスを指定して、複数のボタンのすべての状態に対するイメージを 1 つのファイルに格納できます。DPI スケールに合わせて imageList がスケールされます。
たとえば、24x24 ピクセルのサイズを持つ 10 個のイメージがある場合、イメージリスト ビットマップのサイズは 240x24 ピクセルとなります。インデックス 2 を指定すると、ピクセル列 25 ~ 48 の 24 行のピクセルが取得されます。詳細については、下の count_integer の説明を参照してください。
モノクロのマスク イメージを使用して、ボタンに表示するイメージをマスクすることもできます。これは、同じイメージリスト形式で指定します。マスク イメージのインデックスは、対応するイメージと同じでなければなりません。
既定値では、マスク内の黒のピクセルは、イメージ ピクセルを表示します。白いピクセルはそのピクセルを非表示にし、ボタンの既定値のバックグラウンド カラーを表示します。配列の 8 番目の要素を true に設定することで、これを逆にすることができます。下の invert_boolean を参照してください。
マスク ファイルがない場合には、マスク ファイル名に undefined を指定します。
count_integer (3)
<count_integer> は、各ビットマップ内のサブイメージの数を指定します。
MAXScript は、イメージリスト ビットマップの幅を <count_integer> の値で割ることにより単一イメージの幅を算出します。高さはイメージリスト ビットマップの高さから取得します。
たとえば、ビットマップの幅が 2448 ピクセル、高さが 24 ピクセルで、<count_integer> に 102 が指定された場合、MAXScript は 2448/102 = 24 の除算を行い、アイコン サイズを 24x24 ピクセルとして算出します。"Maintoolbar_24i.bmp" イメージリスト ファイルがこれに該当します。
XXX_image_index (4,5,6,7)
<XXX_image_index> 値は、ボタンの 4 つの状態にビットマップのどのサブイメージを使用するかを指定します。
指定されたインデックスが使用可能なイメージの数を超えている場合、ボタンには空のビットマップが表示されます。
invert_boolean (8)
<invert_boolean> 値は、イメージ ピクセルを表示または非表示にする maskImage カラーの使用方法を定義します。
false にすると、イメージ ピクセルは黒のピクセルで表示され、白のピクセルでマスクされます。
true にすると、イメージ ピクセルは黒のピクセルで非表示になり、白のピクセルで表示されます。
指定しなかった場合、値は false とみなされます。
colortheme_boolean (9)
<colorthreme_boolean> 値は、Windows のカラー テーマを使用するかどうかを定義します。指定しない場合、既定値は false になります。
3ds Max 2010以降で使用可能です。
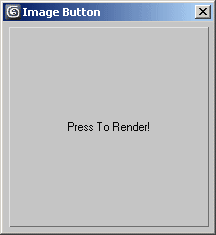
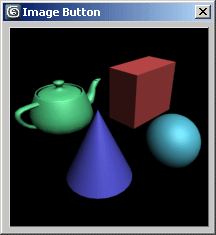
イメージボタンの例:
    rollout image_button_test "Image Button"
    (
    button theButton "Press To Render!" width:200 height:200
    on theButton pressed do
    (
    theBmp = render outputsize:[200,200] vfb:off
    theButton.images = #(theBmp, undefined, 1,1,1,1,1 )
    )
    )
    createDialog image_button_test 210 210
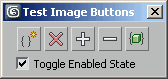
イメージリストの例:
    rollout image_button_test2 "Test Image Buttons"
    (
    button btn_imageButton1 width:24 height:24 across:5
    button btn_imageButton2 width:24 height:24
    button btn_imageButton3 width:24 height:24
    button btn_imageButton4 width:24 height:24
    button btn_imageButton5 width:24 height:24
    checkbox chk_toggleEnabled "Toggle Enabled State" checked:true
    local theButtons = #(btn_imageButton1, btn_imageButton2, btn_imageButton3, btn_imageButton4, btn_imageButton5)
    fn updateButtons =
    (
    for i = 1 to theButtons.count do
    (
    local theIndex = (i*2)-1
    theButtons[i].images = #(
    "enss_tools_16i.bmp",
    "enss_tools_16a.bmp",
    13, theIndex, theIndex, theIndex+1, theIndex+1, false, true
    )
    )
    )
    on chk_toggleEnabled changed state do
    for i in theButtons do i.enabled = state
    on image_button_test2 open do updateButtons()
    )
    createDialog image_button_test2
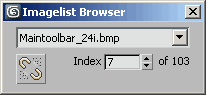
イメージリスト ブラウザの例:
    rollout image_button_test3 "Imagelist Browser"
    (
    local theFiles = #()
    local theCount = 1
    dropdownlist ddl_imageList
    button btn_button width:30 height:30 across:3 align:#left
    spinner spn_index "Index" type:#integer range:[1,100,1] align:#left fieldwidth:40
    label lbl_count "0" align:#right
    fn getIconCount theFile =
    (
    local theBitmap = openBitmap theFile
    theCount = case theBitmap.height of
    (
    24: theBitmap.width/24
    default: theBitmap.width/16
    )
    lbl_count.text = "of " + theCount as string
    )
    fn updateImageButton theFile theIndex =
    (
    btn_button.images = #(theFile, undefined,
    theCount, theIndex, theIndex, theIndex ,theIndex ,false,true )
    )
    on spn_index changed val do
    updateImageButton theFiles[ddl_imageList.selection] val
    on image_button_test3 open do
    (
    theFiles = getFiles (GetDir #ui + "\\Ribbon\\tooltips\\images\\*.gif")
    ddl_imageList.items = for i in theFiles collect filenameFromPath i
    getIconCount theFiles[1]
    spn_index.range = [1,theCount,1]
    updateImageButton theFiles[1] 1
    )
    on ddl_imagelist selected itm do
    (
    getIconCount theFiles[itm]
    updateImageButton theFiles[itm] 1
    spn_index.range = [1,theCount,1]
    )
    ) --end rollout
    createDialog image_button_test3 200 70