The Set Key method allows more control than the Auto Key method, because it lets you out ideas and discard them without having to undo work. It lets you transform objects and selectively key certain tracks on certain objects by using Key Filters and Keyable tracks in Track View.
Straight-Ahead and Pose-to-Pose
Traditional animation is created in one of two ways: straight-ahead animation or pose-to-pose animation. Straight-ahead animation is drawn starting from the beginning and then extra frames are drawn sequentially thereafter, moving straight ahead in time. Pose-to-pose animation is created by drawing the important frames first (extremes and breakdowns), and then the intervening frames are filled in later.
Once a character has been correctly drawn for a specific frame, pose-to-pose animation requires that all the keyable tracks needs to be keyframed. This creates a pose of the character that will not be affected if animation for the character is edited at other points in time. If all the animatable tracks are keyed in the extremes, the in-betweening work will not destroy any of those poses.
Set Key and Pose-to-Pose Animation
The number of objects and tracks that require keying for a character, even a simple character, is not something that can be easily handled manually. Set Key makes this process easier by listing all the tracks that are parts of the character that have to be keyed when you want to fix a pose and create a snapshot in time. Keyable tracks let you determine which tracks can be keyed, then Key filters let you work on them selectively, placing keys on only the tracks you want.
Differences Between Set Key and Auto Key Modes
Set Key mode differs from Auto Key in a number of ways.
![]() In Auto Key mode, the workflow is to turn on Auto Key, move to a point in time, then transform objects or change their parameters. All changes register as keyframes. When you turn off Auto Key mode, you no longer are creating keys. Changes made to objects when Auto Key mode is off are applied globally to the animation. This is referred to as
Layout mode.
In Auto Key mode, the workflow is to turn on Auto Key, move to a point in time, then transform objects or change their parameters. All changes register as keyframes. When you turn off Auto Key mode, you no longer are creating keys. Changes made to objects when Auto Key mode is off are applied globally to the animation. This is referred to as
Layout mode.
![]() In Set Key mode, the workflow is similar, but the behavior is fundamentally different. Turn on Set Key mode, then move to a point in time. Before you transform or change object parameters, you determine the tracks you want to set keys on using Keyable icons in Track View and Filters. Once you know what you plan to key, you try out poses in the viewport (transform the objects, change parameters, and so forth).
In Set Key mode, the workflow is similar, but the behavior is fundamentally different. Turn on Set Key mode, then move to a point in time. Before you transform or change object parameters, you determine the tracks you want to set keys on using Keyable icons in Track View and Filters. Once you know what you plan to key, you try out poses in the viewport (transform the objects, change parameters, and so forth).
 When you like what you see, click the large Set Keys button or press
K on the keyboard to set a key. If you don't do this, no keys are set.
If you move to another point in time, your changes are lost and have no effect on your animation. For example, if you find that you have a posed character, but at the wrong frame in time, you can hold down Shift and use the right mouse button to drag the time slider to the correct frame without losing your pose.
Using Set Key with Inverse Kinematics
Choosing IK Parameters in Key Filters allows you to use Set Key to keyframe inverse kinematics. This lets you set keys for IK goals and end effectors using Set Key as well as other IK parameters such as Swivel Angle or Twist.
As always, when using Set Key, you can selectively keyframe tracks by combining Keyable icons in Track View with Key Filters.
Set Key doesn't currently support IK/FK Enabling, so don't try to keyframe the Enable button using the Set Key button or the keyboard shortcut. Use the Auto Key method when you want to work with IK/FK blending.
Using Set Key with Materials
If you select Materials in Key Filters, you can use Set Key to create keys for materials. Be aware that you need to use Keyable Icons to limit which tracks get keyed. If you simply turn on Materials and set a key, you place keys on every Material track, something you probably don't want to have happen.
Using Set Key with Modifiers and Object Parameters
When you want to set a key on an object's parameters, and you have the Object Parameters Key Filter selected, every parameter will receive a key, unless you have turned off the parameter track in the Controller window of Track View using Keyable icons. It might be easier to simply Shift+ right-click the parameter spinner to set the key.
Also make sure both Modifiers and Object Parameters are turned on in the Filters dialog when you are keyframing a modifier gizmo.
Additional Set Key Tools
Additional Set Key Tools are found in the Customize User Interface dialog. On the Keyboard panel, choose Set Key Tools from the Category field. Here, you can set keyboard shortcuts to clear the Set Key buffer, as well as create keys on just a single axis for a transform.
Using Set Key with Sub-Object Animation
When using Set Key with sub-object animation, you must first assign a controller before creating a key. Sub-objects do not have a default controller assigned upon creation. The controller is assigned by animating at the sub-object level.
Other Methods to Set Keys
You can also set position, rotation, and scale keys by right-clicking the Frame Indicator of the time slider. To set keys on parameters that have spinners, hold down the Shift key and right-click to set a key using the existing parameter value.
Procedures
To use Set Key animation:
- Click
 to turn it on.
The button turns red
 to show you are now in Set Key mode. In this mode, you can try out ideas before you commit to them.
- Open Track View (either Curve Editor or Dope Sheet).
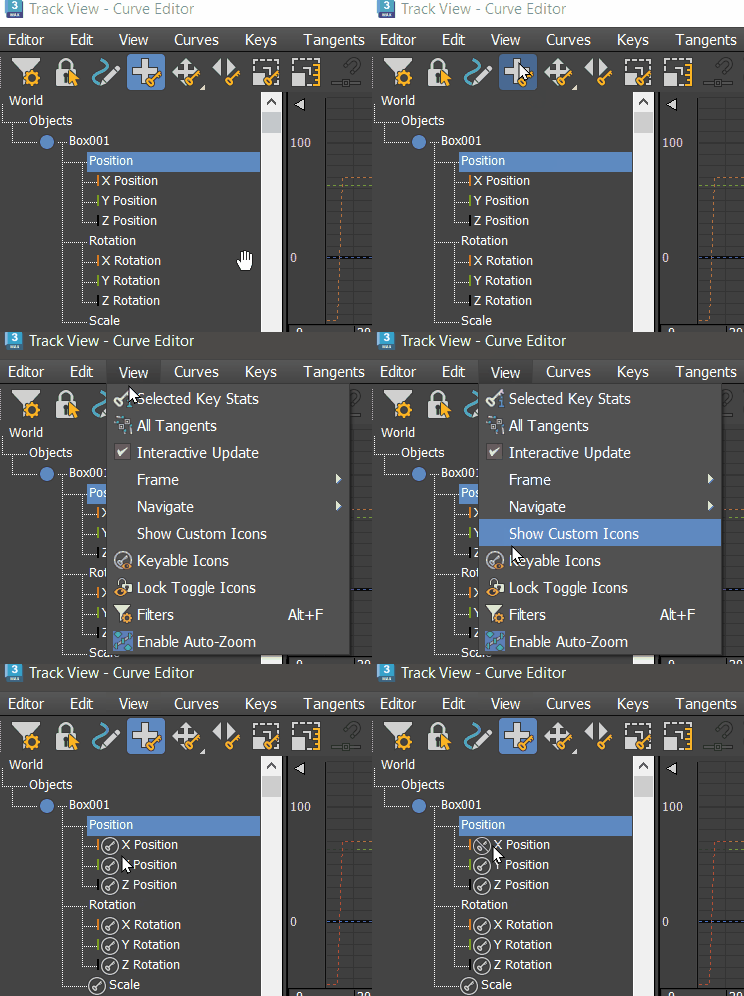
- In the Track View
View menu, click
 (Keyable Icons).
- Turn off all the tracks that you don't want to keyframe.
 The circled key means the track will be keyed. If you click the circled key, it turns to a crossed key
 , which means that track will not be keyed.
 Tip: You can toggle multiple tracks as keyable by using the Edit menu
 Controller submenu
  Keyable command.
When you are finished, minimize or close Track View.
- Click
 and use the Set Key Filters dialog to enable the tracks you want keyframed.
Position, Rotation, and Scale are on by default. So is IK Parameters.
You can use Key Filters to work on individual tracks selectively. For example, if you are in Track View and the Rotation and Position tracks of a character's arm are keyable, you can use the key filters to turn off the Position filter and only work on the Rotation tracks.
- Move the time slider to another point in time, transform your objects or adjust parameters in the command panels to create animation.
This does not yet create keyframes.
- Click
 (Set Keys) or press
K on the keyboard to set a key.
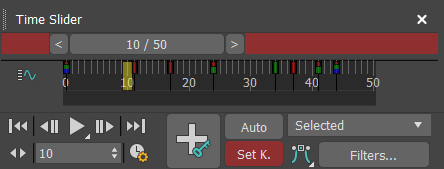
When the Set Keys button turns red
 , it sets a key on the time ruler. The keys are color coded to reflect which tracks are being keyed.

If you don't click Set Keys and you move to another point in time, the pose is lost.
Tip: To move the pose to another point in time, hold down the right mouse button while dragging the time slider.
To animate a vertex using Set Key:
- Create an editable spline.
-
 Select a vertex.
- Turn on
 .
.
- Move the selected vertex.
- Click
 (Set Keys).
Now a controller has been assigned to the vertex. From this point forward, you can animate.
To set a key on every keyable track of an object:
-
 Select the object for which you need to set keys.
- Turn on
 .
.
- On the Key Filters dialog, click All.
- Click
 (Set Keys) or press
K on the keyboard.