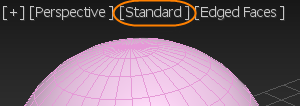
Use this menu to choose visual quality options and global viewport settings for Nitrous displays.

Shading menu - Nitrous
General options for Nitrous viewports appear on the Visual Style & Appearance panel of the Viewport Configuration dialog box.
Interface

- ActiveShade
- Set the viewport to ActiveShade mode, which gives you a preview rendering that can help you see the effects of changing lighting or materials in your scene. When you make adjustments, ActiveShade interactively updates the rendered lighting and materials. The menu item also shows the current renderer being used by ActiveShade, or if an incompatible renderer is currently set.
Unlike older versions, ActiveShade in the viewport is now fully interactive, so you can adjust vertices and apply transforms directly.
Note: You can only set one viewport to ActiveShade at a time. Setting another viewport to ActiveShade will clear the mode from any previously set viewport.
- High Quality
- Applies high-quality settings for shading, lighting, and other viewport preview effects.
- Standard
- Applies standard-quality settings for shading, lighting, and other viewport preview effects.
- Performance
- Applies performance-maximizing settings for shading, lighting, and other viewport preview effects.
- DX Mode
- Uses DirectX (Direct3D) shaders for viewport preview effects. Use DX mode when working with DirectX shader materials.
- Lighting and Shadows
-
Shows a submenu with options for lighting and shadow previews.
- Materials
- Shows a submenu with options for material display.
- Viewports Configuration
- Opens the Viewports Configuration dialog box.
- Active Viewport Settings
- Opens the Active Viewport Settings, Preferences, and Filter dialog box where you can save user-defined quality presets.
Note: If you try to save changes made to an existing default preset, a prompt to save as a new preset appears. The resulting preset then gets added to a new User Defined submenu in the Interface menu.
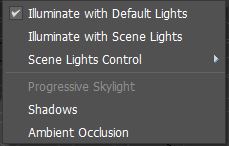
Lighting and Shadows submenu

Options on this menu are disabled when Shaded is the active style.
- Illuminate with Scene Lights
-
Enables lighting from light objects in the scene.
- Illuminate with Default Lights
-
Enables lighting from the default lights.
Ctrl+L toggles between using scene lights and default lights.
- Scene Lights Control
- Displays a submenu for managing lights in the scene:
- Auto Display Selected Lights When enabled, light from selected lights is automatically displayed in shaded viewports. The default is Disabled.
- Lock Selected Lights Locks the selected lights.
- Unlock Selected Lights Unlocks the selected lights.
Locking a light means that the light remains on until unlocked - regardless of whether the light casts shadows. When a light is locked, choosing Auto Display Selected Lights does not turn it off.
- Shadows
- Enables shadow previews.
- Ambient Occlusion
-
Enables ambient occlusion previews.
Materials submenu
These options are the same as those on the Views menu.

- Enable Transparency
- When enabled, transparent materials are displayed as transparent. The default is Enabled.
- Shaded Materials without Maps
- Displays shaded (Phong interpolated) materials but hides maps.
- Shaded Materials with Maps
- Displays shaded (Phong interpolated) materials and maps.
- Realistic Materials without Maps
- Displays realistic materials but hides maps.
- Realistic Material with Maps
- Displays realistic materials and maps.
- Override Off
- Turns the material override off.
- Override with UV Checker
- Overrides materials with the texture checking pattern which helps to identify UV and normal directions when working in the UV Editor.
- Override with Fast Shader
- Overrides materials with fast basic shading for maximum viewport performance.
- Override with Rendering Setting
- Overrides materials with the specified renderer material setting. If not supported by the current renderer, the option is greyed out.
Procedures
To customize the Shading Viewport Label menu for Nitrous displays:
- From the Menu bar, choose .
- From the Custom User Interface dialog box, click the Menu tab.
- From the Menu panel, click the drop-down menu on the top right and choose Viewport Menu Label Bar.
- In the Menu window, add and remove commands as required under Views - Shading Viewport Nitrous Label Menu.