On the Regions panel of the Viewport Configuration dialog, you specify default selection rectangle sizes for the Blowup Region and Sub Region rendering options.
The rectangular selection region appears in the viewport when you choose either the Blowup or Region option from the Area To Render list. You can change the size of a region by dragging its handles, and its position by dragging anywhere within its borders.
Procedures
To use the virtual viewport:
- Make sure you're using the OpenGL driver for the display.
- Activate the viewport to convert to a virtual viewport (typically a camera viewport that is displaying a bitmap background).
- Choose Views menu
 Viewport Configuration and click the Regions tab.
 - Click Use Virtual Viewport. A reduced image of the viewport displays in the dialog, along with a white zoom rectangle representing the virtual viewport.
- Use the Zoom, X Offset, and Y Offset spinners to adjust the size and position of the virtual window, or drag the white window anywhere within the image.
- Click OK.
The viewport is converted to a virtual viewport and displays the area of viewport represented by the white rectangle. All viewport navigation methods work the same, except that you're seeing only the zoomed portion of the viewport.
- To close the virtual viewport, go to Viewport Configuration Region Tab and turn off virtual viewport. You can get to the Viewport configuration menu by right-clicking any of the viewport navigation tools or by going to Views menu Viewport Configuration.
Interface
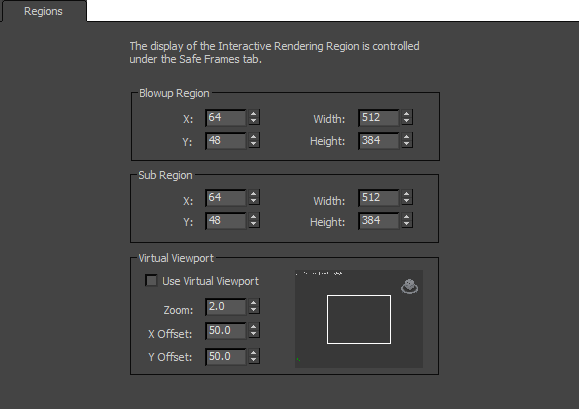
Blowup Region group
Sets the position and size of the blowup region. See Area to Render.
Sub Region group
Sets the position and size of the region to render. See Area to Render.
Virtual Viewport (OpenGL driver only)
OpenGL viewports have Virtual Viewport options that let you zoom in on a sub-region of the current viewport, creating a “virtual viewport” where you can perform any standard navigation, but in a zoomed-in area. For the Direct3D driver, these controls are disabled. When Nitrous is active, these controls don't appear at all.
You can use the virtual viewport on any type of viewport, but it's primarily designed for zooming in on camera views. This lets you perform close-up work, such as tracing, without distorting the relationship between the geometry and a bitmap background. (With the standard Nitrous viewports, 2D Pan Zoom Mode provides a similar function for camera, perspective, and spotlight viewports.)
Because you're actually zooming the viewport image itself, the viewport label might be hidden from display, but you can still right-click in the upper-left area of the viewport to display the menu. This takes advantage of zooming features in the OpenGL driver so that 3ds Max does not compute the display change internally.
- Use Virtual Viewport
- Enables the virtual viewport. A reduced image of the viewport appears in the dialog, along with a white zoom rectangle representing the virtual viewport.
- Zoom, X Offset, and Y Offset
- Adjusts the size and position of the virtual window. You can also drag the white window anywhere within the image.