On the Gamma And LUT panel of the Preference Settings dialog, you set options to adjust the Gamma and lookup-table (LUT) values for input and output images and for the monitor display.
Lookup-table (LUT) Correction
Lookup-table (LUT) correction provides compatibility with the same feature used in other Autodesk Media & Entertainment products such as Composite and the Vfx suite: Inferno, Flint, Smoke, and so on. This feature allows studios to implement a consistent way of displaying colors, assuming that their monitors are calibrated to the same reference. Thus 3D artists can produce results that are closer to what the compositor expects by eliminating a variable in the equation: the way colors are displayed on screen.
Also, please note that the LUT system of the systems suite is complex and offers a variety of controls and flavors of lookup tables. This feature integrates the View LUTs only, such as that found in Composite, where only the displayed images are modified.
Gamma Correction
Gamma correction compensates for the nonlinearity of the encoding of computer displays and popular image file formats.
A standard computer monitor is a nonlinear device, where the difference in actual luminance (light output) does not change linearly with the code values stored in the monitor. On the scale of 0–255 used by most display devices, the increment between 0 and 1 represents a much smaller change in luminance than the increment between 254 and 255.
This is known as gamma encoding. It uses the increments efficiently by taking advantage of the fact that human vision is more sensitive to changes in low light levels than to changes in high light levels. Therefore, gamma-encoded images are sometimes referred to as being in a perceptual color space.
In contrast, computations done by a renderer are performed in a physical space, where the computed values map linearly to changes in luminance.
If a scene calculated using linear data is displayed directly on a computer screen, the image will not match what that image really would look like when lit by real light and viewed by real eyes. Gamma correction overcomes this mismatch.
Mathematically, the calculation of “gamma” is output_intensity = input_intensity (1/gamma) . That is, the result is the original value raised to the power of the inverse of the gamma value. One result of this calculation is that a gamma value of 1.0 does not adjust the image at all.
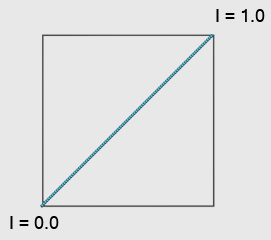
Gamma = 1.0: no correction
I stands for Intensity.
Another result of the gamma calculation is that black is not affected by the adjustment, and neither is white (or any fully saturated color). Gamma adjustment affects only the midtones of an image.
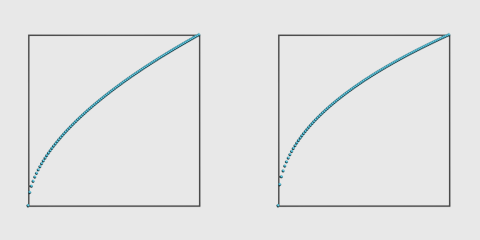
Left: gamma = 1.8
Right: gamma = 2.2, the standard
The horizontal axis represents input (the original value) and the vertical axis represents output (the gamma-corrected value).
The standard gamma value is 2.2. This is the theoretically correct value, specified by the sRGB standard. Modern monitors are calibrated to this standard. Gamma 2.2 makes the linear color space stored in the bitmap and used by the renderer appear to be linear on screen.
However, because the response of photographic film isn’t linear either, some users find that this theoretically correct value looks too bright and washed out. One compromise is to render to a gamma of 1.7 or 1.8, making things look more photographic; that is, as if the image had been shot on photographic film and then developed. Another method would be to apply a film-like response curve in post-production.
We recommend that you always turn on gamma correction.
If you need to set the gamma for a particular monitor, find a value that makes middle gray on your own monitor match a true middle (50 percent) gray.
Gamma Correction and Bitmaps
The data in certain image file formats also come gamma encoded, meaning that the values stored in the file are nonlinear. This is actually a requirement for any 8-bit format. Eight bits are simply not enough to express a picture if it were stored in physical linear colors; the image must be stored in a perceptual space, or banding in the darks will occur.
As a general rule of thumb, 8- and 16-bit files come gamma-encoded. Floating-point files do not, and tend to be in a linear (physical) color space.
Certain file formats contain the applicable gamma values as metadata, and others do not. 3ds Max handles this automatically as much as possible, and loads and saves files with an appropriate gamma value based on the file format and bit depth.
When loading a bitmap file, if the file has an embedded gamma value, 3ds Max uses that value. Otherwise, it applies gamma based on the bit depth of the file format: 2.2 for 8-bit and 16-bit file formats, 1.0 for floating-point or logarithmic file formats.
When saving a bitmap file, 3ds Max saves a gamma value if that is possible. Once again, it uses a gamma of 2.2 for 8-bit and 16-bit formats, and 1.0 for floating-point or logarithmic formats.
You can tell whether a particular file has an embedded gamma value by clicking the Info button on the bitmap file dialog.
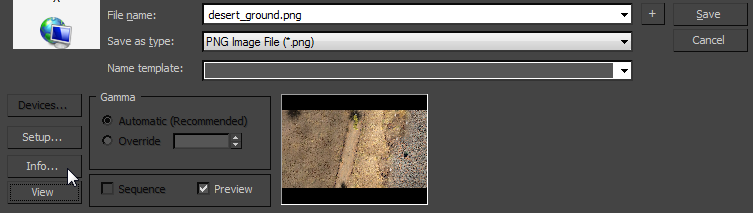
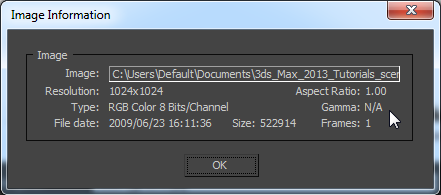
If there is a gamma field, the information dialog shows the gamma value. If there is no gamma field, or if the field has not been set, the dialog shows "N/A".
With the automatic gamma handling in 3ds Max, you should need to set an explicit gamma value for a bitmap only if:
- The bitmap was created using nonstandard gamma, and
- The bitmap does not have an embedded gamma value saved with it.
- The bitmap is being used for computation rather than visual imagery: That is, when it is used for bump mapping, displacement mapping, normal bump mapping, height mapping, and so on. In this case, choose Override and set the gamma value to 1.0 (no correction).
This table shows which supported bitmap formats also support saved gamma values:
| File type | Ability to save gamma correction |
|---|---|
| AVI | No (always 8-bit) |
| MPEG | No (always 8-bit) |
| MOV | No |
| BMP | No (always 8-bit) |
| CIN | Yes (logarithmic files are high dynamic range) |
| CWS | No |
| DDS | No |
| EXR | Yes (optional) |
| GIF | No (always 8-bit) |
| HDR, PIC | Yes |
| JPG | No (always 8-bit) |
| PNG | Yes (optional) |
| PSD | No |
| SGI, RGB | No |
| RLA | Yes |
| RPF | Yes |
| TGA | Yes |
| TIF | No |
| YUV | No |
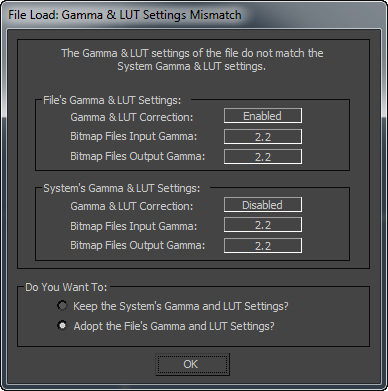
Gamma and LUT Settings Mismatch Dialog
Gamma And LUT correction settings are saved with the market defaults for the current custom UI. See Custom UI and Defaults Switcher. If you open or merge a scene whose gamma or LUT settings differ from the settings active for 3ds Max, you see a dialog that gives you the choice of using the current settings, or adopting those of the file you are loading. For example:
Procedures
To enable gamma correction:
- Choose Customize menu
 Preferences and click the Gamma And LUT tab.
- Turn on Enable Gamma/LUT Correction, if necessary.
- In the Display group at the left-hand side of the panel, choose Gamma, if necessary.
Note: If the gray square in the center of the gamma display contrasts greatly with the surrounding border, then the monitor's gamma correction is not good. You can use this dialog to adjust the gamma value, but we recommend that you leave gamma set to 2.2 and calibrate your monitor instead.
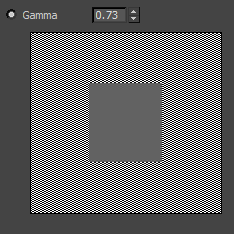
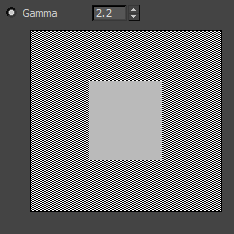
Left: A bad gamma value
Right: A good gamma value
- Click OK to confirm changes and close the Preferences dialog.
Interface
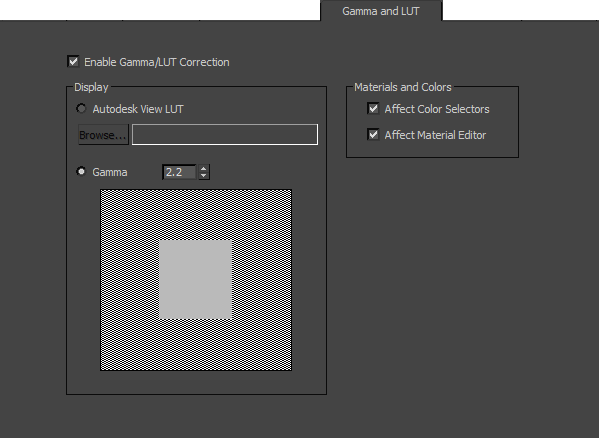
- Enable Gamma/LUT Correction
- Makes available the controls for adjusting gamma or LUT correction. Turn off to disable gamma/LUT correction. Default=on.
Display group
Display gamma correction or lookup tables applies to viewports and the Rendered Frame Window. Use the controls in this group to load an Autodesk View LUT or adjust gamma numerically.
- Autodesk View LUT Click the Browse button and then use the Load LUT File dialog to find and open a LUT file. Thereafter the LUT file name appears in the text field to the right of the button.
Note: 3ds Max does not support generation of LUT files, and no LUT files are included with 3ds Max. To create a LUT file, use a program such as Composite.
- Gamma (The default.) Adjusts the gamma display for 3ds Max. The spinner value increases or decreases the value (lightness or darkness) of the solid gray center square. The center square should appear as close as possible in value to the surrounding checkered border. You can use the spinner to adjust the gamma value, but we recommend that you leave gamma set to 2.2 and calibrate your monitor instead. Range = 0.1 to 5.0. Default=2.2.
Materials and Colors group
By default, the Gamma setting affects the viewport display and rendered frames, as well as the Color Selector and the Material Editor. These switches let you turn off gamma correction for either or both of these dialogs.
- Affect Color Selectors
- When on, the Gamma setting affects the display of colors on the standard 3ds Max Color Selector. and the Object Color dialog.
- Affect Material Editor
- When on, the Gamma setting affects the display of colors on the Material Editor dialog.