The Menus panel lets you customize the menus in 3ds Max. You can edit existing menus or create your own. You can customize menu labels, functionality, and layout.
Customized menu settings use the MNUX file format. (Prior to 3ds Max 2013, menu files had a file name extension of MNU. This format is now superseded.)
Procedures
To create a menu:
- Open the Customize User Interface dialog to the Menus panel.
- Click New.
The New Menu dialog appears.
- Enter the name of the menu, and click OK.
The new menu appears in the menu list.
To add a command to a menu:
- Open the Customize User Interface dialog to the Menus panel.
- Choose the menu you want to edit from the drop-down list.
If you want to change the name of the menu, click Rename, and enter a new name in the Rename Menu dialog.
- Choose the appropriate Group and Category from the respective drop-down lists.
- Choose a command from the action list and drag it into the Menu window.
Use the same procedure to add menus and separators to your menu.
To delete a menu:
- Open the Customize User Interface dialog to the Menus panel.
- Choose the menu you want to delete from the drop-down list.
- Click Delete.
To remove a command from a menu:
- Open the Customize User Interface dialog to the Menus panel.
- Choose the menu you want to edit from the drop-down list.
- Choose the command you want to remove.
- Press Delete.
Use the same procedure to remove menus and separators from your menus.
To move a command in a menu:
- Choose the command in the menu window and drag it to a new position in the window.
Interface
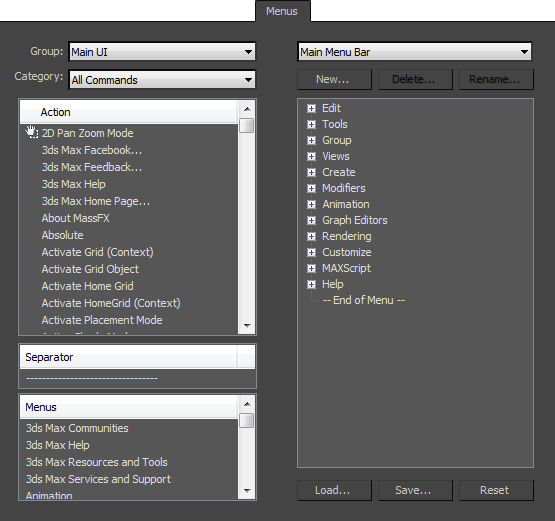
- Group drop-down list
- Lets you select the context you want to customize, such as: Main UI, Track View, Material Editor, and so on.
- Category drop-down list
- Lets you choose among categories of user interface actions for the chosen context.
- Action list
- Displays all the available actions for the chosen group and category. To add an action to a specific menu, select it and drag it to the menu window on the right side of this dialog. Right-click an action in this window to edit the macro script that defines this action (if there is one).
- Separator list
- Displays a separator line that can be used to separate groups of menu items. To add a separator to a specific menu, select it and drag it to the menu window on the right side of this dialog.
- Menus list
- Displays the names of all menus. To add a menu to another menu (shown in the Menu List), select and drag it to the menu window on the right side of this dialog. Right-click an entry in this list to delete the menu, rename it, or create a new, empty menu.
- [menus drop-down list]
- Lists all available menus. To edit a menu, choose it from the list; this makes its contents available for editing in the menu window below it (see following).
The default item is Main Menu Bar.
- New
- Opens the New Menu dialog. Enter the name of the menu you want to create and click OK. The new menu appears in the menu window on the left side of the dialog as well as in the Menu List.
- Delete
- Deletes the item highlighted in the menu list window below.
- Rename
- Opens the Edit Menu Item Name dialog. Select an item in the menu list window and click Rename. This dialog lets you specify a custom name to be displayed in the menu. If you precede a letter in the custom name with the “&” (ampersand) character, that letter is used as a menu accelerator.
- [menu window]
- Displays the entries for the menu currently chosen in the menus drop-down list. To add menus and commands (actions), simply select and drag the options from the Action and Menus lists to this window.
Several actions become available when you right-click any item in the menu window:
- Delete Menu Item Removes the highlighted action, separator, or menu from the menu.
- Edit Menu Item Name Opens the Edit Menu Item Name dialog. The Customize Name checkbox must be on to edit the name. Enter the desired name in the Name text field and press OK.
Changing a menu item name updates its menu entry, but the original name remains in the menu window. Also, if you precede a letter in the custom name with the “&” (ampersand) character, that letter is used as a menu accelerator.
- Edit Menu Item Icon Opens a file dialog that lets you choose a PNG image to use as the icon for this menu item. Note: The assigned icon appears on the menu only when the Alt menu system is active.
- Flatten Sub-Menu Displays contents of the highlighted submenu at the top level of the menu. If you choose this item, the menu name is followed by the string: "[FLAT]".
- Edit MacroScript Opens the script for the highlighted action in a MAXScript editor window.
- Load
- Displays the Load Menu File dialog. Allows you to load custom menu (MNUX) files into the 3ds Max interface.
- Save
- Displays the Save Menu File As dialog. Allows you to save changes to the menus in an MNUX file. Note: Quad menu customizations also use MNUX files.
- Reset
- Restores the default setup ( defaultui.mnux).