Expand the Geometry rollout to access options related to exporting geometry from your scene.
Smoothing Groups
Activate this option when you want to include Smoothing Groups information in your exported FBX scenes.
This option is disabled by default in the Autodesk Media & Entertainment preset.
- Smoothing Groups and Collada
-
The FBX Collada exporter does not export Smoothing Groups data from 3ds Max. Because of this, the FBX Collada importer generates Smoothing Groups during the import process when the Smoothing Groups option is activated.
If you disable the Smoothing Groups option, which is the default state, the FBX Collada importer does not generate Smoothing Groups for a faster import.
Split Per-Vertex Normals
Activate this option in order to split geometry vertex Normals based on edge continuity.
Do not use this option if you do not require hard edges in MotionBuilder, since this operation duplicates vertex information and converts geometry.
- When Do I Use This?
-
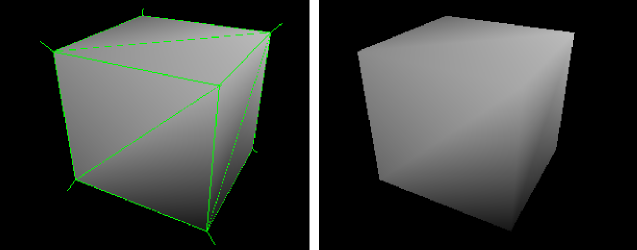
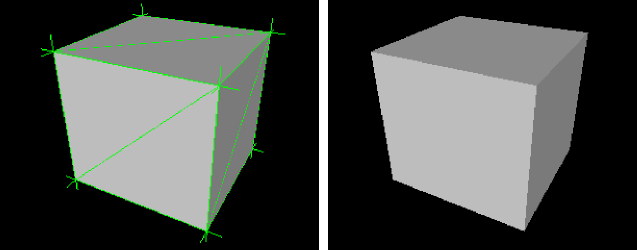
Use this option to preserve whether edges are hard (divided) or not (continuous) when you operate between 3ds Max or Maya and MotionBuilder 2010 and earlier. If you disable this option, all Smoothing Groups in 3ds Max are ignored as well as all hard/soft edge information in Maya.
For example, a 3ds Max-created box that would normally have defined edges would lose them, with all faces visually connected, without visible edges dividing them, in MotionBuilder. This is result is hardly noticeable for organic objects, but is very noticeable on hard surfaces such as tables and cars, and so on.
See the Split per-vertex Normals workflow to import FBX files exported from 3ds Max into MotionBuilder with proper edge continuity while retaining the original 3ds Max edge continuity for import back into 3ds Max.
Split per-vertex Normals workflow:
- Export from 3ds Max with the Split per-vertex Normals option activated.
- Import your scene in MotionBuilder using FBX File Import, finalize your animation and click Save to resave the FBX file.
- In 3ds Max, import the FBX file with your original 3ds Max scene open. Choose Include
 File content
  Update scene elements to import/update only the animation in the scene.

(Above) Split per-vertex Normals option disabled on export produces this result in MotionBuilder 2010 and earlier.

(Above) Split per-vertex Normals option activated on export produces this result in MotionBuilder 2010 and earlier.
Tangents and Binormals
Activate this option if you want the 3ds Max FBX plug-in to create Tangents and Binormals data from UV and Normal information of meshes. This way you have a Tangent space representation of your meshes that you can use for advanced rendering.
- Why Do I Want to Do This?
-
Exporting tangent and binormal data is useful when you need to define the local coordinate system for each vertex in the mesh, which is referred to as “Tangent space”. This is often required for advanced rendering techniques such as Normal mapping.
The 3ds Max FBX plug-in reads the UV data and uses it to calculate the Tangent space data for normal perturbation in per-pixel lighting.
TurboSmooth
Use TurboSmooth to export the source mesh (non-tessellated version) and the TurboSmooth attributes, for objects with an active TurboSmooth modifier applied.
If you disable this option, the tessellated version of the mesh is exported. To export the source mesh, turn off the TurboSmooth modifier in 3ds Max, and export.
Preserve Instances
Activate the Preserve Instances option to preserve instances in the FBX export. If you disable this option, exported instances are made unique (converted to copies).
Selection Sets
Objects and all Editable Poly/Mesh & Poly/Mesh Select modifier sub-object (component) selection sets are supported for export and import with the 3ds Max FBX plug-in.
Activate this option to export Selection sets. Disable this option if you do not want Selection Sets exported with your file. This option is disabled by default.
- When Should I Not Do This?
-
Activating this option includes extra data with your scene so be certain that you need the Selection set data before you export. Exporting a scene with Selection Sets impacts file size and if Selection Sets are not required, it is good practice to keep the file size as small as possible by excluding unwanted data.
Convert Deforming Dummies to Bones
Activate this option to convert geometry used for deforming objects into real bones in the FBX file.
3ds Max lets you use geometry to deform other geometry (as would bones), but other applications do not support this kind of deformation.
- Why Do I Need This?
-
Use this option to keep deformations but convert geometry used as bones into actual bone objects.
In earlier versions of Maya, you could not use geometry to deform other objects instead of bones. This option lets users import objects from other software that had a Use Geometry as Bone option, such as 3ds Max and Softimage into Maya.
For example, if you had a scene in 3ds Max where a box was used to deform another box, the geometry as bone object became a proper bone object in Maya if the Convert Geometry used as Bones option was active. If you disabled this option, the box would remain a box and there would be no animation.
Maya now supports this type of deformation, so it is no longer necessary to activate this option. However, it is still a best practice to leave this option activated for improved interoperability as not all products support geometry as bones.
Triangulate
This option automatically tessellates exported polygon geometry.
Preserve edge orientation
This option lets you automatically convert editable poly objects that contain hidden edge turns to editable mesh objects whenever the plug-in detects them in the file.
Editable Poly objects in 3ds Max have hidden edges which can be flipped/turned to change their direction. Because FBX only stores edge visibility in exported files, not edge orientation, turned edges are lost, and the edges of editable polys export/import back to 3ds Max with the edges in their "unturned/unflipped" state. Activating this option means that every time hidden edges are detected, editable polys always export as editable meshes (triangulated in the process).
This option is active by default. Disable this setting to stop the automatic conversion.