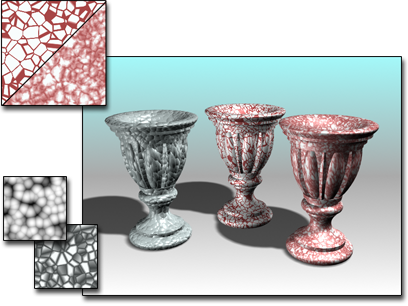
The Cellular procedural map generates a pattern that's useful for a variety of visual effects, including mosaic tiling, pebbled surfaces, and even ocean surfaces.

Cellular maps create the goblet textures.
Procedures
Example: To create confetti:
- Assign the Cellular map as a Diffuse map.
- Set the parameters as follows:
Cell Color (use RGB values after clicking color swatch): 202, 75, 171
Variation: 55
Division Colors (use RGB values after clicking the color swatch):
- First: 127, 150, 197
- Second: 0, 119, 163
Cell Characteristics:
- Circular
- Size: 2.4
- Spread: 0.43
- Fractal: off
Thresholds:
- Low: 0.19
- Mid: 0.65
- High: 0.86
Example: To create alien skin:
- Assign the Cellular map as a Diffuse map.
- Set the parameters as follows:
Cell Color (use RGB values after clicking the color swatch): 52, 107, 58
Variation: 0.0
Division Colors (use RGB values after clicking the color swatch):
- First: 112, 119, 64
- Second: 143, 137, 112
Cell Characteristics:
- Circular
- Size: 7.9
- Spread: 0.61
- Fractal: on
- Iterations: 2.0
Thresholds:
- Low: 0.17
- Mid: 0.64
- High: 1.0
- Copy the Diffuse map to the Bump map.
If you increase the Bump amount, increase the Cellular bump map's Bump Smoothing value as well.
Example: To create a tile mosaic:
- Assign the Cellular map as a Diffuse map.
- Set the parameters as follows:
Cell Color (use RGB values after clicking the color swatch): 141, 120, 87
Variation: 54
Division Colors (use RGB values after clicking the color swatch):
- First: 128, 128, 128
- Second: 221, 221, 221
Cell Characteristics:
- Chips
- Size: 7.0
- Spread: 0.35
- Fractal: off
Thresholds:
- Low: 0.42
- Mid: 0.76
- High: 1.0
- Assign a Mix map as the Bump map.
- Click Material/Map Navigator to display the Navigator. Copy the Cellular Diffuse map by dragging it from the Navigator to the Color #2 map window of the Mix map.
- A dialog is displayed. You are asked if this should be an instance or a copy. Select Copy and click OK.
- Assign a Noise map to the Color #1 map window of the Mix map.
- Set the Noise parameters as follows:
Noise Type: Fractal
Levels: 6.0
Size: 9.3
- In the Mix Parameters rollout of the Mix map, set the Mix Amount to 0.5.
- Go to top level of the material. In the Maps rollout, set Bump Amount to 82.
Interface

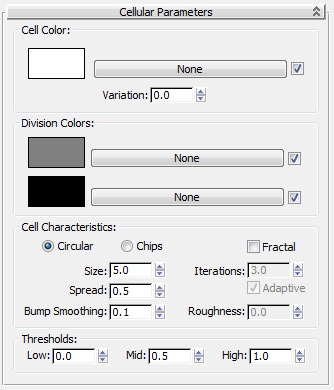
Cell Color group
These controls specify the color of the cells.
- [color swatch]
- Displays the Color Selector. Choose a color for the cells.
- [map button]
-
Assigns a map to the cells, rather than a solid color.
- [checkbox]
-
When on, enables the map. When off, disables the map (cell color reverts to the color swatch).
- Variation
-
Varies the color of the cells by randomly altering RGB values. The higher the variation, the greater the random effect. This percentage value can range from 0 to 100. At 0, the color swatch or the map completely determines the cell color. Default=0.
Division Colors group
These controls specify the color of the divisions between cells. Cell divisions are a ramp between two colors or two maps.
- [color swatches]
- Display the Color Selector for choosing a cell division color.
- [map buttons]
- Assigns a map to one of the cell division colors.
- [checkboxes]
- When on, enables the associated map. When off, disables the associated map (the division color reverts to the color swatch).
Cell Characteristics group
These controls change the shape and size of the cells.
- Circular/Chips
- Lets you choose how cell edges look. With Circular, the cells are circular. This gives a more organic, or bubbly look. With Chips, the cells have linear edges. This gives a more chipped or mosaic appearance. Default=Circular.
- Size
- Alters the overall scale of the map. Adjust this value to fit the map to your geometry. Default=5.0.
- Spread
- Alters the size of individual cells. Default=0.5.
- Bump Smoothing
- When you use a cellular map as a Bump map, you might encounter aliasing or jagginess at the boundaries of the cells. If this occurs, increase this value. Default=0.1.
- Fractal
- Defines the cellular pattern as a fractal, thus enabling the three following additional parameters. Default=off.
- Iterations
- Sets the number of times the fractal function is applied. Caution: Increasing this value increases rendering time. Default=3.0.
- Adaptive
- When on, the number of fractal iterations is set adaptively. That is, the number of iterations increases the closer the geometry is to the scene's point of view, and decreases in the distance. This reduces aliasing and also saves time while rendering. Default=on.
- Roughness
- When you use the Cellular map as a Bump map, this parameter controls how rough the bumps are. When Roughness is zero, each iteration is half the strength of the previous iteration, and half the size. As Roughness increases, each iteration is closer in strength and size to the previous iteration. When Roughness is at its maximum value of 1.0, each iteration is the same size and strength as the previous. In effect, this turns off the fractalization. Roughness has no effect unless Iterations is greater than 1.0. Default=0.0.
Thresholds group
These controls affect the relative size of cells and divisions. They are expressed as normalized percentages (0 to 1) of the sizes specified by the default algorithm.
- Low
- Adjusts the size of the cells. Default=0.0.
- Mid
- Adjusts the size of the first division color, relative to the second. Default=0.5.
- High
- Adjusts the overall size of divisions. Default=1.0.