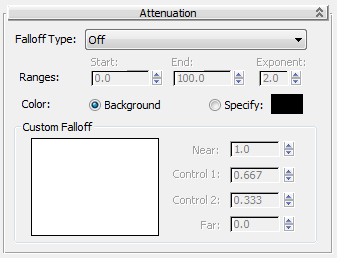
When a ray is reflected off an object or refracted through it, by default the ray travels through space forever, with no attenuation. The controls in this rollout allow you to attenuate rays, so their strength diminishes over distance.
In the Raytrace map, attenuation is implemented by a clipping algorithm. Objects beyond the maximum attenuation range aren't even considered by the raytracer. Because of this, assigning attenuation can speed up rendering time.
Interface

- Falloff Type
- Choose the falloff to use.
- Off Turns off attenuation. (Default.)
- Linear Sets linear attenuation. Linear attenuation is calculated between the start and end range values.
- Inverse Square Sets inverse square attenuation. Inverse square attenuation is calculated beginning at the start range, and doesn't use the end range. Inverse square is the actual attenuation rate for light in the real world. However, it doesn't always give the effect you want in a rendered scene.
- Exponential Sets exponential attenuation. Exponential attenuation is calculated between the start and end range values. You also specify the exponent to use.
- Custom Falloff Specifies a custom curve to use for attenuation (falloff).
- Start Range
- The distance in world units where attenuation begins. Default=0.0.
- End Range
- Sets the distance in world units where the ray is fully attenuated. Default=100.0.
This is not used by inverse square attenuation.
- Exponent
- Sets the exponent used in exponential falloff. Default=2.0.
This is used only by exponential attenuation.
- Color
- Affects the behavior of light rays as they attenuate out. By default, as a ray fades out, it is rendered as the background color. You can set a custom color instead.
- Background (The default.) As the ray attenuates out, returns the background (either the scene's background or the background specified locally in the Raytracer Parameters rollout) rather than the actual color of what the reflected/refracted ray sees.
- Specify Sets the color that is returned by the ray as it attenuates out.
If you choose not to use the background color, black or gray usually work best as the attenuation color,
Custom Falloff group
These controls are inactive unless you set the Falloff Type to Custom Falloff.
- Custom Falloff
- Uses the falloff curve to determine the falloff between the start and the end ranges.
These are the controls for custom attenuation. The custom attenuation curve is at the left. The gray scale bar below the curve shows how the curve will affect the falloff as light rays diminish in strength.
- Near
- Sets the strength of the reflected/refracted ray at the start range distance. This is a normalized percentage that can range from 0.0 to 1.0. Default=1.0.
- Control 1
- Controls the shape of the curve near the curve start. Default=0.667.
- Control 2
- Controls the shape of the curve near the curve end. Default=0.333.
- Far
- Sets the strength of the reflected/refracted ray at the end range distance. This is a normalized percentage that can range from 0.0 to 1.0. Default=0.0.