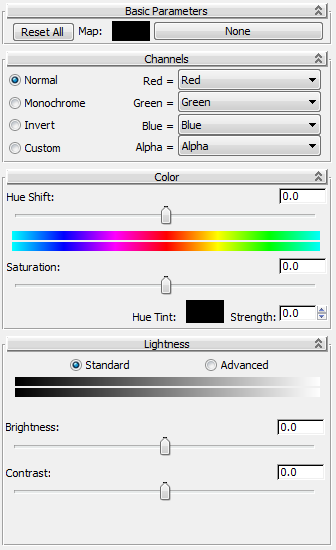
The Color Correction map provides an assortment of tools for modifying the colors of an incorporated, underlying map, using a stack-based method. Tools for correcting color include monochrome, inversion, custom rewiring of color channels, hue shift, and adjustment of saturation and lightness. Color-adjustment controls in many cases mirror those found in Autodesk Toxik and Autodesk Combustion.
Interface
- Texture rollout
- Channels rollout
- Color rollout
- Lightness rollout
Because of this enforced order, it is not possible to reorder the rollouts for this map.

Basic Parameters rollout
- [color swatch]
-
3ds Max uses this color if no map is specified. To change the color, click the swatch and use the Color Selector controls.
- [map button]
-
To specify a map, click this button, initially labeled “None.” After you specify a map using the Material/Map Browser, the button label shows the name and type of the map.
Tip: If you replace an existing map with the Color Correction map, 3ds Max prompts you to choose whether to keep the old map as a sub-map. If you do so, the old map is placed in this slot.
Channels rollout
- [channel operation]
-
Choose the initial operation to be performed on the map color channels:
- Normal Passes the color channels unaltered to the Color rollout controls.
- Monochrome Converts all color channels to shades of gray.
-
Invert Replaces the red, green, and blue color channels with their inverses.
The inverse for each channel is calculated by subtracting the value from the maximum value: 1.0 in the case of floating-point colors, or 255 for eight-bit channels. So, for example, red changes to cyan (green + blue); green changes to magenta (red +blue); and blue changes to yellow (red + green).
- Custom Lets you apply different settings to each channel using the remaining controls on the rollout.
Tip: You can use one of the preset channel operations (Normal/Monochrome/Invert) as a starting point for customization. Choose the preset, and then choose Custom. The previous settings remain active and available for changing. - Red/Green/Blue/Alpha
-
Lets you specify channel operations on a per-channel basis. Available only when Custom is the active choice. Otherwise these fields show the current setting, such as Monochrome for the RGB channels.
Use the drop-down list to choose an replacement value or channel for each channel:
- Red/Green/Blue/Alpha Replaces the channel with the channel you choose. For example, if you set Blue=Red, the blue component of each pixel takes on the current value of the red component of that pixel.
-
Red (Inverse)/Green (Inverse)/Blue (Inverse)/Alpha (Inverse) Replaces the channel with the inverse of the channel you choose. For example, if you set Blue=Red (Inverse), the blue component of each pixel takes on the inverse of the current value of the red component of that pixel.
The inverse for each channel is calculated by subtracting the value from the maximum value: 1.0 in the case of floating-point colors, or 255 for eight-bit channels. So, for example, red changes to cyan (green + blue); green changes to magenta (red + blue); and blue changes to yellow (red + green).
- Monochrome Converts the color channel to grayscale. To determine the grayscale value for a channel, 3ds Max adds the values of of the red, green, and blue channels for each pixel and then divides by three. For example, if the RGB values are 0.5, 0.4, and 0.0, then the monochrome value for any channel of that pixel would be 0.3.
- One Sets the channel to the highest possible value; in effect, turns it all the way on. For example, if the original color of a pixel in a 24-bit or 32-bit map is R=50; G=75; and B=100, then the result of setting Green=One would be R=50; G=255; and B=100.
- Zero Sets the channel to the lowest possible value; in effect, turns it off. For example, if the original color of a pixel is R=50; G=75; and B=100, then the result of setting Green=Zero would be R=50; G=0; and B=100.
Color rollout
This rollout gives you three controls for overall color conversion. These controls work on the output of the Channels rollout. To use the original map, make sure the Channels rollout is set to Normal.
- Hue Shift
-
Lets you change colors using a standard Hue spectrum. Use the slider or the numeric control to determine how to remap colors in the map. To reset to 0, right-click the slider. Range=-180 to 180.
This control works the same as the Hue Shift control in Autodesk Combustion and Autodesk Toxik.
- Saturation
-
The intensity or purity of the map colors. Lowering the Saturation value removes color, causing the image to tend toward grayscale, while raising it intensifies the color. To modify the value, use the slider or the numeric control. To reset to 0, right-click the slider. Range=-100 to 100.
This control works the same as the Saturation control in Autodesk Combustion and Autodesk Toxik.
- Hue Tint
-
Colorizes all non-white map pixels according to the color swatch value. Grayscale values, including black and white, have no effect.
- Strength
-
The degree to which the Hue Tint setting affects the map pixels. Range=0 to 100.
Lightness rollout: Standard
The Standard option on the Lightness rollout gives you two easy-to-use controls:
- Brightness
-
The overall luminance of the map image. To modify the value, use the slider or the numeric control. To reset to 0, right-click the slider. Range=-100 to 100.
- Contrast
-
The difference between brighter and darker portions of the map image. To modify the value, use the slider or the numeric control. To reset to 0, right-click the slider. Range=-100 to 100.
Lightness rollout: Advanced
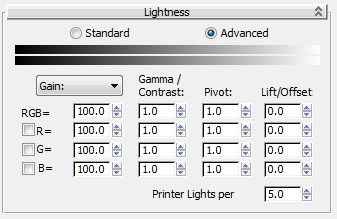
The Advanced controls are similar to those available in the Photo Lab feature of Autodesk Toxik. This tool lets you simulate camera exposure and photo-development changes in maps. You can change the exposure to brighten or darken a map in incremental steps,providing perceptually relative uniform changes in luminance. Photo-development adjustments can produce images with different color distribution.

- [exposure method]
-
Choose from the drop-down list the method by which to express exposure:
- Gain The pixel color values are multiplied by this value.
- F-Stop As in photography, increasing by 1 doubles the luminance, and increases gain by a factor of 2.
- Printer Lights A definable setting (see Printer Lights per Stop) where increasing this value by the value of the Printer Lights per Stop setting (N) doubles the luminance (N printer lights=1 f-stop)
- RGB/R/G/B
-
You can change the settings for all three color channels simultaneously (RGB) and for each channel individually. In addition, you can toggle the settings for the individual channels with the checkboxes.
- Gamma/Contrast
-
The amount of gamma correction can be expressed in terms of contrast or in terms of the usual gamma exponent. Increasing the gamma exponent decreases contrast.
- Pivot
-
Gamma correction is applied about a pivot value. That is, pixel values equal to the pivot value are left unchanged. This is useful when you want to use gamma correction to change the contrast of an map but do not want to affect a particular luminance level.
- Lift/Offset
-
The lift is simply a uniform offset added to all the pixel values (different offsets for different color components). Lift is usually applied as the last step of the process and can be used to control the overall brightness of the map.
- Printer Lights per Stop
-
When using the Printer Lights exposure method, this setting determines the number of printer lights equivalent to one f-stop; that is, the number required to double or halve the exposure.