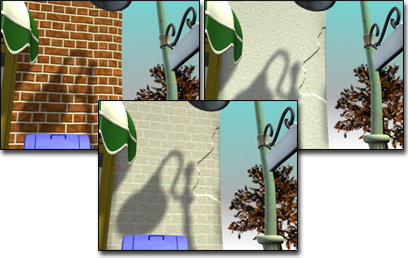
The Blend material lets you mix two materials on a single side of the surface. Blend has an animatable Mix Amount parameter that lets you draw material morphing function curves to control the way that the two materials are blended over time.

Blend material combines bricks and stucco.
Procedures
To create a Blend material, do one of the following:
- In the Slate Material Editor
 Browser panel
  Materials
  Standard group, drag a Blend material into the active View (or double-click the Blend entry).
- In the Compact Material Editor, activate a sample slot, click the Type button, then in the
Material/Map Browser, choose Blend and then click OK.
3ds Max opens a Replace Map dialog. This dialog asks whether you want to discard the original material in the sample slot, or retain it as a sub-material.
The controls for Blend materials are similar to the controls for Mix maps.
To specify a component material, do one of the following:
- On the Blend Basic Parameters rollout, click one of the two material buttons.
The parameters for the sub-material are displayed. By default, a sub-material is a Standard material with Blinn shading.
- In the Slate Material Editor, the default sub-materials appear as nodes in the active View. You can double-click either of these nodes to see and adjust the material parameters, or you can replace the Standard material nodes with nodes of a different type.
To control the mix amount:
- In the Basic Parameters rollout, adjust the Mix Amount value.
You can also control the mix amount by using a map.

Map used to reveal brick beneath stucco
To control the mix amount using a map, do one of the following:
- In the Basic Parameters rollout, click the map button next to Mask.
3ds Max opens the Browser so you can select a map type.
The intensity of pixels in this mixing map controls the mix. When the intensity is close to zero, one of the component colors or maps is visible; when it is close to full intensity, the other component is visible.
Tip: Using a Noise map for the mixing map can create effective results with a natural appearance.The Mix Amount setting is unavailable when a map is assigned to the Mask parameter. If Use Curve is off, the mixing map is used as is. When Use Curve is on, you can use the mixing curve to shift the effect of the mask map's gradient ramp to reveal more of one material and less of the other.
- In the Slate Material Editor, add the map type you want to the active View, then wire the map node to the Blend material’s Mask component.
Interface

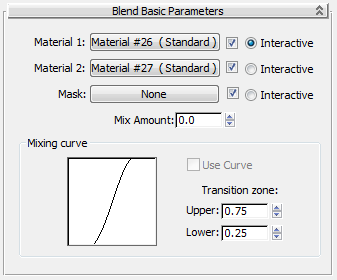
- Material 1/Material 2
- Set the two materials to be blended. Use the checkboxes to turn the materials on and off.
- Interactive
- Chooses which of the two materials or the mask map is displayed on object surfaces in viewports by the interactive renderer.
If one material has Show Map in Viewport on, this takes precedence over the Interactive setting. Only one map at a time can be displayed in viewports.
- Mask
- Click to assign a map to use as a mask. The degree of blending between the two materials depends on the intensity of the mask map. Lighter (whiter) areas of the mask show more of Material 1, while darker (blacker) areas of the mask show more of Material 2. Use the checkbox to turn the mask map on or off.
- Mix Amount
- Determines the proportion of the blend (percentage). 0 means only Material 1 is visible on the surface; 100 means only Material 2 is visible. Unavailable if you have assigned a mask map and the mask's checkbox is on.
You can animate this parameter. Create Material Preview is useful for testing the effect.
Mixing Curve group
The mixing curve affects how gradual or how sharp the transition between the two colors being blended will be. It affects the blend only when a mask map is assigned.
- Use Curve
- Determines whether the Mixing Curve affects the mix. This control is available only when a mask is assigned and active.
- Transition Zone
- These values adjust the level of the Upper and Lower limits. If the two values are the same, the two materials meet at a definite edge. Wider ranges give more gradual blending from one sub-material to the other. The mixing curve displays the effect of changing these values.