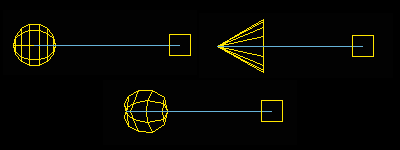
A target light has a target sub-object that you can use to aim the light.

Viewport representations of Target lights with spherical, spotlight, and web distribution
Procedures
To create a Target light:
- On the
 Create panel, click
  (Lights).
 - Choose Photometric from the drop-down list. (This is the default.)
- In the Object Type rollout, click Target Light.
- Drag in a viewport. The initial point of the drag is the location of the light, and the point where you release the mouse is the location of the target.
The light is now part of the scene.
- Set the creation parameters.
You can use the Move transform to adjust the light’s position and direction.
To select the target:
- First,
 select the target point light.
 - Right-click the light and from the quad menu, choose Select Target.
You can also choose Lights from the Selection Filters list on the main toolbar, and then click the target. Clicking the line that connects the light and its target selects both objects.
The target, displayed as a small square, is often in the same area as objects that you want to illuminate. It can be difficult to select it by clicking.
To adjust the light and target position:
-
 Select the light or target or both.
 - On the main toolbar, turn on
 (Select And Move). Drag the selection to adjust the light.
 You can also right-click the light and choose Move from the quad menu
 Transform quadrant.
Because the light is always aimed at its target, you can't rotate it about its local X or Y axes. However, you can select and move the target object as well as the light itself. When you move either the light or the target, the light's orientation changes so it always points at the target.
Clicking the line that connects the light and its target selects both objects. However, region selection doesn't recognize the link line.
You can use the Place Highlight command to change a light's position.
For target lights with spotlight distributions, you can also adjust the light using a Light viewport.
To change a viewport to a light view:
- Click or right-click the Point-Of-View viewport label.
3ds Max opens the POV viewport label menu.
- Choose Lights.
3ds Max opens a submenu that shows the name of each light. By default, Target lights are named TPhotometricLight01,TPhotometricLight02, and so on.
- Choose the name of the light you want.
The viewport now shows the light's point of view. You can use the Light viewport controls to adjust the light.
Tip: The default keyboard shortcut for Light viewports is $.