Column Headings Right-Click Menu
Either of the following menus opens when you right-click a column heading in Scene Explorer:
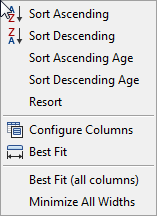
Left: Right-click menu for Name column; Right: Right-click menu for all other columns
- Sort Ascending
- Sorts the column in ascending order.
- Sort Descending
- Sorts the column in descending order.
- Sort Ascending Age (Name column only)
- Sorts listed items in reverse order of creation, with the newest items at the top.
When Sort By Layer is active, sorts by the ages of the objects, not the layers.
- Sort Descending Age (Name column only)
- Sorts listed items in order of creation, with the oldest items at the top.
When Sort By Layer is active, sorts by the ages of the objects, not the layers.
- Resort
- Sorts the list based on the current sorting method.
Use this function when you've altered an item's properties in such a way as to change its position in the sort. For example, if the Name column currently uses Sort Ascending and you change an object's name, the column does not automatically move the object in the sort. Thus the column might be out of correct sorting order. Use Resort to resolve this.
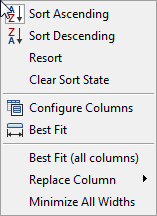
- Clear Sort State (All columns except Name)
- Removes the sorting for this column, as indicated by the lack of an arrow icon in the column heading. You can achieve the same effect by repeatedly clicking the column heading until the arrow disappears.
- Configure Columns
- Opens a dialog for adding columns to the Scene Explorer listing. Scroll to see all the columns, and to add a column, drag it from the dialog to the column headings row.
For details, see Scene Explorer Columns.
- Best Fit
- Automatically resizes the column under the mouse cursor to display its contents fully, but without wasting space.
- Best Fit (all columns)
- Automatically resizes all columns to display their contents as fully as possible within the width of the Scene Explorer dialog.
- Replace Column (All columns except Name)
- Replaces the column you right-clicked with the column you choose from the Replace Column list.
- Minimize All Widths
- Resizes all columns except Name so that the column contents are fully visible, but the headings might be truncated.
Use this when the scene contains objects with long names.
Main Right-Click Menu
The following quad menu opens when you right-click within a column in Scene Explorer:
Top-left quadrant
- Expand Selected
- Opens the hierarchy of selected entries.
Note: You can expand a parent or layer node's hierarchy and those of all of its child nodes by Ctrl+clicking the arrow to the left of the name of the node to expand.
- Expand All
- Opens all hierarchies or layers to display all list entries.
- Collapse Selected
- Closes the hierarchy of selected list entries.
Note: You can collapse a parent or layer node's hierarchy and those of all of its child nodes by Ctrl+clicking the arrow to the left of the name of the node to collapse.
- Collapse All
- Closes all hierarchies or layers so only the top-level parents or layers appear in the list.
- Find Selected Object
- Scrolls the list so the first selected object appears at the top of the window.
Use this to speed up finding an object when the scene contains many items.
- Filters - Use Object Filters
- Toggles the availability of all buttons on the
Display toolbar. When off, no filtering is performed.
This is different from the
 (Display All) and
 (Display None) buttons on the Display toolbar, which simply turn the filter buttons on and off.
- Filters - Invert Object Filters
- Turns off all object filters that were on, and vice versa.
The equivalent control on the Display toolbar is
 (Invert Display).
Display quadrant (top-right)
- Isolate Selection
- Activates a tool that temporarily hides everything in the scene except selected objects.
- End Isolate
- When the Isolate tool is active, turns off the tool, restoring the full scene contents to visibility.
- Unfreeze All
- Sets all objects to the unfrozen state so that they can be selected and manipulated.
- Unfreeze Scene Explorer Selection
- Sets frozen objects that are selected in the Scene Explorer list to the unfrozen state so that they can be selected and manipulated.
This command is specific to Scene Explorer, as it's not possible to select frozen objects in the viewports. It's a convenient alternative to Unfreeze All and Unfreeze By Name.
- Freeze Selection
- Protects selected objects from being selected and manipulated.
- Unhide All
- Sets all objects to be visible in the viewports.
- Unhide Scene Explorer Selection
- Sets hidden objects that are selected in the Scene Explorer list to the visible state so that they can be selected and manipulated.
This command is specific to Scene Explorer, as it's not possible to select hidden objects in the viewports. It's a convenient alternative to Unhide All and Unhide By Name.
- Hide Selection
- Sets all selected objects to be invisible in the viewports.
Layers quadrant (bottom-left)
Available only when Scene Explorer is set to Sort By Layer.
- Create Layer
- Adds a layer to the scene and moves the current selection to the new layer.
- Merge Layers
- Combines the contents of all selected layers into one and places the receiving layer's name in edit mode so that you can change the name if desired.
- By Layer
- Toggles selected objects between By Layer and By Object for four categories of properties: Wireframe Color, Display Properties, Rendering Control, and Motion Blur. When By Layer is on (check mark appears), each selected object's layer controls its properties in those categories. When off, each object's own settings control its properties. See
Object Properties.
Note: For any objects with mixed By Layer / By Object settings (for example, only Wireframe Color is set to By Object), By Layer sets all four categories to By Layer. Likewise, if the selection contains objects with mixed By Layer settings (that is, By Layer is on for some and off for others), using By Layer turns the toggle on for all selected objects.
When an object is set to By Layer, the By Layer icon replaces the normal icon in icon-based columns for properties controlled by the layer. In checkbox-based columns such as Ignore Extents, the By Layer icon is a lined-out checkbox instead. In the Color column, By Layer is represented with an empty color swatch.
Tip: To specify a subset of settings to control by layer, such as Display Properties only, use the Object Properties dialog instead.
Bottom-right quadrant
- Select Child Nodes
- When Sort By Hierarchy is active, selects hierarchical descendants of selected objects. When Sort By Layer is active, selects all members of selected layers.
- Select Invert
- Selects all unselected objects and deselects all selected objects.
- Add Selection To
- Opens a submenu with choices for moving the selected objects to:
- Create Layer: Adds a new layer that contains the selected objects. The layer is selected so that any objects created subsequently are added to it.
- New Parent (pick): Places you in Pick mode, so that clicking an object in Scene Explorer or in the viewport parents the current selection to the object you click.
- New Group: Opens a dialog for naming a group. When you click OK or press Enter, a new group is created and the selected objects are added to it.
- New Container: Automatically creates a new container and adds the selected objects to it.
- Clone
- Opens the Clone Options dialog for creating one copy, instance, or reference of each selected object. The clones are added to the same layer or hierarchical parent as the originals.
- Rename
- Places the selected item in edit mode for renaming from the keyboard. If multiple items are selected, only the last one selected is affected.
- Delete
- Removes selected objects from the scene.
- Unlink
- Removes selected hierarchy descendants from their parent objects and sets them as top-level objects. Any children of selected objects remain parented to them.
Available only when Sort By Hierarchy mode is active.
- Unnest
- Removes any selected layers that are children of other layers and sets them as top-level layers.
Available only when Sort By Layer mode is active.
- Display Properties
- Opens a submenu listing the following display-property switches. To toggle a property for selected objects, click its label in the submenu.
If a property is off for all selected objects, nothing appears next to its name. If a property is on for all selected objects, a check mark appears next to its name. If the setting varies among the current selection (that is, it's off for some objects and on for others), a short horizontal line appears next to the property name. In the latter case, clicking the property turns it on for all selected objects.
For descriptions, see Display Properties.
- See-Through
- Display As Box
- Edges Only
- Backface Cull
- Vertex Ticks
- Trajectory
- Ignore Extents
- Render Properties
- Opens a submenu listing the following rendering-property switches. To toggle a property for selected objects, click its label in the submenu.
If a property is off for all selected objects, nothing appears next to its name. If a property is on for all selected objects, a check mark appears next to its name. If the setting varies among the current selection (that is, it's off for some objects and on for others), a short horizontal line appears next to the property name. In the latter case, clicking the property turns it on for all selected objects.
For descriptions, see Rendering Control.
- Renderable
- Inherit Visibility
- Visible to Camera
- Visible to Reflection
- Receive Shadows
- Cast Shadows
- Apply Atmospherics
- Render Occluded Objects
- Motion Blur: Switches the object property
Motion Blur setting between None and Object.
Note: Does not affect the Enabled setting.
- Properties
- Opens the Object Properties dialog for selected objects.