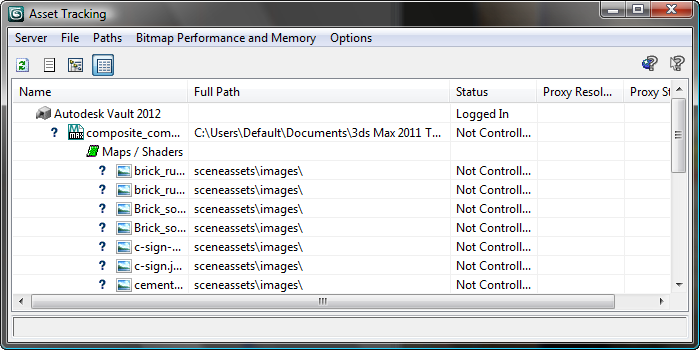
With the Asset Tracking dialog, you can check files in and out, add files to the Asset Tracking System (ATS), get different versions of files, and so on, all from within 3ds Max.
Asset tracking provides full support for the Autodesk Vault data-management solution, and basic version-control support for other providers, such as Perforce and Microsoft SourceSafe. In general, asset tracking supports version-control providers that are capable of integrating into Microsoft Visual Studio, sometimes referred to as MSSCC support. This topic assumes usage of Autodesk Vault.
The Asset Tracking dialog provides the principal functionality for working with the Vault data-management solution from within 3ds Max, but you can also work directly with Vault using the Vault Explorer client software, which is included with 3ds Max. To run Vault Explorer, go to Windows Start menu  Autodesk
  Autodesk Data Management and choose Autodesk Vault Explorer. To learn more about using Vault Explorer, open the Autodesk Vault Explorer Help menu and choose Autodesk Vault Help Topics, or simply press
F1 while the Vault Explorer window is active.

Menu bar
The menu bar provides access to most Asset Tracking functions. Most of the menu functions are also available from the right-click menu available in the dialog window.
Toolbar
 Refresh
-
Reloads the asset listing from the local scene and updates the window contents. This is useful for adding XRefs, as these are not automatically detected and updated in this table.
 Status Log
-
Opens a read-only window showing all status messages received from the Vault during the current session.
 Tree View
-
Displays a simplified, hierarchical listing of the assets in the current scene without path or status information. You can expand and collapse hierarchy branches by clicking the + and - icons to the left of the branch names.
 Table View
-
Displays listing of the assets in the current scene in tabular format along with the full path and status for the local version of each asset. The branches are hierarchical, but cannot be expanded or collapsed.
Folders
- [folders]
-
If the system administrator created files folders in Autodesk Vault, they appear in the Asset Tracking dialog and help you maintain organization of files.
- [library folders]
-
If your system administrator set library folders up in Autodesk Vault, they appear in the Asset Tracking dialog. The system administrator sets these folders up on the network and they can act as multiple network workspaces for a team. Your team can use them to organize different types of files. For example, you may have a library folder for materials, for maps, for animations, and so on. Since these library folders are stored on the network, files that are shared between team members can reside on the network at all times, rather than on a user's local workspace. Library folders can also be used to protect files because the system administrator can set up read/write permissions so that only certain users can make changes to files. See your system administrator for further details.
Note: A regular folder looks the same as a library folder from the Asset Tracking dialog. Different icons distinguish the two types of folders inside Autodesk Vault. - [Asset Tracking window]
-

Left: Asset Tracking dialog window in Tree View
Right: Asset Tracking dialog window in Table View
The Asset Tracking dialog window lists all assets in the current scene in a tree or table view, depending on the current setting. Listed assets include the scene file, any images used by the scene in materials, and so on, XRefs, and photometric files. By default, output files such as rendered images also appear in the window listing; you can turn off display of these if you wish.
Also shown are icons for each assets showing the type of asset (3ds Max scene file, map branch, and so on) and status, as appropriate. Most status icons are documented in the Vault Explorer Help
 Autodesk Vault Explorer Icon Reference topic.
Note: No status icons appear if you don't have any version-control provider installed.
Autodesk Vault Explorer Icon Reference topic.
Note: No status icons appear if you don't have any version-control provider installed.In general, status errors can be resolved by being careful to coordinate the local folder/file structure with that of the Vault, as described in the above procedure.
You can access most dialog commands by right-clicking an asset in the window; the commands applicable to the asset are available in the context menu. These commands are the same as those documented above.