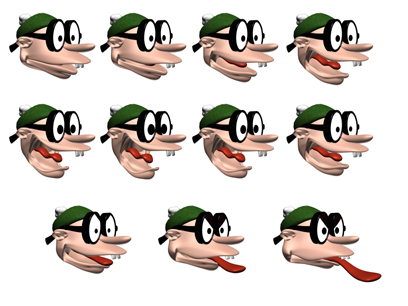
Morphing is an animation technique similar to tweening in 2D animation. A Morph object combines two or more objects by interpolating the vertices of the first object to match the vertex positions of another object. When this interpolation occurs over time, a morphing animation results.

Seed or base object, and the target objects at specific frames

The resulting animation
The original object is known as the seed or base object. The object into which the seed object morphs is known as the target object.
You can morph one seed into multiple targets; the seed object's form changes successively to match the forms of the target objects as the animation plays.
Before you can create a morph, the seed and target objects must meet these conditions:
- Both objects must be mesh, patch, or poly objects.
- Both objects must have an equal number of vertices.
If these conditions don't apply, the Morph button is unavailable.
You can use any kind of object as a morph target, including an animated object or another morph object, as long as the target is a mesh that has the same number of vertices as the seed object.
Creating a morph involves the following steps:
- Model the base object and target objects.
- Select the base object.
- Click
 Create panel
  Geometry
  Compound Objects
  Morph.
 - Add the target objects.
- Animate.
Setting Up the Morph Geometry
Make sure that the objects you want to use as the seed and targets have the same number of vertices.
You should also turn off Adaptive and Optimize for other shape-based objects that you want to use with Morph, such as those with Extrude or Lathe modifiers.
Morph Object and Morpher Modifier
There are two ways to set up morphing animations: the Morph compound object and the Morpher modifier.
The Morpher modifier is more flexible because you can add it multiple times at any place in an object's modifier stack display. This flexibility lets you animate the base object or the morph targets before reaching the Morpher modifier, for example with a noise modifier. The Morpher modifier works hand in hand with the Morpher material. The Morpher modifier is the ideal way to morph characters.
The Barycentric Morph controller can be simpler to use in Track View. The Track View display for Compound Morph has only one animation track regardless of the number of targets. Each key on the track represents a morph result based on a percentage of all the targets. For basic morphing needs, Compound Morph may be preferable to the Morpher modifier.
Lastly, you can add the Morpher modifier to the stack of a Compound Morph object.
Procedures
Example: To create a basic morph:
- On the
 Create panel, with
  (Geometry) active, turn on Patch Grids. On the Object Type rollout, click Quad Patch.
 - In the Top viewport, click and drag to create a patch on the left side of the viewport.
- Right-click the modifier stack display in the Modify panel and select Convert To Editable Patch from the pop-up menu.
- Right-click the patch, and then click Move in the Transform quadrant of the quad menu.
- In the Top viewport, hold down Shift and drag with the patch to create a copy on the right side of the viewport.
- On the Modify panel
 Selection rollout, go to the Vertex sub-object level.
 - In the Front viewport, select and move vertices on the selected patch to alter its shape.
- On the Modify panel, in the stack display, click Editable Patch again to return to the top level.
- Select the original patch in the viewports.
- On the
 Create panel, with
  (Geometry) active, choose Compound Objects from the drop-down list. On the Object Type rollout, click Morph.
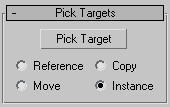
 - On the Pick Targets rollout, click Pick Target.
- In the viewports, click the second patch object.
Both patch objects are listed in the Morph Targets list.
- Click Modify panel.
Morph displays above the Editable Patch in the modifier stack.
- Move the time slider to frame 10.
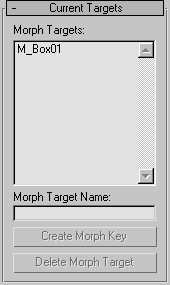
- In the Morph Targets list, click M_QuadPatch01.
- On the Current Targets rollout, click Create Morph Key.
On the track bar, a key is displayed at frame 10.
- On the track bar, right-click the key at frame 10 and click QuadPatch01:Morph in the menu.
A Key Info dialog displays.
- On the Key Info dialog, select M_QuadPatch01 from the list.
- On the Key Info dialog, drag the percentage spinner.
The base object changes shape.
- Close the Key Info dialog and drag the time slider back and forth. The patch morphs its shape.
To select the targets for a morph:
- Select the seed object.
- On the
 Create panel, with
  (Geometry) active, choose Compound Objects from the drop-down list. On the Object Type rollout, click Morph.
 The name of the seed object is displayed at the top of the Morph Targets list on the Current Targets rollout.
- On the Pick Targets rollout, choose the method for creating targets: Reference, Move, Copy, or Instance.
- Click Pick Target.
- Select one or more target objects in the viewports.
As you select each target, its name is added to the Morph Targets list. If an object can't be a target (for example, if it has a different number of vertices than the morph seed), you can't select it.
If you select a target object while you are not at frame 0, creating the target also creates a morph key. You can create additional morph keys from targets you've already selected, as described in the following procedure.
To create morph keys from existing targets:
- Drag the time slider to the frame where you want to place the morph key. Note: The Auto Key button does not need to be on to set morph keys.
- Highlight the name of a target object on the Morph Targets list.
The Create Morph Key button is available only when a target object name is selected.
- Click Create Morph Key.
3ds Max places a morph key at the active frame.
- To preview the effect of the morph, drag the time slider back and forth. You can view and edit the morph keys in Track View, which also lets you view the morph's target object parameters.
Interface
Pick Targets rollout

When you pick target objects, you designate each target as a Reference, Move (the object itself), Copy, or Instance. Base your selection on how you want to use the scene geometry after you create the morph.
- Pick Target
-
Use this button to designate the target object or objects.
- Reference/Copy/Move/Instance
-
Lets you specify how the target is transferred to the compound object. It can be transferred either as a reference, a copy, an instance, or it can be moved, in which case the original shape is not left behind.
- Use Copy when you want to reuse the target geometry for other purposes in the scene.
- Use Instance to synchronize morphing with animated changes to the original target object.
- Use Move if you've created the target geometry to be only a morph target, and have no other use for it.
You can use an animated object or another morph as the target of a morph.
Current Targets rollout

- Morph Targets
-
Displays a list of the current morph targets.
- Morph Target Name
-
Use this field to change the name of the selected morph target in the Morph Targets list.
- Create Morph Key
-
Adds a morph key for the selected target at the current frame.
- Delete Morph Target
-
Deletes the currently highlighted morph target. If morph keys reference the deleted target, then those keys are deleted as well.