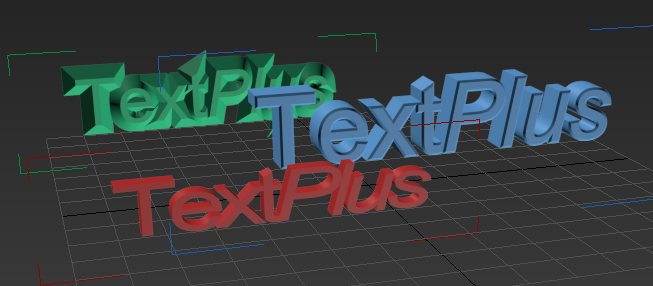
TextPlus provides an all-in-one text object. You can create a spline outline or solid, extruded, beveled geometry. Additional options let you apply different fonts and styles on a per-character basis and add animation and special effects.

Examples of TextPlus
Procedure
To create text:
- On the Create menu choose Standard Primitives
 TextPlus.
- Enter the text in the Text field of the Parameters rollout.
- In any viewport, define an insertion point by either clicking to place the text or dragging the text into position and then releasing the mouse button.
Interface
Interpolation rollout
Use this rollout to change how the text element is generated.
- Steps
- Sets the number of vertices used to divide the curve. The higher the number of steps, the smoother the curve. You can set the steps manually or automatically using the Adaptive checkbox. Range=0-100.
- Optimize
- Removes unnecessary steps from straight segments. Default=on.
- Adaptive
- Automatically sets the number of steps to produce as a smooth curve. Default=off.
Layout rollout
Use this rollout to change how the text is located.
Type group
- Point
- Determines layout using a point.
- Plane
- Determines layout using Auto, XY, XZ, or YZ planes.
Note: To reverse a flow pivot point (flow of text reversed from pivot point), press Alt+click.
- Region
- Determines layout using Length and Width measurements.
Parameters rollout

Use this rollout to change the text and typography.
- Text box
- Allows for multiple lines of text. Press Enter to start a new line. The default text is "TextPlus". You can copy and paste single and multiple lines of text from the Clipboard.
- Set Value as Text
- Toggles the Set Value as Text window to link the text to a value to display. The value can be an object value such as a radius, or any other value that can be returned from a script or expression.
- Open Large Text Window
- Toggles a large text window to better see large amounts of text.
Font group
- Font list
- Choose from a list of available fonts including fonts installed in Windows and Type 1 PostScript fonts.
- Font type list
- Choose from Regular, Italic, Bold, or Bold Italic font types.
- Bold style button
- Toggles bolding text.
- Italic style button
- Toggles italicizing text.
- Underline style button
- Toggles underlining text.
- Strikethrough button
- Toggles striking-through text.
- All Caps button
- Toggles capitalizing text.
- Small Caps button
- Toggles capitalizing text using the same height and weight as lowercase.
- Superscript button
- Toggles reducing the height and weight of letters and placing them above the regular line of text.
- Subscript button
- Toggles reducing the height and weight of letters and placing them below the regular line of text.
- Align
- Set the text alignment. Justification options include: Left, Center, Right, Last Left, Last Center, Last Right, and Full.
Note: The alignment buttons require multiple lines of text within the text bounding box.
Global Parameters group
- Size
- Sets the text height where the measuring method is defined by the active font.
- Tracking
- Sets the space between letters.
- Leading
- Sets the distance between lines. Multiple lines of text are required.
- V Scale
- Sets the vertical scale.
- H Scale
- Sets the horizontal scale.
- Reset Parameters button
- Reset selected parameters to their default values for selected characters or all characters. Parameters include: Global V Scale, Global H Scale, Tracking, Leading, Baseline Shift, Kerning, Local V Scale, and Local H Scale.
- Manipulate Text button
- Toggles the ability to manually manipulate the text uniformly or non-uniformly. You can adjust the text size, font, tracking, kerning, and baseline.
Note: To select all letters between two selected letters, select the first letter then hold CTRL and select the second letter. To clear all but one selected letter, hold SHIFT and select the letter.
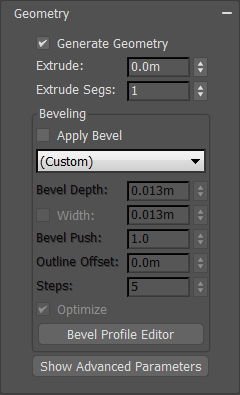
Geometry rollout

- Generate Geometry
- Toggles the geometric effects from 2D to 3D.
- Extrude
- Sets the extrusion depth.
- Extrude Segs
- Specifies the number of segments created in the extruded text.
Beveling group
- Apply Bevel
- Toggles the beveling on the text.
- Presets list
- From the drop-down list, select a preset bevel type or select custom to use a bevel you create using the Bevel Profile Editor. Presets include: Concave, Convex, Engrave, Half Circle, Ledge, Linear, Ogee, Three Step, Two Step.
Note: Any bevels you create and save will appear in the list.
- Bevel Depth
- Sets the depth of the beveled area.
- Width
- The checkbox toggles the ability to modify the width parameter. The default setting is unchecked and constrained to the depth parameter. Select to change the width from the default and enter the amount in the width field.
- Bevel Push
- Sets the intensity of the bevel curve. For example: using a concave bevel preset, a value of 0 is a perfect linear edge, -1 is a convex edge, and +1 is a concave edge.
- Outline Offset
- Sets the outline's offset distance.
- Steps
- Sets the number of vertices used to divide the curve. The higher the number of steps, the smoother the curve.
- Optimize
- Removes unnecessary steps from straight segments in the bevel. Default=on.
- Bevel Profile Editor button
- Toggles the Bevel Profile Editor window, enabling you to create your own custom profiles.
- Show Advanced Parameters button
- Toggles advanced parameters.

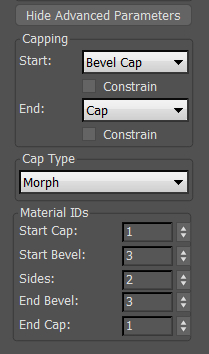
Capping group
- Start
- Set the cap for the front face of the text. Options include: Cap (simple cap without bevel), No Cap (open face), Bevel Cap, Bevel No Cap. Default=Bevel Cap.
- End
- Set the cap for the back face of the text. Options include: Cap (simple cap without bevel), No Cap (open face), Bevel Cap, Bevel No Cap. Default=Cap.
- Constrain
- Uses selection constraints on the selected face.
Cap Type group
- Morph
- Creates cap face using triangles.
- Grid
- Creates cap face in a grid pattern. This cap type deforms and renders better than morph capping.
- Subdiv
- Creates cap face that will deform using a subdivision pattern.
Material IDs group
Use this group to apply individually selected materials to the Start Cap, Start Bevel, Sides, End Bevel, and End Cap.
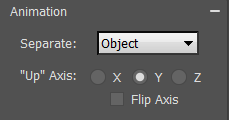
Animation rollout

- Separate
- Sets which portion of the text animates. Options include:
Object Applies animation globally to entire text element. Character Separates characters as children objects and only animates selected characters. Word Separates words as children objects and only animates selected words. Line Separates lines of text as children objects and only animates selected lines. Paragraph Separates paragraphs as children objects and only animates selected paragraphs. - "Up" Axis
- Sets the upward orientation of the text element to the X, Y, or Z axis. This is necessary if you are using an animation preset where original object used to create the preset had a different orientation axis than the current text element, resulting in the text running in an incorrect direction.
- Flip Axis
- Reverses the orientation of the text element. This may be necessary if you are using an animation preset where original object used to create the preset had a different orientation axis than the current text element, resulting in the text running in an incorrect direction.