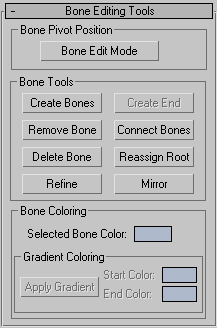
Controls on the Bone Editing Tools rollout let you create and modify bone geometry and structure, and set bone color for one or more bones.
Interface

Bone Pivot Position group
- Bone Edit Mode
-
Toggles a mode that lets you change the lengths of bones and their positions relative to one another.
When on, you can change the length of a bone by moving its child bone. In effect, you can scale or stretch a bone by moving its child bone while in this mode. This tool is available both before and after assigning an IK chain to the bone structure.
When Bone Edit Mode is on, animation tools are unavailable, and when Auto Key or Set Key is on, Bone Edit Mode is unavailable. To edit bones, turn off Auto/Set Key.
Note: Moving a bone in Bone Edit mode affects the length of both the child and its parent . If the bones aren't spatially aligned in the usual way (for example, if you are using other objects as bones), this might have unexpected results.
Bone Tools group
- Create Bones
-
Begins the bone-creation process. Clicking this button is the same as clicking Create panel
 Systems
  Bones System.
 - Create End
-
Creates a nub bone at the end of the currently selected bone. If the selected bone is not at the end of a chain, the nub is linked in sequence between the currently selected bone and the next bone in the chain.
- Remove Bone
-
Removes the currently selected bone. The bone’s parent bone is stretched to reach the removed bone’s pivot point, and any children of the removed bone are linked to its parent. Any IK chains that included the removed bone will remain intact.
- Connect Bones
-
Creates a connecting bone between the currently selected bone and another bone. When you click this button, a dotted line appears in the active viewport from the first selected bone. Move the cursor to another bone to create a new connecting bone. The first selected bone will become a parent to the connecting bone, which is in turn a parent to the second selected bone.
- Delete Bone
-
Deletes the currently selected bone, removing all its parent/child associations. A nub is placed at the end of the deleted bone’s parent. Any IK chains that included this bone become invalid.
- Reassign Root
-
Makes the currently selected bone the root (parent) of the bone structure.
If the current bone is the root, clicking this has no effect. If the current bone is the end of the chain, the chain is completely reversed. If the current bone is in the middle of the chain, the chain becomes a branching hierarchy.
- Refine
-
Splits a bone in two. Click Refine, and then click a bone where you want it to split.
- Mirror
-
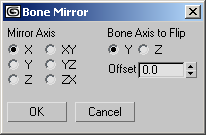
Opens the Bone Mirror dialog (see following), which lets you create mirror copies of selected bones without changing the sign of the bones' scale. Instead, Mirror flips one of the bone axes: Y or Z. You can specify the mirroring axis and the flip axis with the dialog controls.
Bone Mirror dialog

Opens when you click the Mirror button. Use it to specify the mirroring axis, the flip axis, and an offset value.
While the dialog is open, you can see a preview of the mirrored bone(s) in the viewports. Click OK to create the bones, or Cancel to prevent creation.
- Mirror Axis
-
Choose an axis or plane about which the bones will be mirrored: X/Y/Z or XY/YZ/ZX.
- Bone Axis to Flip
-
To avoid creating a negative scale, choose the bone axis to flip: Y or Z.
- Offset
-
The distance between the original bones and the mirrored bones. Use this to move the mirrored bones to the other side of the character.
Bone Coloring group
- Selected Bone Color
-
Sets the color for selected bones.
- Apply Gradient
-
Applies a gradient color across several bones based on the Start Color and End Color values. This option is available only when two or more bones are selected. The Start Color is applied to the highest parent bone in the selected chain, while the End Color is applied to the last child object in the selected chain. Intermediate colors in the gradient are applied to bones in between.
- Start Color
-
Sets the starting color for the gradient.
- End Color
-
Sets the ending color for the gradient.