This topic provides short step-by-step procedures for basic usage of the bones system.
Create a bones system:
- On the
 Create panel, click
  (Systems). On the Object Type rollout, click the Bones button.
 Alternatively, use Create Bone on the Bone Tools
 Bone Editing Tools rollout. Commands for creating bones are also available on the Create menu (Standard) and Objects menu (Enhanced).
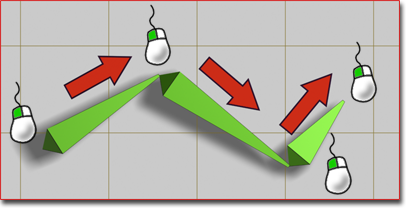
 - Click anywhere in a viewport to start a bone.
- Move the mouse to define the length and direction of the bone, then click to finish the bone and start a new one connected to the first. The second bone becomes apparent only when you move the mouse after clicking the second time.
- Move the mouse to adjust the second bone. Continue clicking and moving to continue creating the bone chain. Each new bone is connected to its forebear, and is its hierarchical child.
- Right-click to finish the bone chain.
3ds Max creates a small “nub” bone at the end of the hierarchy. This bone is used when assigning an IK chain. If you are not going to assign an IK chain to the hierarchy, you can delete the small nub bone.
The first bone you create is at the top of the hierarchy. The last bone you create is at the bottom. To work with object hierarchies, use the Hierarchy Panel.

Creating a simple chain of three bones
Create a branching hierarchy, such as legs branching from a pelvis:
- Create a chain of bones, and then right-click to exit bone creation.
- Click Bones (or Create Bones) again, and then click the bone where you want to begin branching. The new chain of bones branches from the bone you click. Warning: The behavior of a branching bone hierarchy is not always intuitive.
Create a bones hierarchy with an IK solver automatically applied:
- On the
 Create panel, click
  (Systems). On the Object Type rollout, click the Bones button.
 - On the IK Chain Assignment rollout, choose an IK solver from the drop-down list.
- Turn on Assign To Children.
- In a viewport, click and move to create the bones. Right-click to end bone creation.
After you finish creating the bones, 3ds Max applies the chosen IK solver to them.
Edit a bone's appearance:
- Select a bone.
- Go to the
 Modify panel.
 - Change its settings on the Bone Parameters rollout.
Change bone lengths after they’ve been created:
- Choose Animation menu
 Bone Tools.
 - On the Bone Tools dialog, click Bone Edit Mode.
- Move the child of the bone you want to change. The length of its immediate parent changes to reach the child bone.
- When you are finished editing the bones, turn off Bone Edit Mode.
Add fins to bones:
 Select a bone.
 - Choose Animation menu
 Bone Tools.
 - Select the bones to which you want to add fins.
- On the Fin Adjustment Tools rollout, turn on Side Fins, Front Fin or Back Fin.
- Adjust the size and appearance of the fins with the appropriate spinners. Note: You can also add fins to an individual bone on the Modify panel.
Fins can help you visualize bones' orientations, and can also help to approximate the character shape.