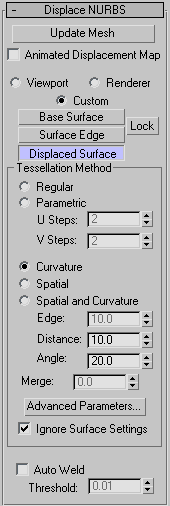
The Displace NURBS world-space modifier (World Space) converts a NURBS object into a mesh. If a displacement map is applied to the object, the mesh shows the effect of the displacement map in viewports. There are two main reasons for using Displace NURBS:
- As a visualization aid to see the effect of a displacement map in viewports
When you use Displace NURBS this way, you usually delete the modifier once you've obtained the effect you want.
- To obtain an editable mesh created from a displacement map on a NURBS object
To use Displace NURBS this way, you apply it to the object that has a displacement map, then use the Snapshot command from the Tools menu, and choose Mesh as the Clone Method.
Snapshot creates a permanently displaced mesh. As it does for other kinds of objects, Snapshot also leaves the original, displacement-mapped object in the scene. After applying Snapshot, you can delete the original object, or you can keep it in your scene to use for other purposes.
Interface
The rollout for Displace NURBS lets you choose which surface approximation settings are used to produce the mesh.

- Update Mesh
-
Click to update the mesh if you have changed the displacement mapping and want to see the results of the change. The mesh isn't updated automatically because that could become extremely time consuming.
- Animated Displacement Map
-
If you use an animated displacement map on the mesh, turn on this toggle to have the NURBS Modifier correctly update the mesh as the displacement map animates.
You can apply a Displacement map using the Material Editor.
- Viewport Uses the tessellation that the NURBS object currently uses in viewports.
- Renderer Uses the tessellation that the NURBS object currently uses for the renderer.
- Custom Uses controls in the Tessellation Method group box to set the tessellation explicitly.
- Base Surface, Surface Edge, Displaced Surface, and Lock
-
These controls are the same as in the surface approximation controls for NURBS objects.
Tessellation Method group
Most controls in this group are the same as the Tessellation Method controls for NURBS objects.
- Ignore Surface Settings
- When turned off, Displace NURBS uses the surface approximation settings for surface sub-objects. When turned on, Displace NURBS uses the settings in the Tessellation Method group and overrides settings for surface sub-objects. Default=off.
- Auto Weld
-
All vertices closer than the Threshold value are automatically welded together. This can simplify the mesh geometry. It is useful to turn this on when you have increased the Merge value in order to eliminate gaps between surface edges in the approximation of the NURBS object.