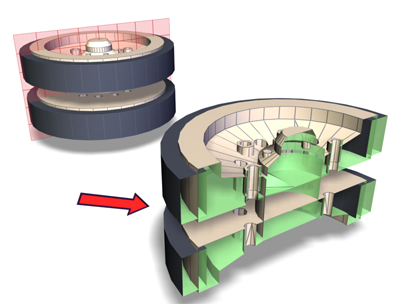
The Slice modifier lets you use a cutting plane to slice through a mesh, creating new vertices, edges and faces based on the location of the slice plane gizmo. The vertices can either refine (subdivide) or split the mesh, and you can also remove the mesh from one side of the plane. Using Radial slicing, you can also slice an object based on minimum and maximum angles.
The Slice modifier slices through groups, selected objects or sub-object selections of faces. It works similarly to the Editable mesh  Edge
Edge  Slice function but does not require the object to be an editable mesh or poly.

Slice cuts through the assembly
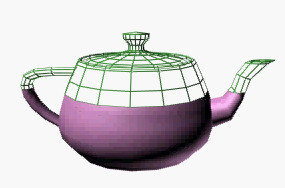
You can animate the cutting plane, changing its position and rotation over time. You can also make objects gradually appear and disappear of objects by animating the Slice Plane gizmo in conjunction with the Remove Top and Remove Bottom options.


Top: Original object
Middle: Object without top
Bottom: Object without bottom
Multiple Slices
To create multiple slices in an object, apply multiple Slice modifiers. If the geometry doesn't need to remain parametric, you can collapse it into editable mesh or editable poly format and use the respective Slice tool (see Cut and Slice (Editable Mesh) and Cut and Slice group (Polymesh). This tool is easier to use for making multiple slices in an object, but the object cannot retain its creation parameters.
Interface
Modifier Stack

- Slice Plane
-
At this sub-object level, you can transform and animate the gizmo like any other object to determine where the slice occurs. Scaling the gizmo has no effect, because its extents are effectively infinite. If you need to limit the extent of the slice, use it on a sub-object selection set of faces, rather than on the entire object.
For more information on the stack display, see Modifier Stack.
Slice Parameters rollout

- Slice Type menu
- Choose the slice type, either Planar or Radial.
Slice Along group
- X, Y, Z buttons
- Slices the object along the selected axes.
- Flip (Planar type only)
- When enabled, flips the slice to the opposite side of the corresponding axis.
Radial Slice group
This group is only shown when Radial is selected as the slice type.
- Angle 1
- Sets the minimum angle of the radial slice.
- Angle 2
- Sets the maximum angle of the radial slice.
- Align to Face button
- Selects the face used to align the gizmo.
 Reset Gizmo button
- Resets the gizmo to its default position.
- Pick Object button
- Selects a reference object from the scene.
Slice Type group
Selecting a slice type defines how the slice plane will affect the geometry to which it has been applied.
- Refine Mesh (Planar type only)
- Adds new vertices and edges along the intersection of the geometry with the slicing plane. Faces cut by the plane are subdivided into new faces.
- Split Mesh (Planar type only)
- Adds a double set of vertices and edges along the plane boundary, producing two separate meshes (one on either side of the slice plane), which you can modify differently if desired. Use this to break a mesh in two.
- Remove Positive
- Removes the positive portion of the mesh.
- Remove Negative
- Removes the negative portion of the mesh.
- Cap
- When enabled, automatically caps any holes in the mesh along the boundary edges.
- Set Cap Material
- When enabled, automatically caps any holes along any boundary edges set to specific material ID.
- Material ID
- Sets the material ID to cap.
- Operate On
- Selects how the slice handles...
- Automatic
- Poly
- Mesh


Operate On Face versus Operate On Polygon
Procedures
Example: To slice vertically through an object:
- Create a teapot primitive.
- Apply a Slice modifier.
The Slice Plane gizmo appears at the base of the teapot.
- On the modifier stack, expand the Slice modifier hierarchy and highlight the Slice Plane gizmo.
- Move the Slice Plane gizmo so it intersects the middle of the teapot.
- Rotate the Slice Plane gizmo so it is vertical.
- Turn on Remove Top.
The back of the teapot is sliced away.
- Turn on Remove Bottom.
The front half of the teapot is sliced away.
Example: To animate the appearance of a teapot using the Slice modifier:
- Create a teapot primitive. Set the viewport to wireframe.
- Apply a Slice modifier.
The Slice Plane gizmo appears at the base of the teapot.
- On the modifier stack, highlight the Slice Plane gizmo.
- Turn on
 (Auto Key), and drag the time slider to frame 100.
- Move the Slice Plane gizmo above the top of the teapot.
 Play the animation to verify that the slice plane is animated.
- Change the Slice type from Refine Mesh (the default) to Remove Top.
 Play the animation again.
- Make a copy of the teapot in the same position (choose Edit menu
 Clone and click OK to accept the default settings).
- Put a Wireframe material on the clone and change the Slice type on the clone to Remove Bottom.
-
 Play the animation.
The wireframe teapot is transformed into a fully-shaded object.
