The Displace space warp acts as a force field to push and reshape an object's geometry. Displace affects both geometry (deformable objects) and particle systems.
-
 Create panel >
  (Space Warps) > Forces > Object Type rollout > Displace button
-
Create panel > (Space Warps) > Geometric/Deformable > Object Type rollout > Displace button
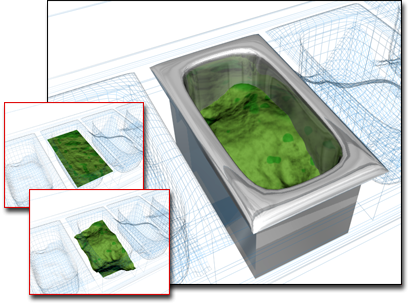
Displace used to change the surface in the container
There are two basic ways to use the Displace space warp:
- Apply the gray scale of a bitmap to generate the displacement amount. Black areas of the 2D image are not displaced. Whiter areas push outward, causing a 3D displacement of geometry.
- Apply displacement directly by setting displacement Strength and Decay values.
The Displace space warp works similarly to the Displace modifier, except that, like all space warps, it affects world space rather than object space. Use the Displace modifier when you need to create detailed displacement of a small number of objects. Use the Displace space warp to displace particle systems, a large number of geometric objects at once, or an object relative to its position in world space.
For geometry, the detail of the displacement depends on the number of vertices. Use the Tessellate modifier to tessellate faces you want to show in greater detail.
Procedures
To create a Displace space warp:
- On the Create panel, click (Space Warps). Choose Geometric/Deformable from the list, then on the Object Type rollout, click Displace.
- Drag in a viewport to create the Displace warp object, which appears as a wireframe. Its shape depends on the active mapping parameter settings. Regardless of the mapping, a single drag creates the space warp.
- Bind the space warp to an appropriate object.
To assign a bitmap to a displace space warp:
-
 Select the Displace warp object.
 - In the Parameters rollout
 Displacement group, click the Bitmap button (labeled "None" by default). Use the selection dialog to choose a bitmap.
 - Set the Strength value. Vary the strength of the field to see how the bitmap displaces the object's geometry.
Interface
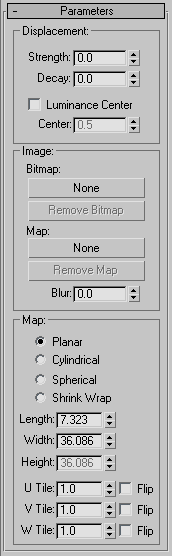
Displacement group
These are the basic controls for Displace space warps.
- Strength
- When set to 0.0, the Displace warp has no effect. Values greater than 0.0 displace object geometry or particles away from the position of the Displace space warp object. Values less than 0.0 displace geometry toward the warp. Default=0.0
- Decay
- By default, the Displace warp has the same strength throughout world space. Increasing Decay causes displacement strength to diminish as distance increases from the position of the Displace warp object. Default=0.0
- Luminance Center
- By default, the Displace space warp centers the luminance by using medium (50%) gray as the zero displacement value. Gray values greater than 128 displace in the outward direction (away from the Displace warp object) and gray values less than 128 displace in the inward direction (toward the Displace warp object). You can adjust the default using the Center spinner. With a Planar projection, the displaced geometry is repositioned above or below the Planar gizmo. Default=0.5. Range=0 to 1.0.
Image group
These options let you choose a bitmap and map to use for displacement.
- Bitmap button
- (Labeled "None" by default.) Click to assign a bitmap file from a selection dialog. After you choose a bitmap, this button displays the bitmap's name.
- Remove Bitmap
- Click to remove the bitmap or map assignment.
- Map button
- (Labeled "None" by default.) Click to assign a bitmap or map from the Material/Map Browser. After you choose a bitmap or map, this button displays the map's name.
You can also drag and drop a map from a Material Editor sample slot. If the Slate Material Editor is open, you can drag from a map node's output socket, then drop onto this button. You can also drag and drop from a map button in the Material Editor or anywhere else in the 3ds Max interface. When you drop a map onto the displacement map button, a dialog asks if you want the map to be a copy (independent) or an instance of the source map.
To adjust the displacement map's parameters (for example, to assign a bitmap or change the coordinate settings), drag the Map button to the Material Editor, and be sure to drop it as an instance. In the Compact Material Editor, drop the map over an unused sample slot. In the Slate Material Editor, drop it over the active View.
- Remove Map
- Click to remove the bitmap or map assignment.
- Blur
- Increase this value to blur or soften the effect of the bitmapped displacement.
Map group
This area contains mapping parameters for a bitmapped Displace warp. The mapping options are comparable to those options used with mapped materials. The four mapping modes control how the Displace warp object projects its displacement. The warp object's orientation controls where in the scene the displacement effect will appear on bound objects.
- Planar Projects the map from a single plane.
- Cylindrical Projects the map as if it were wrapped around a cylinder.
- Spherical Projects the map from a sphere, with singularities at the top and bottom of the sphere where the bitmap edges meet at the sphere's poles.
- Shrink Wrap Truncates the corners of the map and joins them all at a single pole, creating only one singularity.
- Length, Width, Height
- Specify the dimensions of the bounding box of the space warp gizmo. Height has no effect on planar mapping.
- U/V/W Tile
- The number of times the bitmap repeats along the specified dimension. The default value of 1.0 maps the bitmap once; a value of 2.0 maps the bitmap twice, and so on. Fractional values map a fractional portion of the bitmap in addition to copies of the whole map. For example, a value of 2.5 maps the bitmap two and one-half times.
Flip Reverses the orientation of the map along the corresponding U, V, or W axis.