Learn how to use the quick connection configuration tool and make your required settings in the respective dialog.
- In the Extended Modeling tab
 Joint Utilities panel, click
 (Configure Quick Connections).
The Quick Connection dialog offers all the options you need to fully configure the quick connection and also a Use button to apply the set rules to the current model, in a similar way to the Drawing Style Manager.
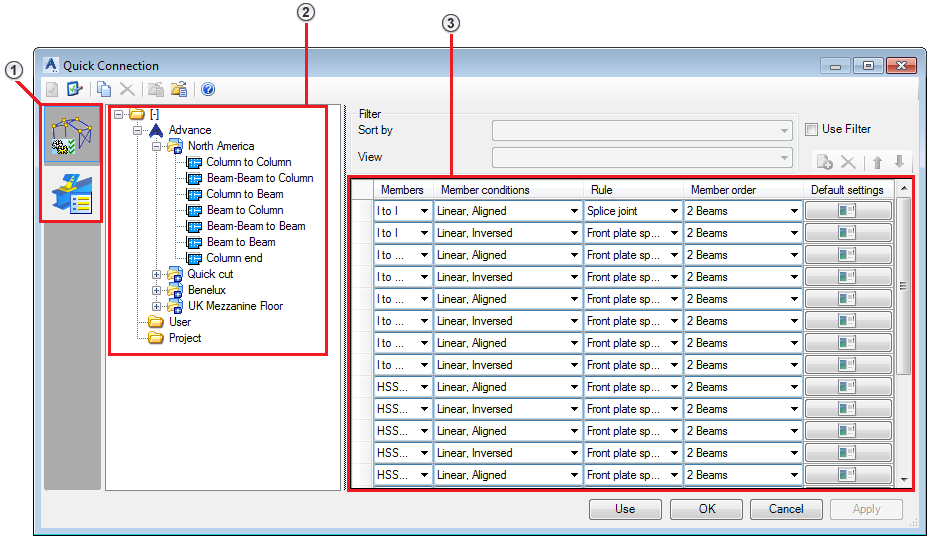
The configuration dialog is split into three main areas:

- Two tab-switch buttons that give you access to the two main configuration aspects of the quick connection:
- Connection rule - maps the geometric position, orientation and member type of the input elements to an existing Advance Steel connection.
- Default settings - associates a library setting that belongs to the respective connection, to quickly configure all the details of the connection (object size, bolt placement, welds, etc.) to the combination of geometric constrains + Advance Steel connection.
- Tree view of the available rules. Similar to other Advance Steel configurations, the Quick Connection offers an Advance/User category split, with Advance options being greyed out - the out-of-the-box configuration, while the User options allow changes and configuration of the connections as needed. There is also a Project category available, where rules can be configured and will be stored together with the model, in a database file associated to the dwg file, on the disk (the Project database has the same name as the 3D model dwg file, and is located in the same folder, next to it).
- The main configuration area. Here, the mapping between geometry constrains, connections and the library is done for each category.
The Profiles
Available in both the Advance and User categories, profiles are a contained set of rules that are applied together with multiple profiles existing under the same User category. Each profile has a key which allows the configuration of a command that can apply the quick connection configuration directly from the model.
If you need to provide different quick connection configurations, you can rename the profiles by right-clicking on any of them and selecting Rename from the contextual menu. You can also add new profiles using a database modification workflow.
Use profile keys to create a quick connection command

- In the Extended Modeling tab
 Joint Utilities panel, click
 (Quick Connection All).
With its default setting, the command will apply the North America profile, from the Advance category.
The quick connection fast command has the following format that can be seen when used in the command line:_AstorAutoConnection 0 1
- "_AstorAutoConnection" - this is the Advance Steel internal command.
- "0" - the first number defines the category from where the quick connection profile is used (0 for Advance, 9 for User).
- "1" - the profile key.
To create a new command, the two numbers need to be replaced with the appropriate ones.
For example, creating a command to apply the North America profile from the User category requires the following command: _AstorAutoConnection 9 1, where the category was replaced from 0 to 1, representing the User category, while the key value was kept 1 to match.
The new command can be added to the Ribbon or the palette.