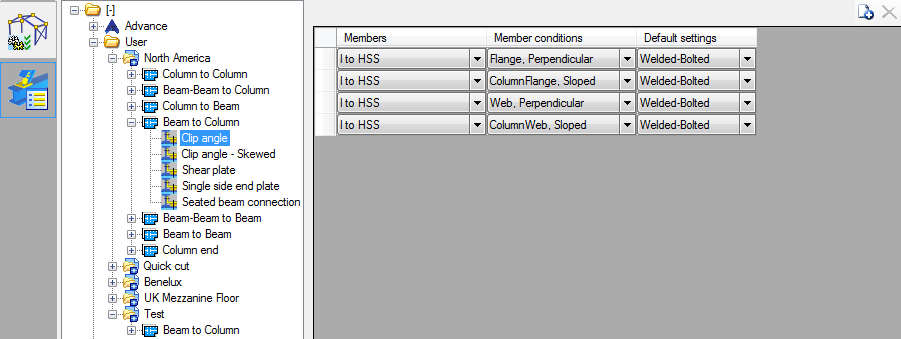
Learn how to assign specific library settings to the connections configured in the rules.
The library settings are pre-configured connection sets, which are created by saving a specific configuration made to the connection in the database. The specific configuration can then be used, permitting the configuration of all connection parameters in one take.

The tree on the left side of the page contains the same settings as the ones made in the Connection Rule tab, with the Advance and User categories, profiles and node types. In addition to those, each node type also contains a list with the connections that are configured for it.
Clicking on any of the connections opens a table, where lines can be added to associate the connections geometric constrains and members to the library settings. This table is not position-dependent (the lines can be added in any order), and it will not automatically fill with all the existing geometrical constrains and members previously configured in the Connection Rule.
Create Rules for Default Settings
For new profiles, the list associated to the node - connection combination will be empty. All the rules need to be manually added. They don't necessarily need to match the Connection Rule configuration, but it is important that the respective combination of geometric constrains, member types, connections and nodes fits one of the Connection Rule configurations.
For example : If a connection rule is made for Beam-Beam, I to I beam, Web of main member to create a shear plate, then the default settings can accept a rule saying the same Beam-Beam, Shear plate connection, I to I beam, Web - Sloped&Skewed. In addition to this, a second rule can be added for Web-Perpendicular, matching the same connection rule mentioned above - so for one connection rule that ensures the creation of a shear plate when two beams are connected, two default settings lines can be configured to use different library settings for perpendicular and sloped&skewed situations.
You can add a new default settings definition line using the
 (Add new connection situation) button.
Next to the Add button, there is also a Delete button. This list doesn't require line positioning - so there are no arrow buttons.
A line is configured using the three columns:
- Members - similar to the connection rule, you can restrict the definition line to beam shapes (I, O, U, etc.)
- Member conditions - the geometrical relative positioning of the two (three) beams joined by this connection. The rules that apply are identical to the ones from the Connection Rule configuration.
- Default settings - lists all the library entries of the selected connection and allows the quick connection to associate it to the defined rule.
