Dynamo Player sample scripts
![]()
Alias provides several Dynamo scripts that are setup to be run in Dynamo Player. You can also run your custom Dynamo scripts in Dynamo Player, however you must first configure them for the player. See Customize scripts for Dynamo Player.
For information about running scripts in Dynamo Player, see Play a script in Dynamo Player.
Load a Dynamo Player sample script
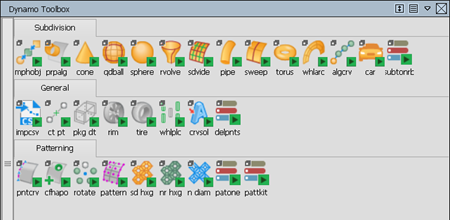
The easiest way to load a script into Dynamo Player, is to select it from the Dynamo Toolbox. To open the Dynamo Toolbox, do either of the following:
- If Dynamo Player is open, click the
 icon.
icon. - Select Help > Dynamo Resources > Dynamo Toolbox from the Alias main menu.
- If Dynamo Player is open, click the
Click the icon of the script you want to load.
If the scrip you want to run is not available from the Dynamo Toolbox, click the browse
 icon, and then browse the
 Dynamo Playerfolder located in your Alias installation directory. For example:C:\Program Files\Autodesk\AliasAutoStudio2021.3\Dynamo\Sample Files\
If you edit or customize the sample scripts in Dynamo, be sure to save them to a local directory to preserve the originals.
About the Dynamo Player sample scripts
The following sections provide information about each sample script, such as what it does, inputs required, and details about how the script can be modified to be used with different types of geometry. The scrips are categorized as follows:
Scripts for subdivision objects
Scripts for general modeling
Scripts for generating patterns
Scripts for subdivision objects
DP-Subdiv-from-Planes
![]()
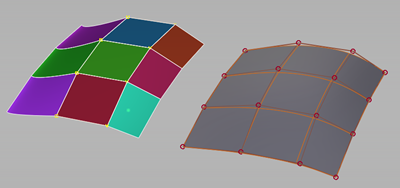
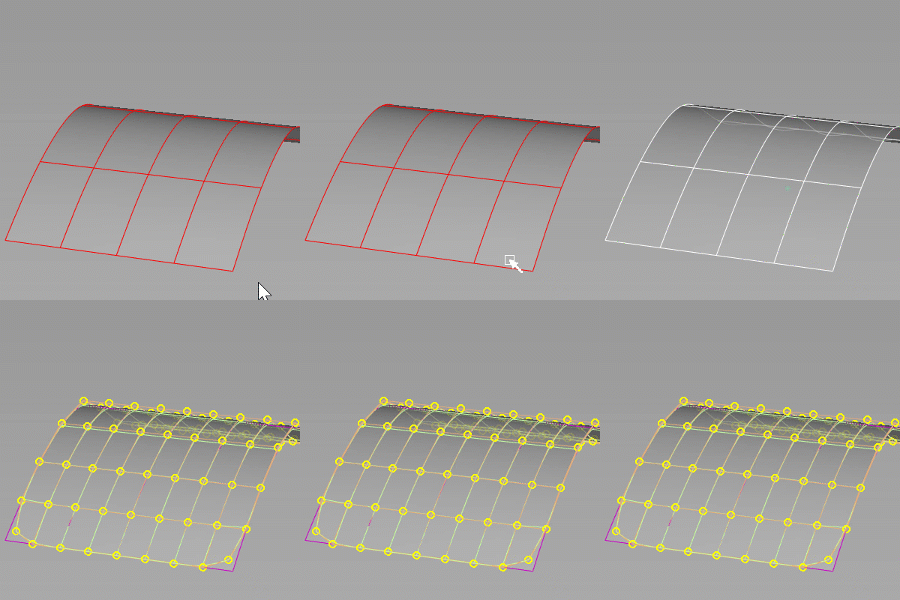
Create a subdivision object from a collection of planar NURBS surfaces. You can choose to keep the original input NURBS surfaces after generating the subdivision object.
Use the Surface Edit > NURBS to Bezier tool to split your NURBS surface into separate planar surfaces before using the script.
DP-Subdiv-from-Curves
![]()
Creates a subdivision object from connected linear curves. Note that the script only takes into account start and end points of curves.
DP-Subdiv-from-Nurbs.dyn
![]()
Use this script to convert a NURBS object to a subdivision object. You can choose to keep the input NURBS surface after generating the subdivision object.
DP-Subdiv-by-1-Gen-1-Rail/ DP-Subdiv-by-1-Gen-2-Rails
![]()
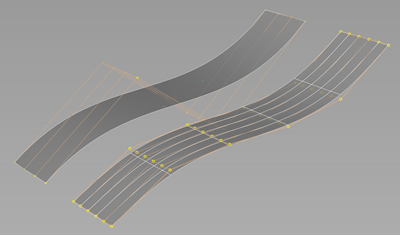
Use this script to build out a subdivision object using a series of one or two connected straight edges, which are used as rails, and a third set of connected edges, which guides the shape of resulting subdivision geometry.
Export-to-tsm-2021.2.2.dyn
![]()
Lets you export a single subdiv body to the .tsm T-Spline file format. Use this script to export subdivision bodies for applications that do not support the .tss T-Spline files such as Autodesk Fusion.
Subdiv-Cone-2021.2.1.dyn
![]()
Uses two construction points as inputs to create a subdivision cone.
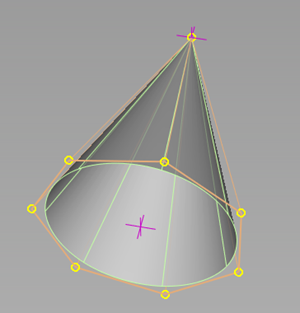
Subdiv-Torus-2021.2.3-Torus.dyn
![]()
Uses a construction point as an input to create a subdivision torus.
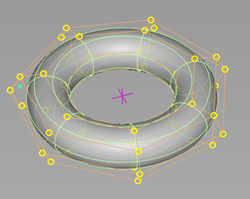
Subdiv-Sphere-2021.2.1.dyn
![]()
Uses a construction point as an input to create a subdivision sphere.
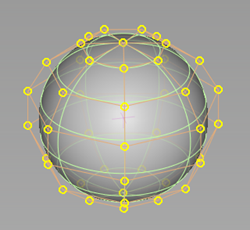
Subdiv-Quadball-2021.2.1.dyn
![]()
Uses a construction point as an input to creates subdivision sphere with quad topology.
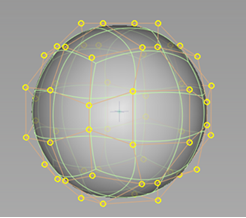
DP-Subdiv-Pipe.dyn
![]()
Uses any number of selected curves as inputs to create a subdivision pipe. At the connection point between two tangential curves, the pipe geometry merges without additional topology. You can choose whether or not to add caps to the ends of the pipe geometry.
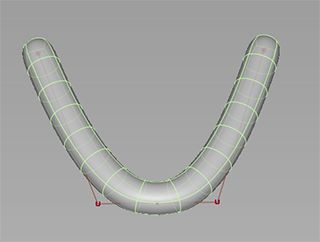
At the connection of position continuous curves, the script adds topology to create the proper angle in the pipe.
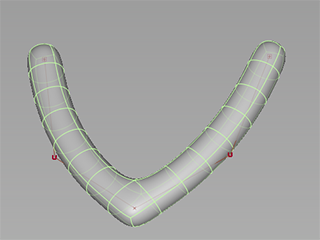
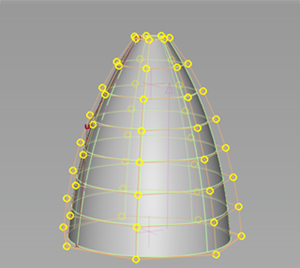
Subdiv-Revolve-2021.2.3.dyn
![]()
This script uses three inputs: a curve for the profile curve that gets revolved around the axis, a construction point, which defines the axis origin for the revolve, and a vector to specify the direction of the curve sweep.
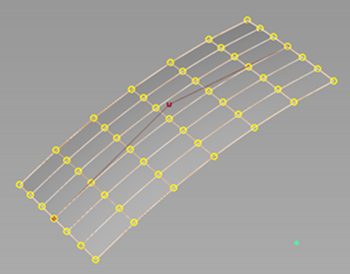
DP-Subdiv-Sweep.dyn
![]()
This script uses two curve inputs to create a subdivision object with a sweep. One curve is used for the sweep profile and the other as a sweep path. By default, the sweep geometry gets generated at the location of the path curve. Turning on Use Profile Position lets you create or move the sweep geometry to the location of the profile curve. In either case, the path curve defines the start and end points of the sweep.
Subdiv-Subdivide-2021.2.2.dyn
![]()
Creates a copy of the selected subdivision body and subdivides each face of the new object into four faces. The original subdivision body is not deleted by the script.
Subdiv-Distribute-and-Rotate-along-a-Curve-2021.3.8
![]()
Generates multiple copies of a closed subdivision body along a curve. Use the Start Angle and End Angle parameters to set the rotation angle of the first and last copies. The rotation angle of copies in between are interpolated from the start and end angles. The Distribution parameter lets you adjust how the copies get distributed along the curve. A value of 0.5 equally distributes the copies, while higher or lower values, distribute copies non-linearly with a bias towards the first or last copies.
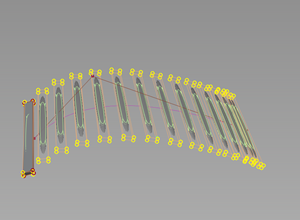
This script uses the Graph-Mapper-2021.3.7.dyn Dynamo script to provide the non-linear distribution functionality.
DP-Subdiv-Car.dyn
![]()
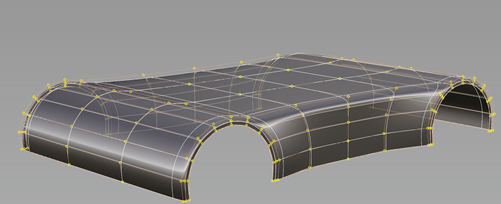
Creates a simple subdivision model of a full car body, half of a car body, which consists of two bridged wheel arches, or just two wheel arches. Use the script controls adjust model dimensions, wheelbase, and overall topology. You can use this script to quickly generate a base car shape for further design and refinement.
DP-Subdiv-Align.dyn
![]()
This script aligns the open edges of a subdivision objects in any direction to a reference surface. To only align the first row of CVs, set Mode to G0. To only align the second row of CVs, set Mode to G1. Set mode to G0+G1 to align both rows of CVs. By default the script aligns the CVs at G1 to the surface. When using G1 alignment, you can specify the alignment angle applied to the second row CVs. Use the G1 Angle parameter to set the alignment angle between -180 to 180 degrees.
This script replaces the DP-Subdiv-Perpendicular-Align.dyn script from the previous version of Alias.
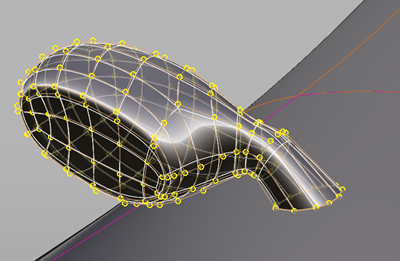
Use this script with the DP-Rim-Support-and-Radial-Scaling.dyn script to accurately align your spoke geometry to the rim reference geometry. To work correctly, the subdivision objects must have open edges, such a subdivision cylinder without a cap.
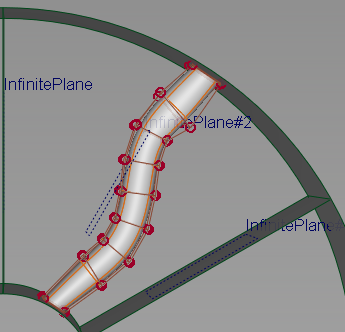
DP-Subdiv-Morph-between-2-Objects.dyn
![]()
This script uses two subdivision bodies as source inputs and generates a third body which is an intermediary object of the source objects. Use the Morph Ratio to adjust the ratio of influence either subdivision source input has on the resulting shape of the third body. This script includes a WIRE file for reference purposes.
For best results, follow these guidelines:
- The two source subdivision bodies should derive from the same model and be only slight variations of each other. Copy and paste the model to create the second source object.
- Each source body needs to have the same number of CVs. This ensures that the script works correctly since it uses the internal IDs to determine the connecting vector between each ID matching CV pair.
- Place the two source objects on two separate layers. When the script generates the third object, it gets put on its own layer. You can then easily hide the source objects, and then adjust the Morph Ratio parameter to the update the intermediate object.
Subdiv-Wheel-Arch-2021.2.3.dyn
![]()
This script generates the curve topology for wheel arches. After loading the script, press the spacebar or click Build to generate the geometry. You do not need to provide curve inputs for the script.
Radius - Radius of the wheel arch to the center point.
Width - Width of the topology around the arches.
Wheel Arch Radial Spans - Number of spans along the arch.
Wheel Arch Across Spans - Number of spans from bottom to topic of the arch
Spans Front to Back - Number of spans between the front and back wheel arches.
Width Offset Back - Offsets the rear arch along the X axis by pushing it out.
Height Offset Back - Offsets the rear arch along the Z axis by moving it up or down.
Scripts for general modeling
DP-Thicken
![]()
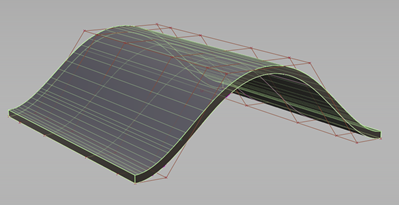
Use this script to add thickness to NURBS objects. For the script to work correctly, the geometrical normals on the surfaces must be aligned. Use this script to add material thickness to surfaces instead of using the Surface Offset tool.
The thicken surfaces can be stitched, however you may need to increase the Tolerance value of the Stitch Control Construction options.
DP-Explode
![]()
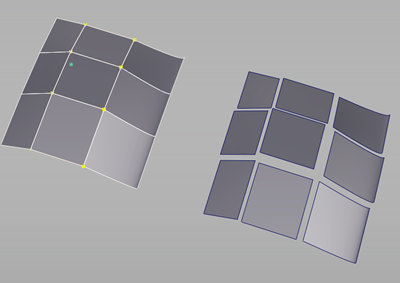
Creates copies of selected entities and moves them away from the computed center of the selected input object. Use the Relative Movement parameter to set the move distance.
DP-Delete-Duplicate-Points.dyn
![]()
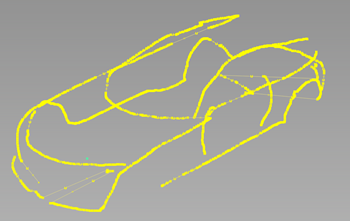
This script takes a selection of points as an input and deletes any duplicate instances of each point. The result is a set of unique points. You can use this script in situations when you require only single instances of points such as in point clouds.
DP-Import-CSV-file-as-Points.dyn
![]()
This script reads comma separated value text files into Alias. If the file contains coordinate values, it can be used to generate point clouds or point lines in the scene. You can also use this script to display text annotations, such as for design review purposes.
DP-Objects-Center-Point.dyn
![]()
This script generates a construction point at the center of one or more geometry objects. When calculating the center point, only the actual visible geometry of the inputs is taken into account. CV layouts or trimmed areas do not affect the point calculation. After the construction point gets added, you can select the surface and use Move Pivot to snap the pivot to the center point. Use this script as a way of centering the pivot point of trimmed geometry.
DP-Package-Data.dyn
![]()
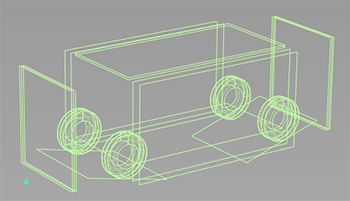
This script creates a data package consisting of numerical inputs, which you can use for laying out your car designs. The script includes several parameters for adjusting the size and position of tires and wheels, as well for setting the dimensions of various planar surfaces used to set up your design.
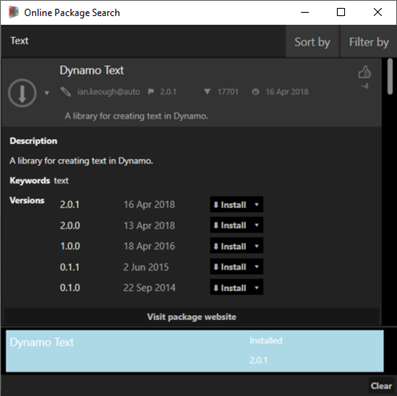
To add text for dimensions or other information in the viewport, you must install the Dynamo Text package in Dynamo. To do this:
Open Dynamo, select Packages > Search for a Package, and then type text into the search area.
Select and install the Dynamo Text package.
DP-Nurbs-Tire.dyn
![]()
![]()
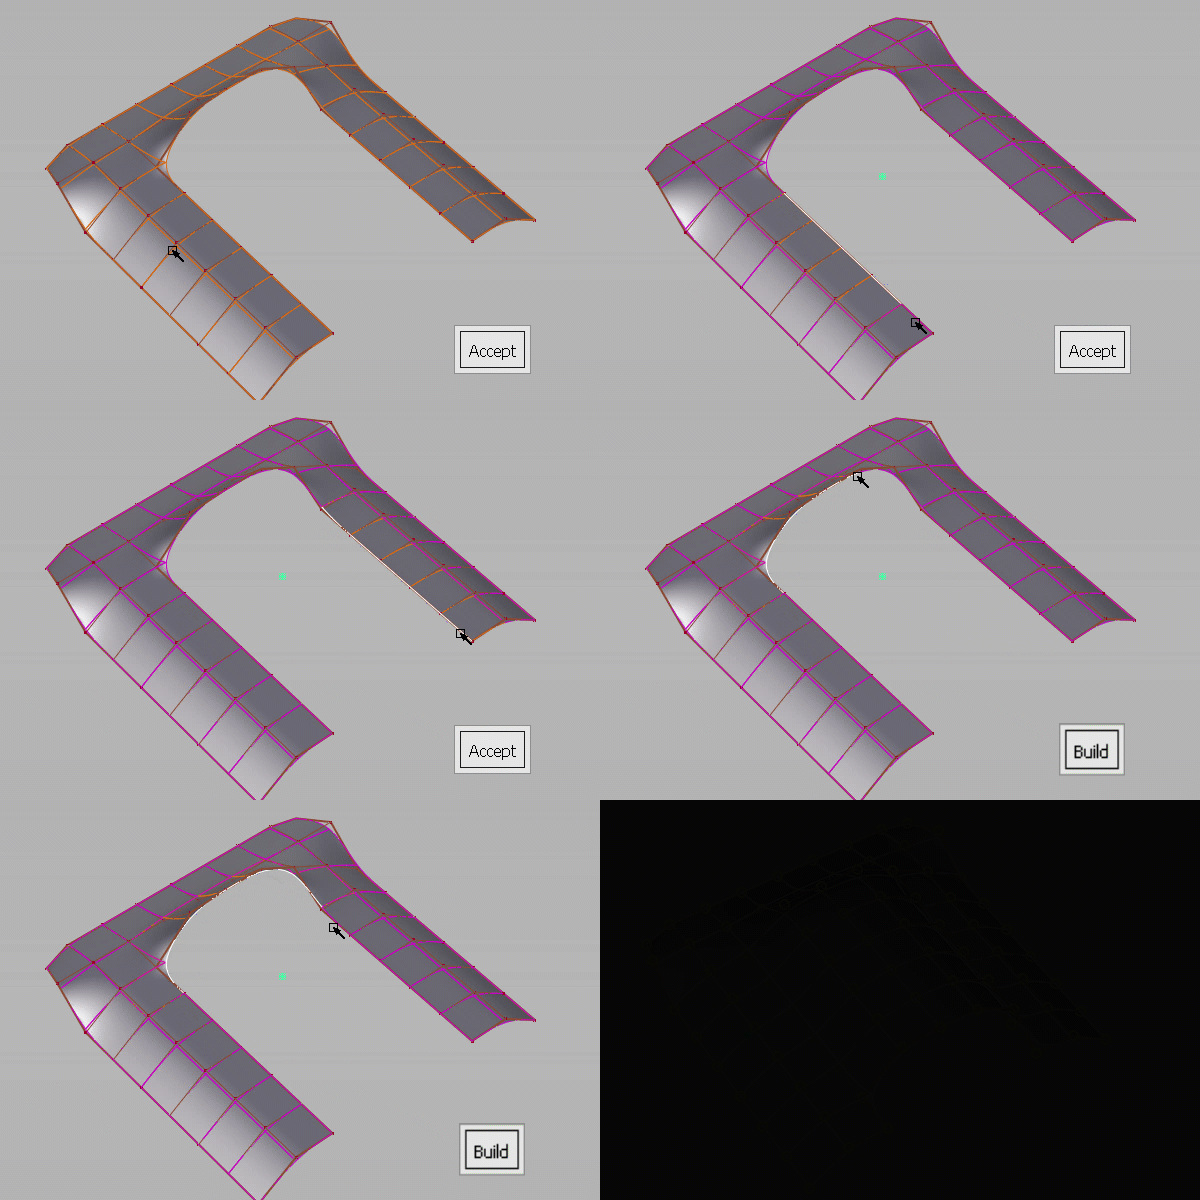
This script creates a NURBS model of a tire at the location of a construction point (Construction > Point). Select the point, and then click Accept before clicking Build.
Tire size and shape
Use the Tire and Shape parameters to fully customize the tire's specifications, including rim size, cross-sectional width, and height-to-width ratio. The resulting tire geometry is made up of multiple surfaces. This allows you to add different textures to the surfaces, such as a side wall label or tread patterns.
Create the tire tread
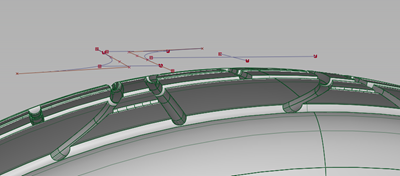
After you've created a tire with the desired specifications, you can generate a tire tread. In the Tread parameters section, you can select either Standard or Custom as the Create option. Select Standard to generate a tread pattern based on the set Standard Tread parameter values. Select Custom to use curves to generate the tread pattern. Use the Custom Tread parameters to make adjustments to the pattern.
When creating a tread using custom curves, ensure the curves are located above and in close proximity to the tire geometry.
Preview the design
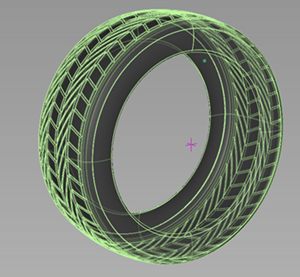
Turn on Preview mode while you adjust the tread parameters to create your tread design. The preview lets you view your tread design before generating the geometry. When you are satisfied with the design, turn on Create 3D Tread to generate the tread pattern geometry on the tire. Note that the tread generation may take between 40 and 90 seconds to complete.
DP-Wheel-Placement.dyn
![]()
This script takes selected geometry, such as a wheel or rim, creates four copies, and then places the objects at the wheel positions of a car. Wheelbase, Track Width, and Offset parameters let you adjust the wheel placement to the specifications of your car models. Use this script to quickly place tires created by the tire generation (DP-Nurbs-Tire.dyn) script. This script may run slowly when you select large amounts of geometry.
DP-Nurbs-Closed-Curves-to-Solids.dyn
![]()
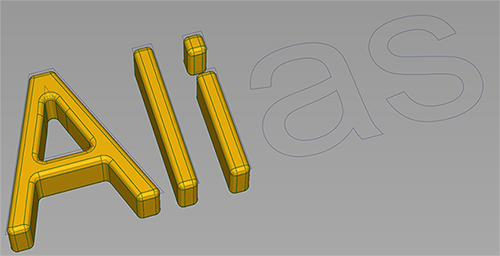
This script takes one or more closed curves as the inputs and generates a solid NURBS object. Use this script to create NURBS objects from any series of closed curve shapes including curves generated by the Alias Text tool (Curves > Text).
This script extrudes the closed curves to generate the NURBS object. The default direction of the extrude is calculated using the best fit plane. You can change the direction of the extrusion by turning on Invert Direction. Use the script controls to add chamfer, fillets, or a combination of these effects to the resulting NURBS object.
DP-Rim-Support-and-Radial-Scaling.dyn
![]()
You can use this script to aid in the design and creation of wheel spoke geometry. Executing this script generates reference rim geometry, including symmetrical regions inside the rim, which are intended to guide the scale and position of the resulting spoke geometry. You can generate the reference rim geometry a location of construction point or at the origin of the viewport (X=0, Y=0, Z=0).
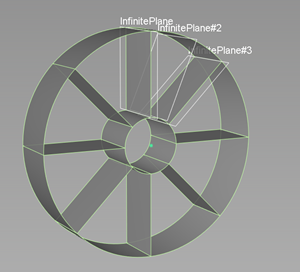
In this case, the term reference does not refer to WREF geometry.
About the reference geometry and script parameters
- Three construction planes are included for the purposes of helping you shape your spoke geometry.
- Use the Rim Dimension parameters to scale the reference geometry.
- Sectors refer to the symmetrically spaced regions between the outer and inner rim of the reference geometry. Spokes get generated inside each sector.
Using this script is a multi-step process that includes the following suggested workflow:
Select the construct point located where you want to generate the rim and spoke geometry. If you do not select a construction point, the geometry gets generated at the viewport origin (X=0, Y=0, Z=0).
After loading the script, click accept to generate the reference rim geometry.
Adjust the scale and dimensions of the reference rim geometry.
Specify the number of sectors in the reference rim geometry by setting the Amount of Sectors and Reference Sector Count to the same value.

The script uses these values to ensure that the spokes will be symmetrically scaled and positioned when they are generated from the source subdivision body.
Note:At this stage, the Amount of Sectors and Reference Sector Count values must be the same, otherwise the script cannot accurately calculate the symmetrical spacing of the spokes. Later, you can use the Amount of Sectors to adjust the number of spokes, but do not modify the Reference Sector Count value after this step.
Create the subdivision geometry you want to use for your spoke. For example, you can use a subdivision pipe created from the Subdiv-Pipe-2021.2.2.dyn script or any other subdivision object.
Position and align the subdivision body inside the sector containing the construction planes. The top of your subdivision body should be flush to the inner surface of the outer rim, and the object's bottom flush to the outer surface of the inside rim.
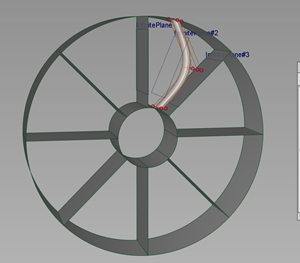
In the Spoke section, click the Select Subdiv and pick your subdivision body.
Click Accept.
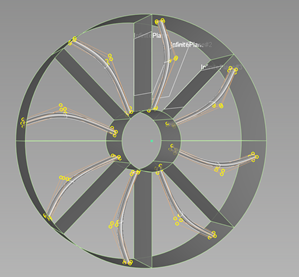
The script generates a new spoke in each sector around the rim.
Set the number of spokes by adjusting the Amount of Sectors parameter.
 Tip:
Tip:To only display your spoke geometry, you can either hide the reference geometry, or turn off Create Rim Sectors and Create Symmetry Plane.
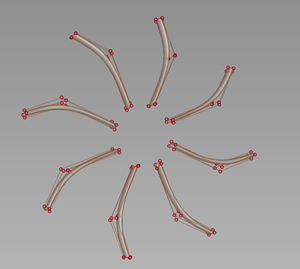
Since construction history is created with the script, any edits to the shape of the source subdivision object automatically get applied to all the spokes.
Scale-from-Center-Point-2021.3.2.dyn
![]()
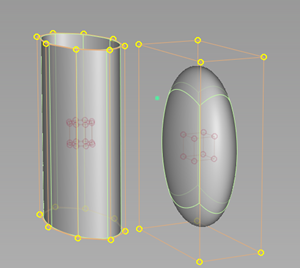
Lets you scale one or more objects from the center point of the object. The script takes the center point of each object and applies the set Scaling Factor values. Use this script to simultaneously scale multiple objects by the same value.
This script provides a good example of how to add scaling functionality to your custom scripts.
Graph-Mapper-2021.3.7.dyn
This Dynamo script generates non-linear distribution of objects or components. You can use this script as an example of how to add this type of functionality to your custom scripts. For example, you can use it as a way of calculating non-linear distribution of CVs along a curve.
You need to load this script into Dynamo. It is not intended to be loaded and executed directly in Dynamo Player.
Scripts for generating patterns
DP-Pattern-Toolkit.dyn
![]()
Lets you quickly create basic patterns on NURBS surface planes. This script simplifies pattern generation and incorporates the more complex components of a patterning script in Dynamo, such as calculating linear distribution.
You can also populate the point positions with solid geometry, and then use the pattern to trim another surface.
Generate a point pattern
Select an input surface as the Base Surface for the point pattern, and then press the spacebar or click Accept.
Use the Pattern Parameters to choose from pattern types, such as a grid, circular, or diamond pattern and adjust the number of pattern points using the Amount U/ Rings and Amount V/Linear parameters.
Use the Point of Influence and Attract/Detraction parameters to add non-linear distribution to the pattern. Use the Gravity slider to adjust the intensity. Switch between Linear and Radial attraction to produce interesting patterns.
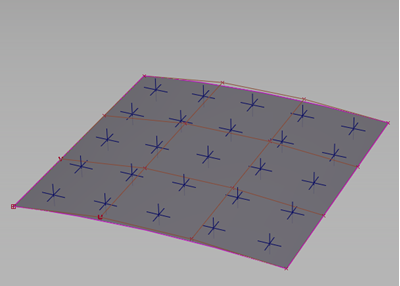
Since the points pattern has history, scaling the surface affects the pattern. Use the DP-Multi-Surface-Patterning-One-Guide-Curve script to transfer the points pattern to a target surface.
Place solid geometry and trim
In addition to the steps above, do the following to place geometry at the point locations and use the placed geometry to trim other input surfaces.
Select the Surfaces to Trim, and then press the spacebar or click Accept.
Select the Solid to Place, and then press the spacebar or click Accept.
Press the spacebar or click Build to run the script.
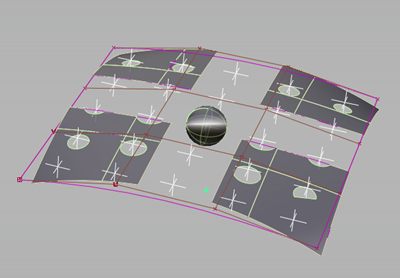
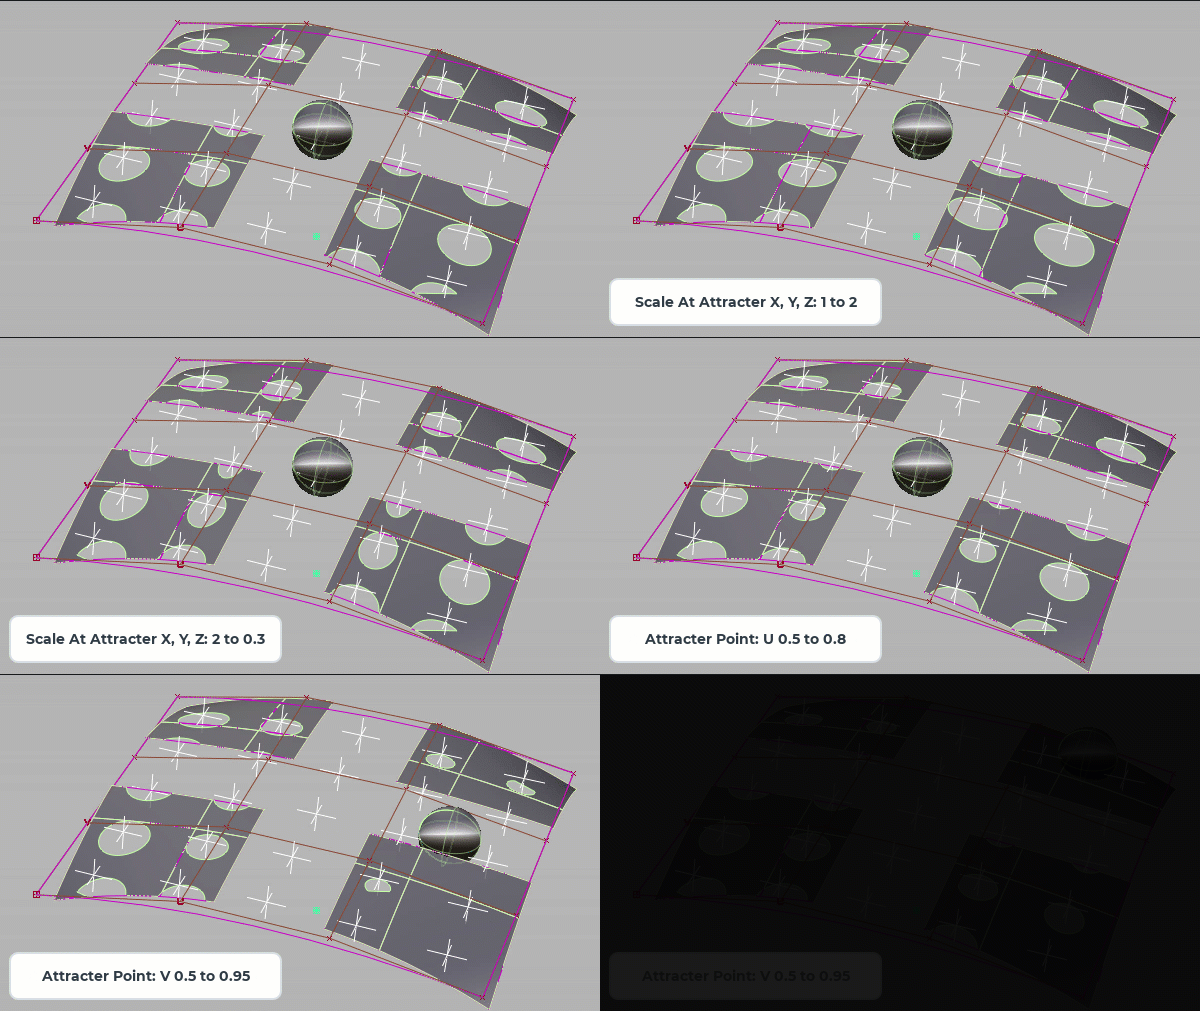
Use the U and V parameters to reposition the attractor point in the U and V directions. When these parameters are set to 0.5, the attracter point is at the center of the geometry. You can then use the X, Y, and Z Scale At Attracter parameters to change the trimming pattern relative to the attracter point position.
This script uses the Dynamo Pattern Toolkit package, so you must first install this for Alias Dynamo before using the script.
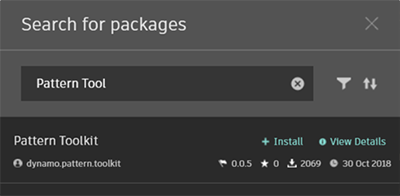
For information about installing packages, select Help > Interactive Guide > Packages from the Alias-Dynamo menu.
DP-Multi-Surface-Patterning-One-Guide-Curve.dyn
![]()
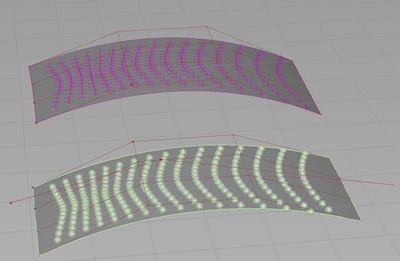
Use this script to place objects according to the points pattern onto one or more target surfaces. This script uses the following geometry from the DP-Pattern-Toolkit.dyn script as inputs:
- Pattern Base Surface - Select the source NURBS surface that the points pattern was generated on.
- Pattern Points - Select the points generated on the source surface.
It also includes the following additional inputs:
- Guide Curve - This curve is used to specify the center point of the pattern on the target surface. Modifying the position or shape of the curve also affects the pattern on the target surface, such as compressing or expanding it.
- Surfaces to Pattern - Select one or more NURBS surfaces as targets for the pattern.
- Object to Place - Select the NURBS object you want to instance on the target surface.
This script also provides options for trimming the target surfaces and aligning the instanced to the normal. Use the Flip Result parameter to flip the pattern geometry across the axis of the target surface.
DP-Points-on-Curves.dyn
![]()
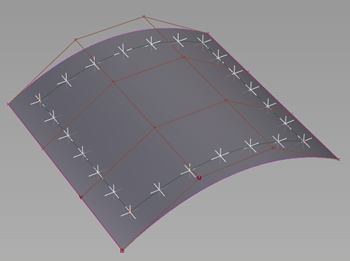
This script generates a specified number of points along a curve, curve-on-surface, NURBS surface edge or subdivision edge. You can choose between two modes: distribution and fixed distance. When Create Points is on in the Mode Distribute parameters, points can be distributed evenly along the curve. You can also choose to create a point at the start and the end of the curve by enabling the Create Point at Start or Create Point at End parameters. If you are creating points along a closed curve or edge, such as a loop or circle, you may want to create either a point at the start or at the end. Creating both will cause the end point of the previous curve to overlap with the start point of the next curve. You can also enable an Attract Point to skew the distribution of the points based on the its position along the curve.
For Mode Fix Distance, you can specify the distance you want in between each point. Note that both modes can be used at the same time if required.
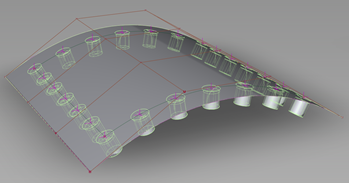
DP-Create-Filleted-Holes-and-Place-Objects.dyn
![]()
This script generates filleted-holes at selected points on a NURBS surface or subdivision body and places a selected object in the holes. Use this script to quickly create screw or rivet patterns on the surface of your models.
The inputs for this script include the base surface or subdivision geometry fillets and holes are generated on, the object you want to place in the filleted hole, and the points, which mark the position of the filleted holes.
Use the DP-Points-on-Curves.dyn script as a quick way of generating the point positions for the filleted holes.
Use the Normal Adjustment parameter to specify the placement of the object in the normal direction with respect to the surface.
DP-Rotate.dyn
![]()
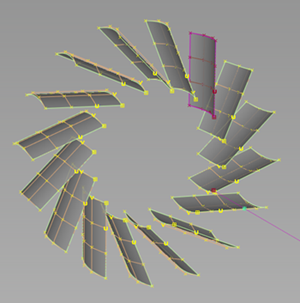
This script Uses an object input, such as a surface or infinite plane, as an instance that rotates around an axis. A curve input defines the start and end of the rotation axis. Use the Total Amount slider to set the number of instances that rotate around the axis. The Angle Coverage parameter lets you evenly distribute objects based rotational angle. For example, setting this value to 90 evenly distributes objects between 0 and 90 degrees.
DP-Multi-Surface-Patterning.dyn
![]()
This script lets you transfer a pattern of points from a planar NURBS or subdivision surface to a target surface, and then instance a selected object at those point locations on the target surface.
Follow these guidelines when selecting inputs for this script:
- Entities to be placed - Refers to the geometry you want to instance on the target surface.
- Pattern Single Surface - Refers to the source surface of the point pattern.
- Pattern Points - Refers to all points in the pattern on the source surface.
- Guide Curve and 2nd Guide Curve refer to the boundary curves on the target surface. The space between these curves defines the implicit surface on which the point pattern gets transferred and the selected geometry gets instanced.
- Center Point, Optional - This parameter lets you select a center point of the object you want to place, such as its pivot point. If you do not select an input, the center of the object bounding box is used by default.
- Surfaces to Pattern - Refers to the target surfaces receiving the points pattern and placed geometry.
Other parameters include the following:
- Stretch&Squeeze - Setting this parameter to 1 turns on Cut mode, which cuts off the pattern at the point it no longer fits on the target surface. Setting this parameter to 0 turns on Stretch & Squeeze mode, which resizes the pattern so that it fits onto the target surfaces.
- Align to surface normal - When on the geometry gets oriented along the normal of the target surface.
Nurbs-Hexagon-Pattern-2021.2.8.dyn
![]()
This script uses a single NURBS surface as an input and creates a NURBS Hexagon pattern on it.
- If you want to continue modifying the surface by modeling symmetrically, use Object Edit > Symmetric Modeling rather than using layer symmetry. Layer symmetry can invert the pattern.
- When using this script on large surfaces, you may need to increase the maximum value range for the sliders. See Customize scripts for Dynamo Player.
DP-Subdiv-Hexagon-Pattern.dyn
![]()
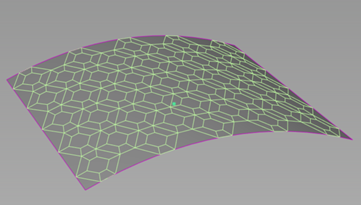
This script generates a subdivision-based hexagon pattern on a NURBS surface. Use the script controls to add and position an attractor point for modifying the pattern. A Create Preview Only option lets you experiment with different patterns before creating the real geometry. Use this script for quickly creating grill patterns.
DP-Nurbs-Diamond-Pattern.dyn
![]()
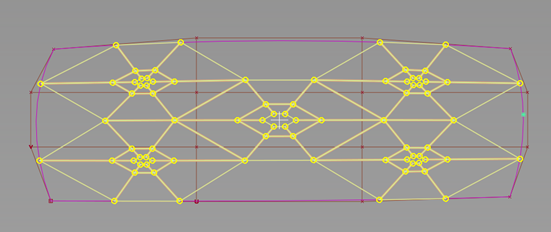
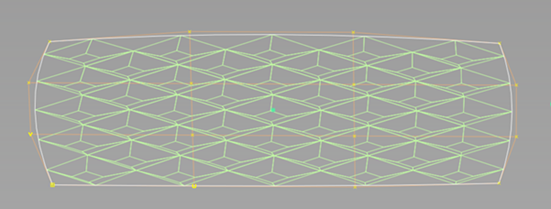
This script generates a diamond pattern on a NURBS surface. Use the script controls to add and position an attractor point for modifying the pattern. A Show Preview Only option lets you preview the patterns before generating the real geometry. Use this script to quickly create a grill pattern.
Related Tasks
- Play a script in Dynamo Player
- Set up a Dynamo script for Dynamo Player
- Customize scripts for Dynamo Player