Use this procedure to create a wall component, or to edit existing wall components in a wall style.
You can also add components to a wall style by copying them from other wall styles.
Note: Only the first 20 components of a wall style are controlled by the display system. Although you can specify more than 20 components in a wall style, it is suggested that you limit the number of components to 20. Components 21 and higher are controlled by material assignment only.
- Click

 .
. 
- Expand Architectural Objects, and expand Wall Styles.
- Select the wall style that you want to change.
- Click the Components tab.
- Click
 .
. - Enter a name for the new component.
- Enter the cleanup priority for the component when walls intersect.
The lower the priority number, the higher the priority of the component when it intersects with the components of other walls.
- Specify the width of the component:
If you want to … Then … specify a fixed width that cannot be edited when you add or edit walls of this style enter a value for Width. specify a variable width that can be edited when you add or edit walls of this style select the setting for Width. Enter a formula that defines how the component width is calculated. 
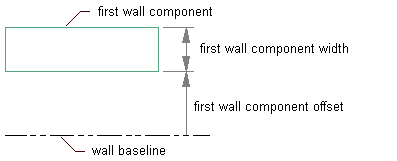
Adding the first wall component
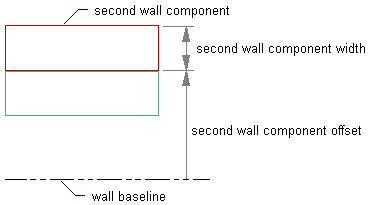
- Specify the edge offset, which is the offset of the exterior edge of the component from the baseline:
If you want to … Then … graphically specify the offset select the component, select  or
or  to offset the component by an increment that you specify. The viewer shows the position of the wall component as you click the icons. The selected component is highlighted in green.
 let the software calculate the offset select Auto Calculate Edge Offset. specify a fixed offset enter a value for Edge Offset. specify a variable offset that is calculated from values that you specify select the setting for Edge Offset. Enter a formula that defines how the edge offset is calculated for this component. - To specify the top elevation offset or bottom elevation offset, enter a new value, and select from where the distance is to be measured: Wall Top, Base Height, Baseline, or Wall Bottom. Note: Do not define wall components with elevation offsets that are above Wall Top or below Wall Bottom. Walls that have components that are defined this way do not clean up correctly and may not be displayed correctly if you edit their roof line or floor line. To avoid cleanup and display problems, you can define wall components with elevation offsets that are above Base Height or below Baseline.
- Repeat steps 5 through 10 to add more components to the wall style.

Adding the second wall component
- To change the order of components in the wall style, select a wall component, and click
 or
or  to move the component to the desired position relative to the other wall components.
 - Click OK.