Use this procedure to add a straight stair with settings that you specify.
Creating a straight stair
Tip: To ensure that the Properties palette is displayed before you select a tool, click  Properties.
Properties. - Open the tool palette that you want to use, and select a stair tool.
If necessary, scroll to display the tool that you want to use.
Note: Alternatively, click. 
- On the Properties palette, click the Design tab, expand Basic, and expand General.
- Select a style.
- For Shape, select Straight.
- Specify the vertical orientation of the stair:
If you want to… Then… draw the stair from this floor to the floor above select Up for Vertical Orientation. draw the stair from this floor to the floor below select Down for Vertical Orientation. - Expand Dimensions.
- Specify stair width, height, and justification:
If you want to… Then… specify the width of the stair enter a value for Width. specify the height of the stair enter a value for Height. specify the justification of the stair enter a value for Justify. The Justify value controls the insertion point when you place the stair (left, center, or right) at the beginning of the stair run. - Specify the stair termination:
If you want to… Then… end the stair run with a riser select Riser for Terminate with.  Note: Stairs that end with a riser will have an overall height that is one tread thickness less than the floor-to-floor height specified.
end the stair run with a tread select Tread for Terminate with. 
end the stair run with a landing select Landing for Terminate with. 
- Click
 next to Calculation rules, and
if you want to… then… specify the overall linear length of the stair enter values for Straight Length, and Riser Count, then click OK. - When Straight Length is set to
 (automatic), the value is calculated based on the tread size and riser count.
 - When Straight Length is
 (user-defined), the stair length is equal to the dimension entered, and the other three values are adjusted within the code limits.
 - When Riser Count is (user-defined), the tread depth is increased or decreased to accommodate the stair.
specify the total number of stair risers enter a value for Riser Count, then click OK. - When Riser Count is set to (automatic), the number of risers is based on the overall length and overall height of the stair and the code limits specified on the Design Rules tab. The Straight Length value of the stair is adjusted automatically.
- When Riser Count is set to (user-defined), you can specify a value that is used to calculate the tread depth and riser height. If these values fall outside the stair limits, an error message is displayed.
specify the height of each riser in the stair flight set all fields to (automatic), click the icon to Riser to change it to (user-defined) and enter a value for Riser. Click OK. specify the tread depth for each tread in the stair flight set all fields to (automatic), click the icon next to Tread to change it to (user-defined), and enter a tread depth value. You can also specify the Riser Count when you set the tread depth. Note: If a value is set to user-defined on the Calculation rules worksheet, it can be modified directly in the Properties palette.Note: If is displayed next to a field in the Calculation Rules dialog box, that field can’t be changed until another field is changed from (user-defined) to (automatic).
 - When Straight Length is set to
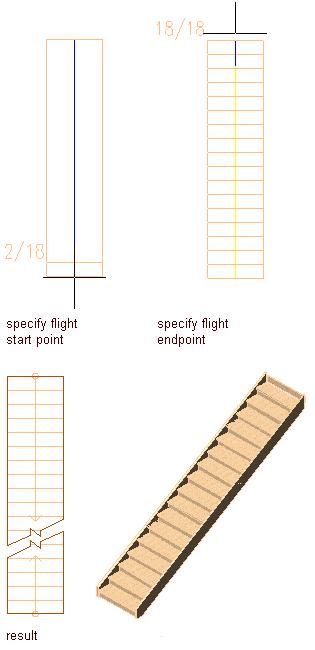
- In the drawing area, specify the insertion point of the stair.
You can move or hide the Properties palette to expose more of the drawing area.
- Specify the endpoint of the stair.
- Continue adding stairs, or press Enter.