If you are signed in to your Autodesk account, you can change the resolution of map images, modify their extent, adjust their opacity, or update them to the latest version available on the online maps service.
Change the Resolution of a Map Image
- Click the Map Image border. The Map Image contextual ribbon tab displays.
- Click
 .
Find
.
Find
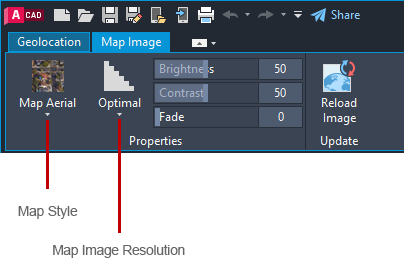
- From the Map Image Resolution flyout, select the desired resolution.
Change the Style of a Map Image
- Click the Map Image border. The Map Image contextual ribbon tab displays.
- Click
.
Find
- From the Map Style flyout, select the desired style.
Update an Image Map
- Click the Map Image border. The Map Image contextual ribbon tab displays.
- Click
.
Find
- If you want to reset the resolution of the map image to the optimum for on-screen viewing, click Optimize and reload. If not click Reload only.
Make Drawing Geometry Easier to See Against a Map Image
- Click the Map Image border. The Map Image contextual ribbon tab displays.
- From the Properties panel, adjust the Brightness, Contrast and Fade setting until the drawing geometry is clearly visible against the map image.
Enlarge or Shrink the Extent of a Map Image
- Click the Map Image border. Grips appear around the border.
- Drag a corner grip and resize the border of the map image. The map image reloads imagery from the online maps service and fills the area within the map image border