After you create a table, you can modify the size of its rows and columns, change its appearance, merge and unmerge cells, and create table breaks.
You can click any grid line on the table to select it and then modify it by using the Properties palette or grips.
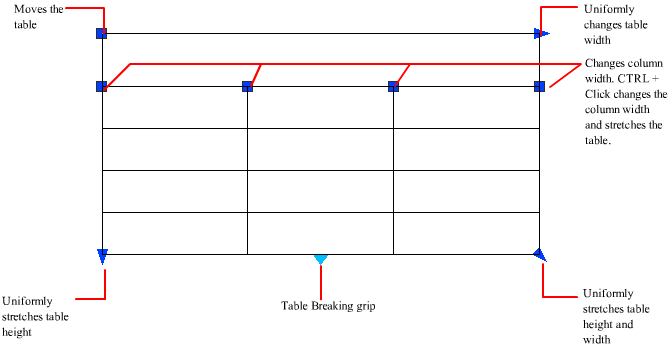
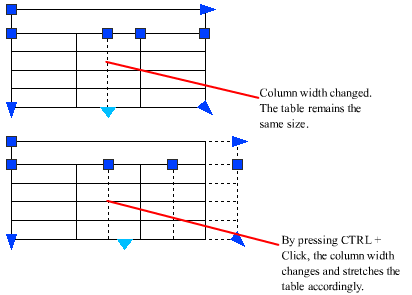
When you change the height or width of the table, only the row or column adjacent to the grip you have selected will change. The table will maintain its height or width. To change the size of the table proportionally to the size of the row or column you are editing, press Ctrl while using a column grip.
Modify a Table Cell
You can click inside a cell to select it. Grips are displayed in the middle of the cell borders. Click inside another cell to move selection to that cell. Drag the grips on a cell to make the cell and its column or row larger or smaller.

When a cell is selected, double-click to edit the cell text. You can also start entering text when a cell is highlighted to replace its current content.
To select more than one cell, click and drag over several cells. You can also hold down Shift and click inside another cell to select those two cells and all the cells between them. When you click inside a table cell when the ribbon is active, the Table ribbon contextual tab is displayed. If the ribbon is not active, the Table toolbar is displayed. From here, you can
- Insert and delete rows and columns
- Merge and unmerge cells
- Match cell styles
- Alter the appearance of cell borders
- Edit data formatting and alignment
- Lock and unlock cells from editing
- Insert blocks, fields, and formulas
- Create and edit cell styles
- Link the table to external data
With a cell selected, you can also right-click and use the options on the shortcut menu to insert or delete columns and rows, combine adjacent cells, or make other changes. When cells are selected, you can use Ctrl+Y to repeat the last action.
Using Ctrl+Y to repeat the last action only repeats actions executed through the shortcut menu, the Table ribbon contextual tab, or the Table toolbar.
Customize Display of Column Letters and Row Numbers
By default, the In-Place Text Editor displays column letters and row numbers when a table cell is selected for editing. Use the TABLEINDICATOR system variable to turn this display on and off.
To set a new background color, select a table, right-click, and click Table Indicator Color on the shortcut menu. The text color, size, and style and the line color are controlled by the settings for column heads in the current table style.
Break Tables into Multiple Parts
You can break a table with a large number of rows horizontally into primary and secondary table parts. Select the table and use the Properties palette, Table Breaks section, to enable table breaks. The resulting secondary tables can be located to the right, left, or below the primary table. You can also specify the maximum height and spacing of the table parts. By setting Manual Positions to Yes, you can drag the secondary tables by their grips to different locations. Several additional properties are also available.