Display the Customize User Interface (CUI) Editor
- Click
 .
Find
.
Find
Add a tooltip to a command
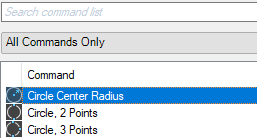
- In the Customize tab, Command List pane, select the command to which you want to add a tooltip.
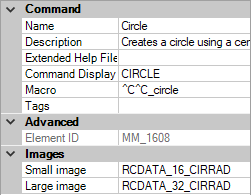
- In the Properties pane, Description field, enter the tooltip text for the selected command.
- Click Apply.
The next time the cursor hovers over the command on a toolbar or ribbon panel, the text is displayed in a tooltip.
Add an extended tooltip to a command
- In the Customize tab, Command List pane, select the command to which you want to add an extended tooltip.
- In the Properties pane, select the Extended Help File field and click the […] button.
- In the Select Extended Help File dialog box, browse to and select the XAML file that contains the extended tooltip definition for the command. Click Open.
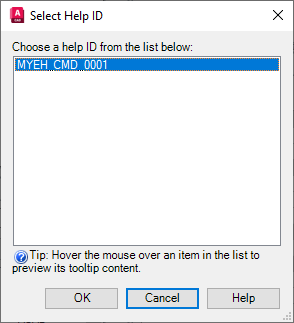
- In the Select Help ID dialog box, select the help ID for the extended tooltip content. Click OK.
- Click Apply.
When the command is added to a toolbar or ribbon panel, the extended tooltip content is displayed if extended tooltips are enabled and the cursor hovers over the command for the designated time interval.
Create a XAML file
- In a text editor (for example, Notepad), create a new file and enter the elements needed to define the extended tooltip content.
As an example, enter the text below in the text editor:
<ResourceDictionary
 xmlns="http://schemas.microsoft.com/winfx/2006/xaml/presentation"
 xmlns:x="http://schemas.microsoft.com/winfx/2006/xaml"
 xmlns:src="clr-namespace:Autodesk.Windows;assembly=AdWindows">
 <src:RibbonToolTip x:Key="MYEH_CMD_0003">
 <src:RibbonToolTip.ExpandedContent>
 <StackPanel>
 <TextBlock Background="AntiqueWhite" TextAlignment="Center">
 Configures the settings for the current drawing.
 </TextBlock>
 </StackPanel>
 </src:RibbonToolTip.ExpandedContent>
 </src:RibbonToolTip>
</ResourceDictionary>
- Save the file as an ASCII text file, with a file extension of .xaml.
Update extended tooltips created for AutoCAD 2009-based products to use in the latest release
- Open the XAML file in a text editor (for example, Notepad).
The following is an example of an extended tooltip created for use with an AutoCAD 2009-based product.
<src:ProgressivePanel x:Key="MYEH_CMD_0003">
 <StackPanel>
 <TextBlock Background="AntiqueWhite" TextAlignment="Center">
 Configures the settings for the current drawing.
 </TextBlock>
 </StackPanel>
 </src:ProgressivePanel>
- Change the bold and italicized text shown in the previous step to match the following to use the extended tooltip with the latest release:
<src:RibbonToolTip x:Key="MYEH_CMD_0003">
 <src:RibbonToolTip.ExpandedContent>
 <StackPanel>
 <TextBlock Background="AntiqueWhite" TextAlignment="Center">
 Configures the settings for the current drawing.
 </TextBlock>
 </StackPanel>
 </src:RibbonToolTip.ExpandedContent>
 </src:RibbonToolTip>
- Save the changes made to the XAML file.