Set a workspace current, create or modify a workspace, and import a workspace from a partial CUIx file to a main CUIx file.
Set a Workspace Current
Do one of the following:
- On the status bar, click Workspace Switching, and select the workspace you want to set current. ( Find)
- Set a workspace current from the Customize User Interface (CUI) Editor:
- Click
 .
Find
.
Find
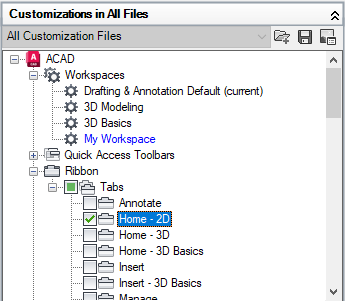
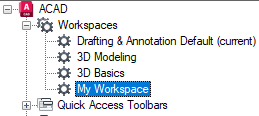
- In the Customize tab, Customizations In <file name> pane, click the plus sign (+) next to the Workspaces node to expand it.
- Right-click the workspace you want to set current. Click Set Current.
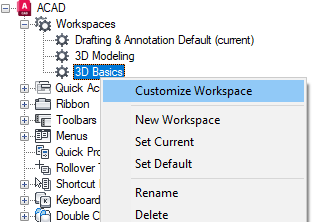
- Click Apply.
- Click
Save Changes to a Workspace from the Application Window
- On the status bar, click Workspace Switching, select Save Current As.
- In the Save Workspace dialog box, Name box, enter a name to create a new workspace or select an existing workspace from the drop-down list to overwrite it.
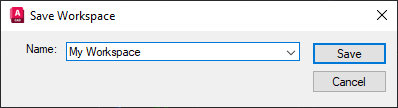
- Click Save to create or modify the workspace.
Set a Workspace as Default
Workspaces in a CUIx file can be marked as default. Setting a workspace as default determines that it should be restored when the CUIx file is loaded into the program the first time, or after the CUIx file has been loaded with the CUILOAD command.
- Click
.
Find
- In the Customize tab, Customizations In <file name> pane, click the plus sign (+) next to the Workspaces node to expand it.
- Right-click the workspace you want to set as default. Click Set Default.
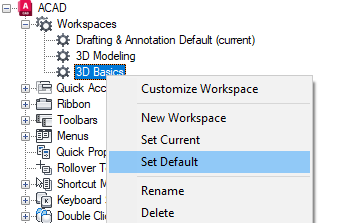
- Click Apply.
Note: In AutoCAD only, in the Network Deployment Wizard, the main and enterprise CUIx files can be specified. If the main CUIx file has a default workspace set, the default workspace will be set as the current workspace when the file is loaded the first time.
Create and Customize a Workspace
- Click
.
Find
- In the Customize tab, Customizations In
<file name> pane, right-click the Workspaces node and click New Workspace.
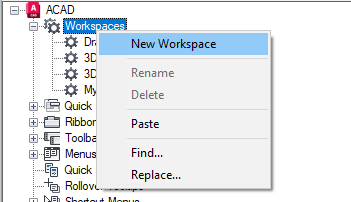
A new, empty workspace (named Workspace1) is placed at the bottom of the Workspaces.
Tip: You can also create a copy of an existing workspace by right-clicking a workspace and clicking Duplicate. - Right-click Workspace1. Click Rename and enter a new workspace name.
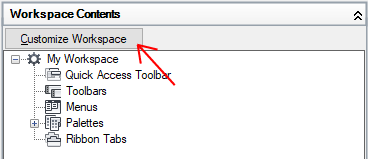
- In the Workspace Contents pane, click Customize Workspace.
- In the Customizations In
<file name> pane, click the plus sign (+) next to the user interface elements to expand them.
Note: The Quick Access toolbar, ribbon tabs, toolbars, pull-down menus, and partial CUIx file nodes now display check boxes next to them so you can easily add elements to the workspace.
- Click the check box next to each user interface element that you want to add to the workspace.
The selected user interface elements are added to the workspace.
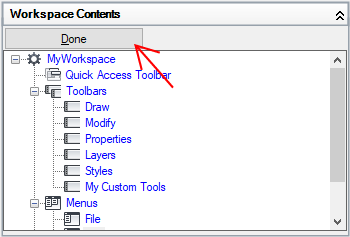
- In the Workspace Contents pane, click Done.
- Click Apply.
Change the Properties of a Workspace
- Click
.
Find
- In the Customize tab, Customizations In
<file name> pane, click the workspace whose properties you want to change.
- In the Properties pane, do any of the following:
- In the Name box, enter a name for the workspace.
- In the Description box, enter a description.
- In the Start On box, select an option (Model, Layout, Do Not Change).
- In the Menu Bar box, select an option (Off, On).
- In the Status Bar box, select an option (Off, On).
- In the Navigation Bar box, select an option (Off, On).
- In the Model/Layout Tabs box, select an option (On, Off, Do Not Change).
- In the Scroll Bars box, select an option (On, Off, Do Not Change).
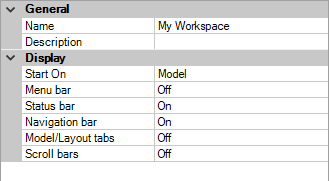
- Click Apply.
Import a Workspace to the Main CUIx File
- Click
.
Find
- In the Transfer tab, Customizations In
<file name> pane (right side), click the Open Customization File button.
- In the Open dialog box, locate and select the customization file that contains the workspace you want to add to the main CUIx file.
- In the Customizations In
<file name> pane (right side), drag the workspace from the CUIx file to the Workspaces node of the main CUIx file in the Customizations In
<file name> pane (left side).
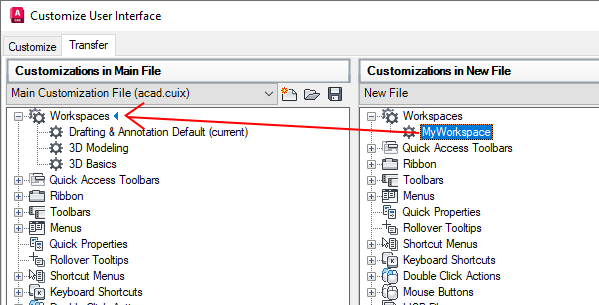
- Click Apply.