You can easily create closed polylines that enclose interior or exterior sets of geometric objects. Typical applications include the following:
- Generating a foundation plan from a residential floor plan
- Finding the area and perimeter of an enclosed area such as within a plat map
- Using polylines to create complex region objects for 2D Boolean operations and extracting the 2D centroid, moments of inertia, and other 2D data
- Creating a polyline profile for 3D operations such as extruding, sweeping, and revolving
Self-Guided Demo
The purpose of the following steps is to generate closed polylines from an area enclosed by contiguous or overlapping objects.
- Create some geometry as shown below.

- Create a layer for boundaries named 00 Boundaries. Use a distinctive color and make it the current layer.
- From the Home tab, Draw panel, click Boundary or enter the BOUNDARY command.
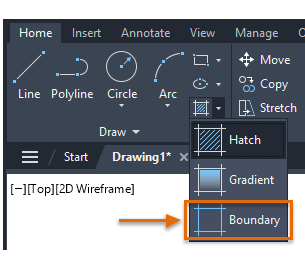 Note: With complex boundaries, you might need to zoom in to the desired area to avoid error messages.
The Boundary Creation dialog box displays with several options. The default settings are best choices in most cases. Make sure that the object type is set to Polyline.
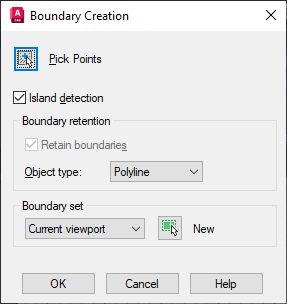
- Click OK and then click within the interior areas at points 1 and 2.
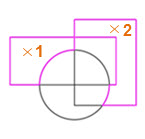
Two separate closed polylines are generated.
- To see them clearly, move the resulting polylines as shown below.

- Go ahead and erase the resulting polylines.
Enclose a Set of Objects with a Closed Polyline
Next, let's use a technique to create a closed polyline around a set of objects. For example, the foundation plan for this residence was generated simply by creating a rectangle around the floor plan, using the Boundary command within it, and then deleting any unneeded geometry.

This same technique can be used to create a single, closed polyline around a mechanical component or a compound map.
- Create a large rectangle around all the objects.
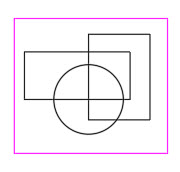
- Using the Boundary command again, click inside the rectangle near an edge. Then, to see the resulting polyline clearly, move the polyline as shown.
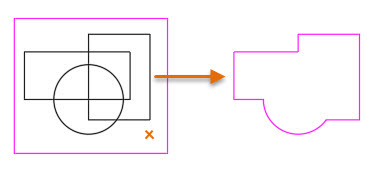
- Finally, delete any unneeded interior objects that are generated. This will happen when there are internal islands, which also generate boundaries.
Delete Unneeded Boundaries Easily
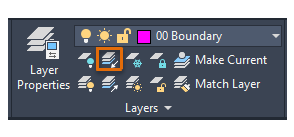
An easy way to delete unneeded objects is available with the Isolate and Unisolate tools from the Layers panel (the commands are LAYISO and LAYUNISO). Unneeded objects will result from independent areas within a drawing, which are called islands.
Here's how.
- On the ribbon, click the Isolate tool on the Home tab, Layers panel. Alternatively, enter LAYISO in the Command window.
- Before selecting an object, right-click. From the shortcut menu, choose the Settings option, and choose Off.
This turns off all layers except the layers that you choose.
- Select an object on the 00 Boundary layer and press Enter.
All the layers in the drawing are turned off except layer 00 Boundary.
- Erase any unneeded objects.
- Click the Unisolate tool, which is just below the Isolate tool. Alternatively, enter LAYUNISO.

The display states of all the layers are restored.
For a variety of applications, the Boundary feature provides powerful capabilities to generate outlines and profiles in a drawing quickly and efficiently.
Discuss and Share with Others
Have You Tried articles can jumpstart new ways of working with AutoCAD, you can discuss and share ideas with others in the companion post on the AutoCAD forum.